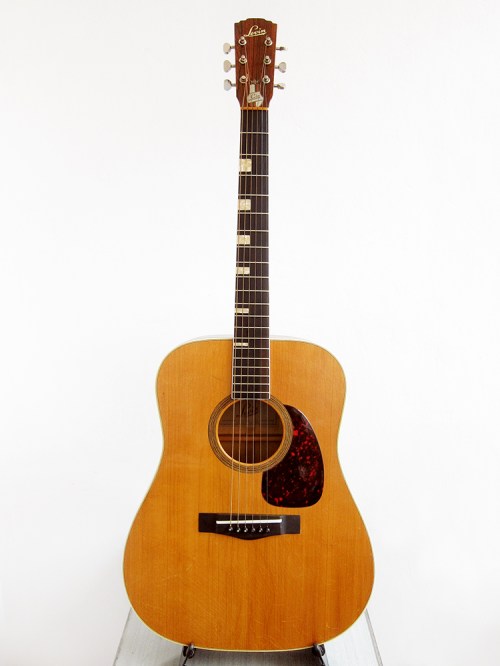
I decided to carve a new bridge for my 1968 Levin LT-18. The old bridge needed to be re-glued anyway so I thought it was a good time to create a new one in ebony instead. I did this once, I carved a new bridge for my 1973 K. Yairi YW-1000. This was a pretty similar job, both ebony and roughly the same shape. I’m really happy with the sound of this guitar now, so much richer than with the original bridge.
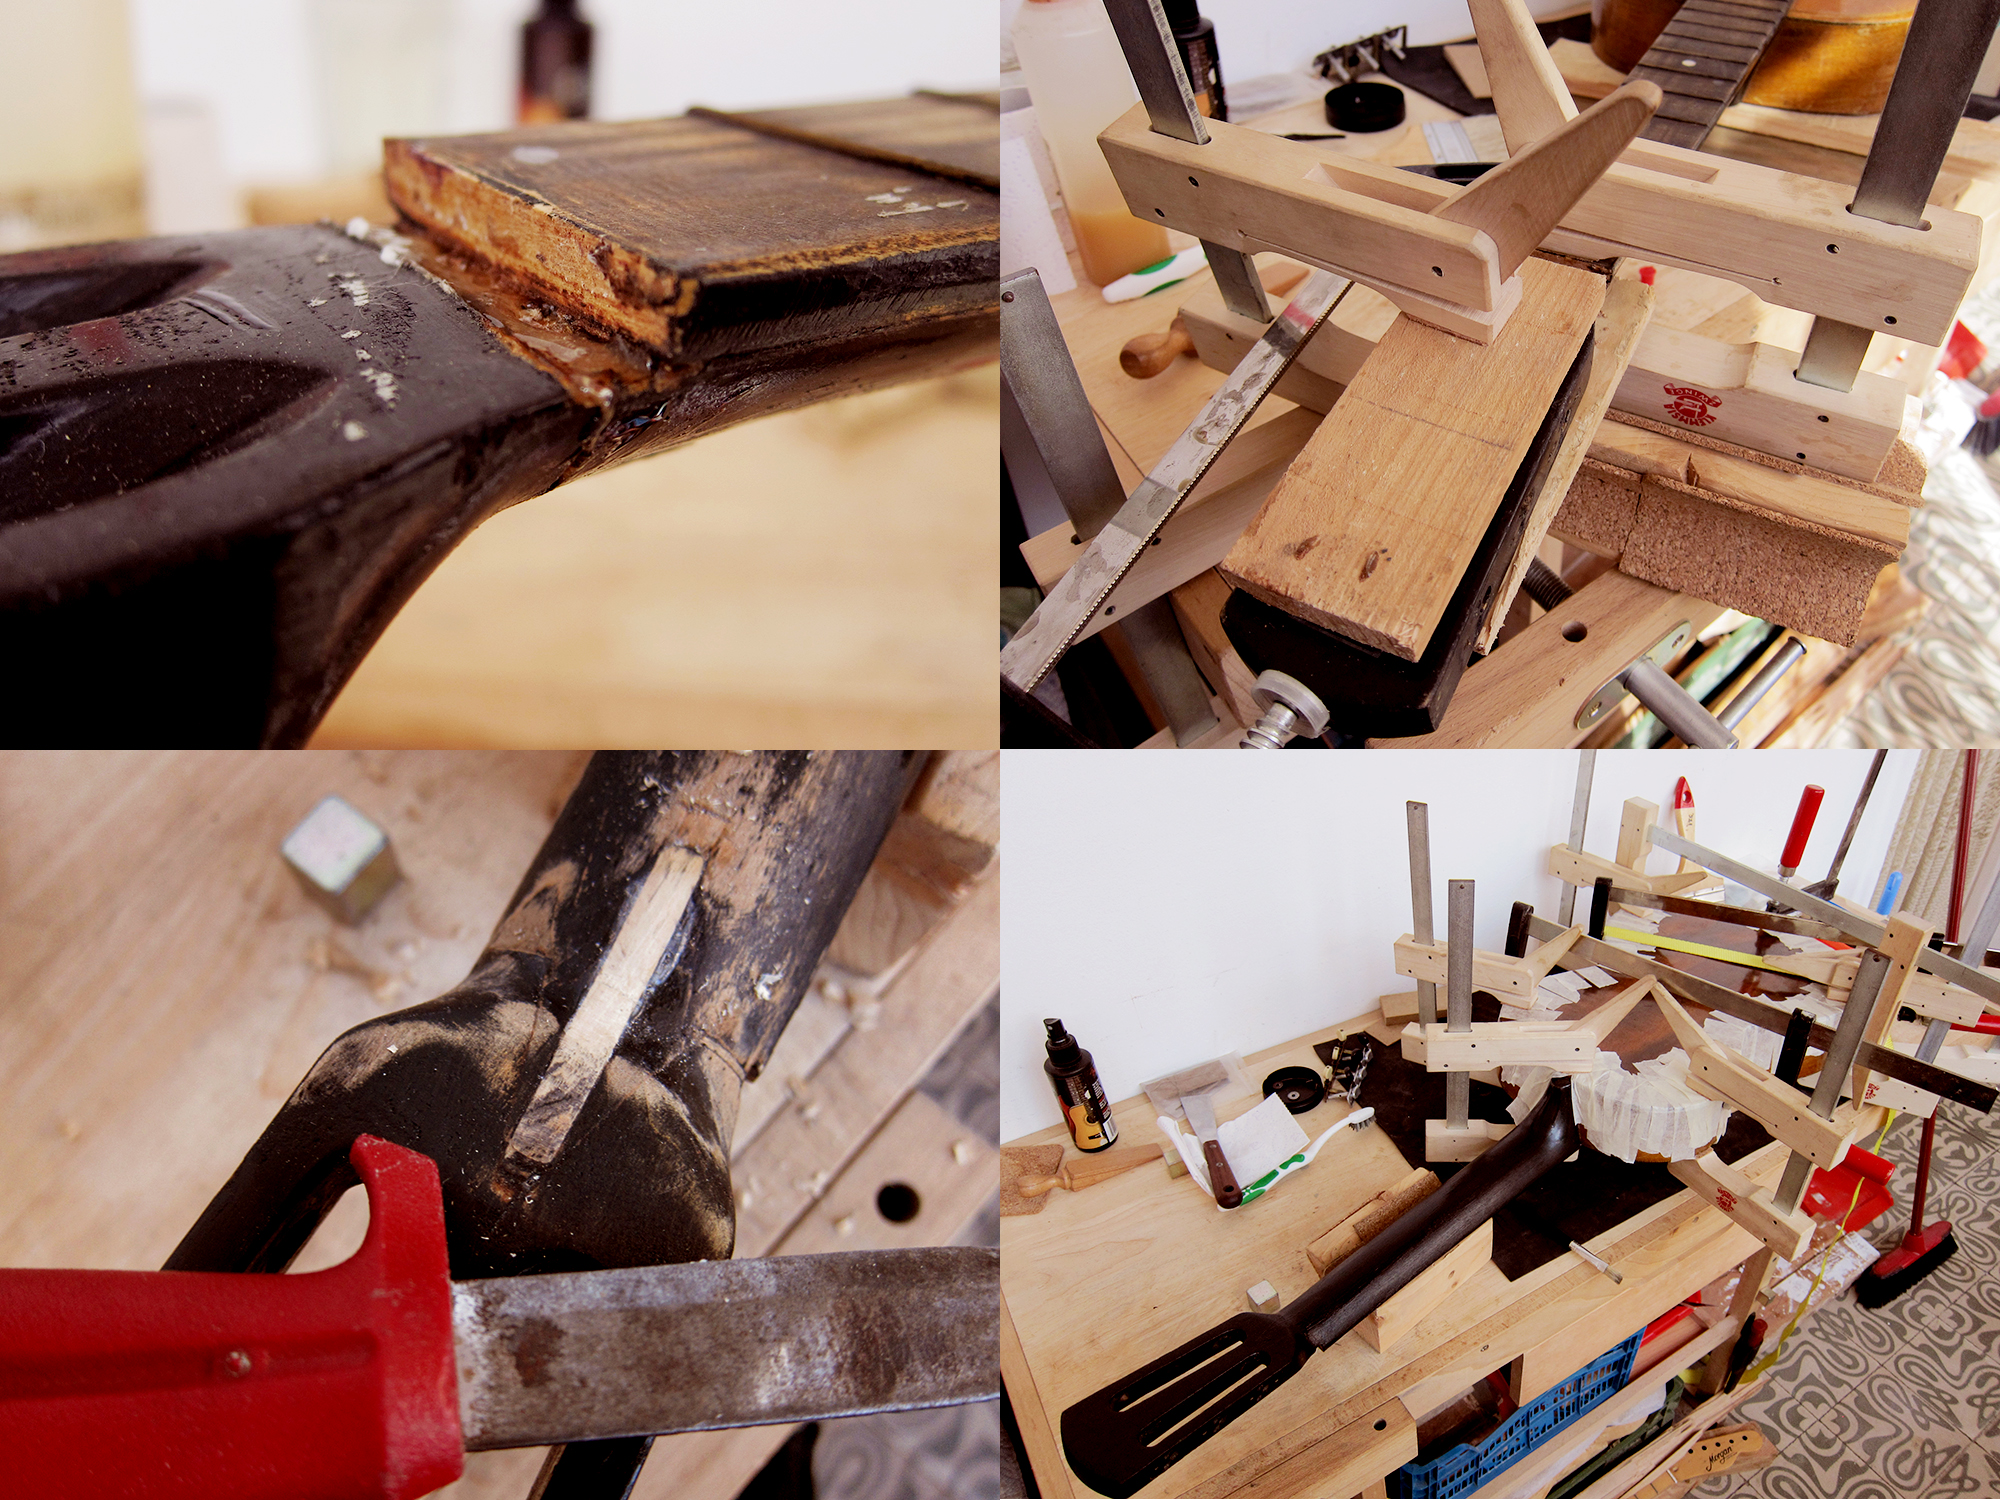
First step was to remove the old bridge with a heated spatula and then copy the bridge and drill the holes.
Then shape it as close to the original as possible using my Japanese saw rasp and different files.
Last step, fit the bridge and glue it down. Once the bridge was in place I could check the intonation to get the saddle slot in the perfect spot. Unfortunately I cut the slot 1 mm too wide so the bone saddle got a bit fatter than I had planned. Perhaps that gives tonal qualities I would have missed with a thinner saddle, let’s hope so. I also installed a LR Baggs M1A so I can use the guitar for gigs.
Before: with the original rosewood bridge and the individual height adjustable plastic saddles
After: with the ebony bridge I carved and a bone saddle
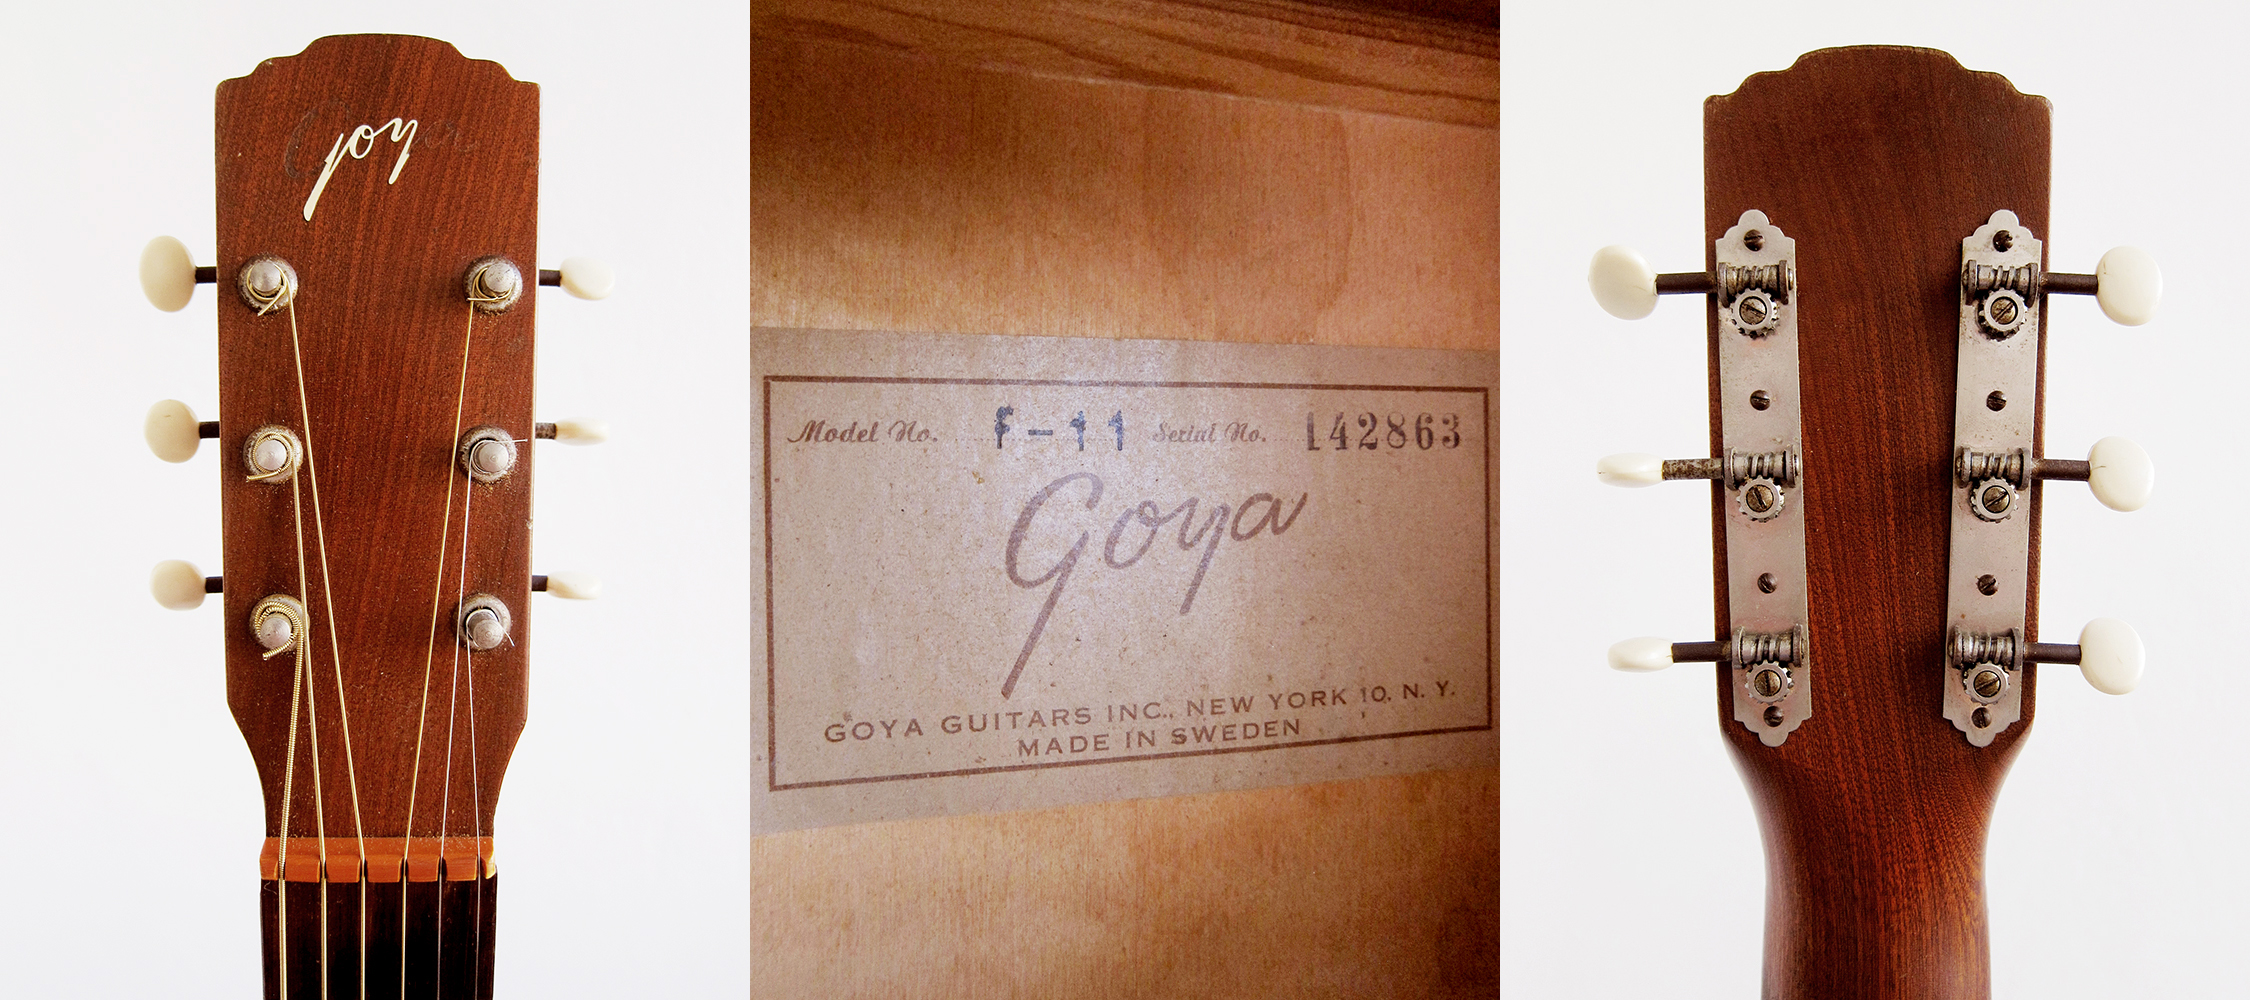
Back in May I bought a 1963 Goya F-11 from a pawn shop San Diego, California. It’s my 18th Levin so far but my first steel stringed classical guitar, or it’s actually more of a Flamenco shape than a normal Spanish guitar. It’s an awesome little finger picker with a wide nut and pretty small body, very comfortable to play in the sofa. The sound is very different, I guess because it’s a steel stringed but fan braced and built like a classical guitar. These type of guitars got really popular in the mid 1960’s during the folk boom in the US and Levin built quite a few under the Goya brand to compete with the Gibson F-25 and other concert sized steel stringed folk guitars of the time. I have never played anything like this before and really like it, even though it doesn’t sound as good as a Goya T-16 for chord playing, it has something almost ladder braced like in the sound that makes it pretty unique.
A 1963 Goya F-11, worn, bruised and beaten but still very beautiful, I love the flamed back. It’s fun that half the logo has been removed to read Joy instead of Goya.
Goya F-11 Concert size: Body width: 360 mm, body length: 465 mm, body depth: 98 mm. Fingerboard width: 43 mm, scale length: 630 mm. Spruce top with fan bracing, birch back and sides, 4-ply bound top, unbound back. Mahogany neck with non-adjustable T-shaped duraluminum truss rod. Unbound rosewood fingerboard with pearl dot inlay. Rosewood bridge, double pickguards and nickel plated strip tuners. Matte natural finish
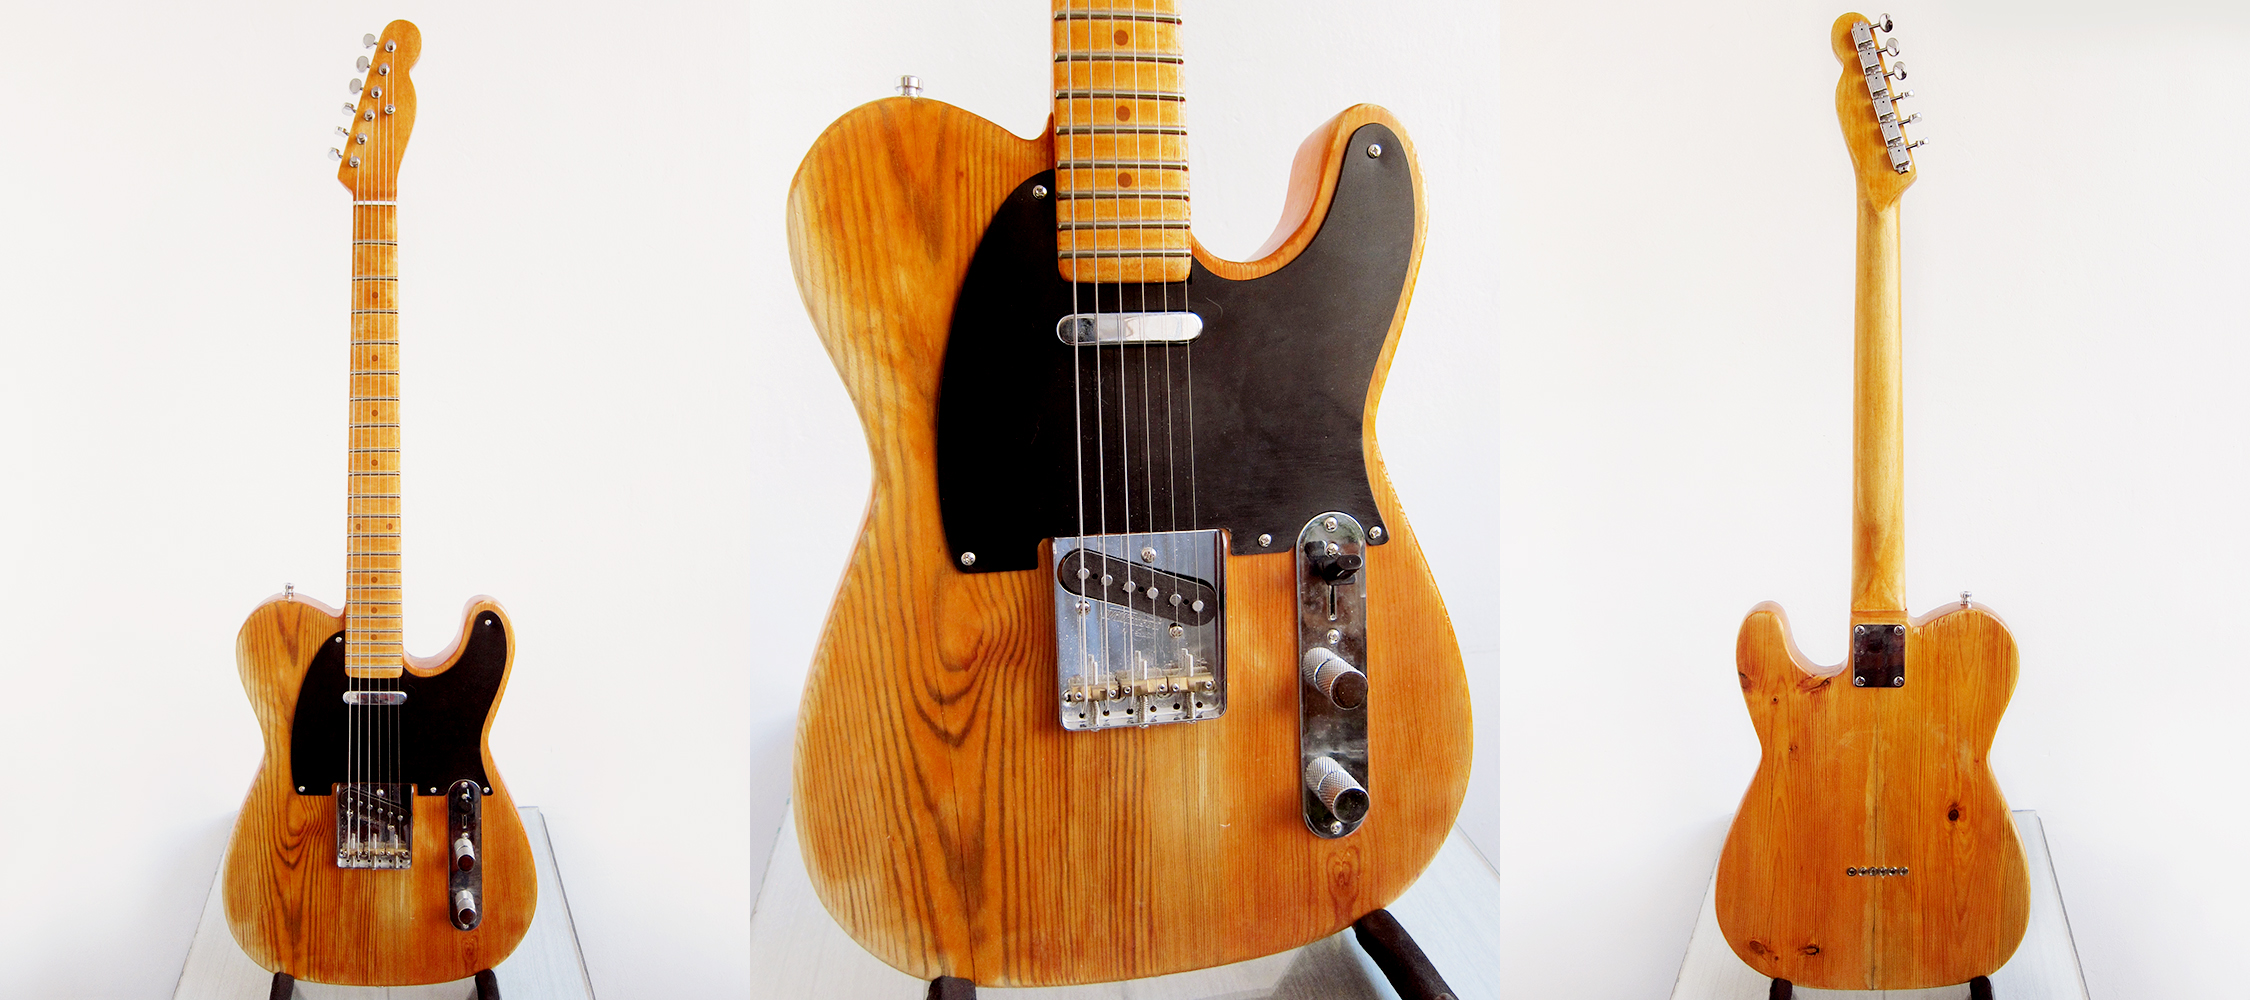
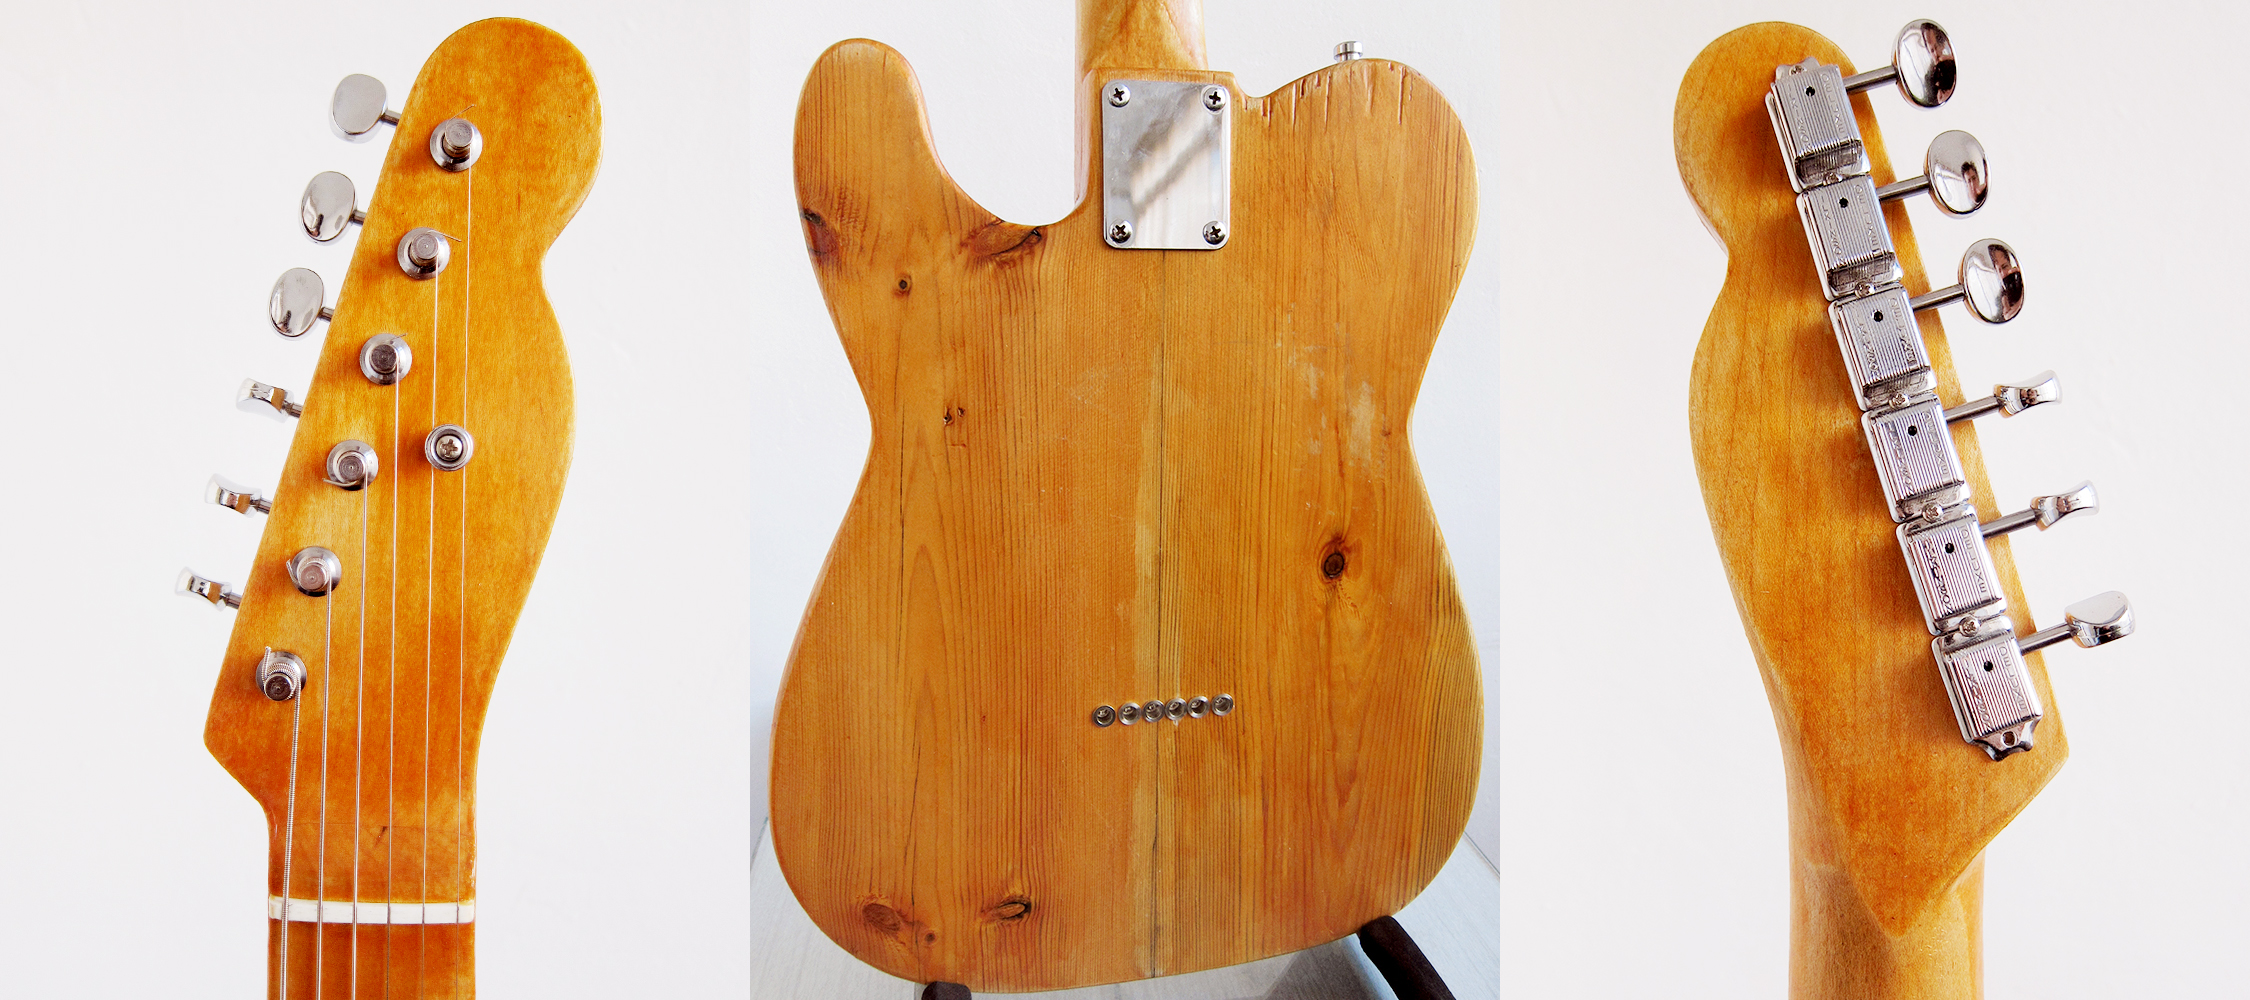
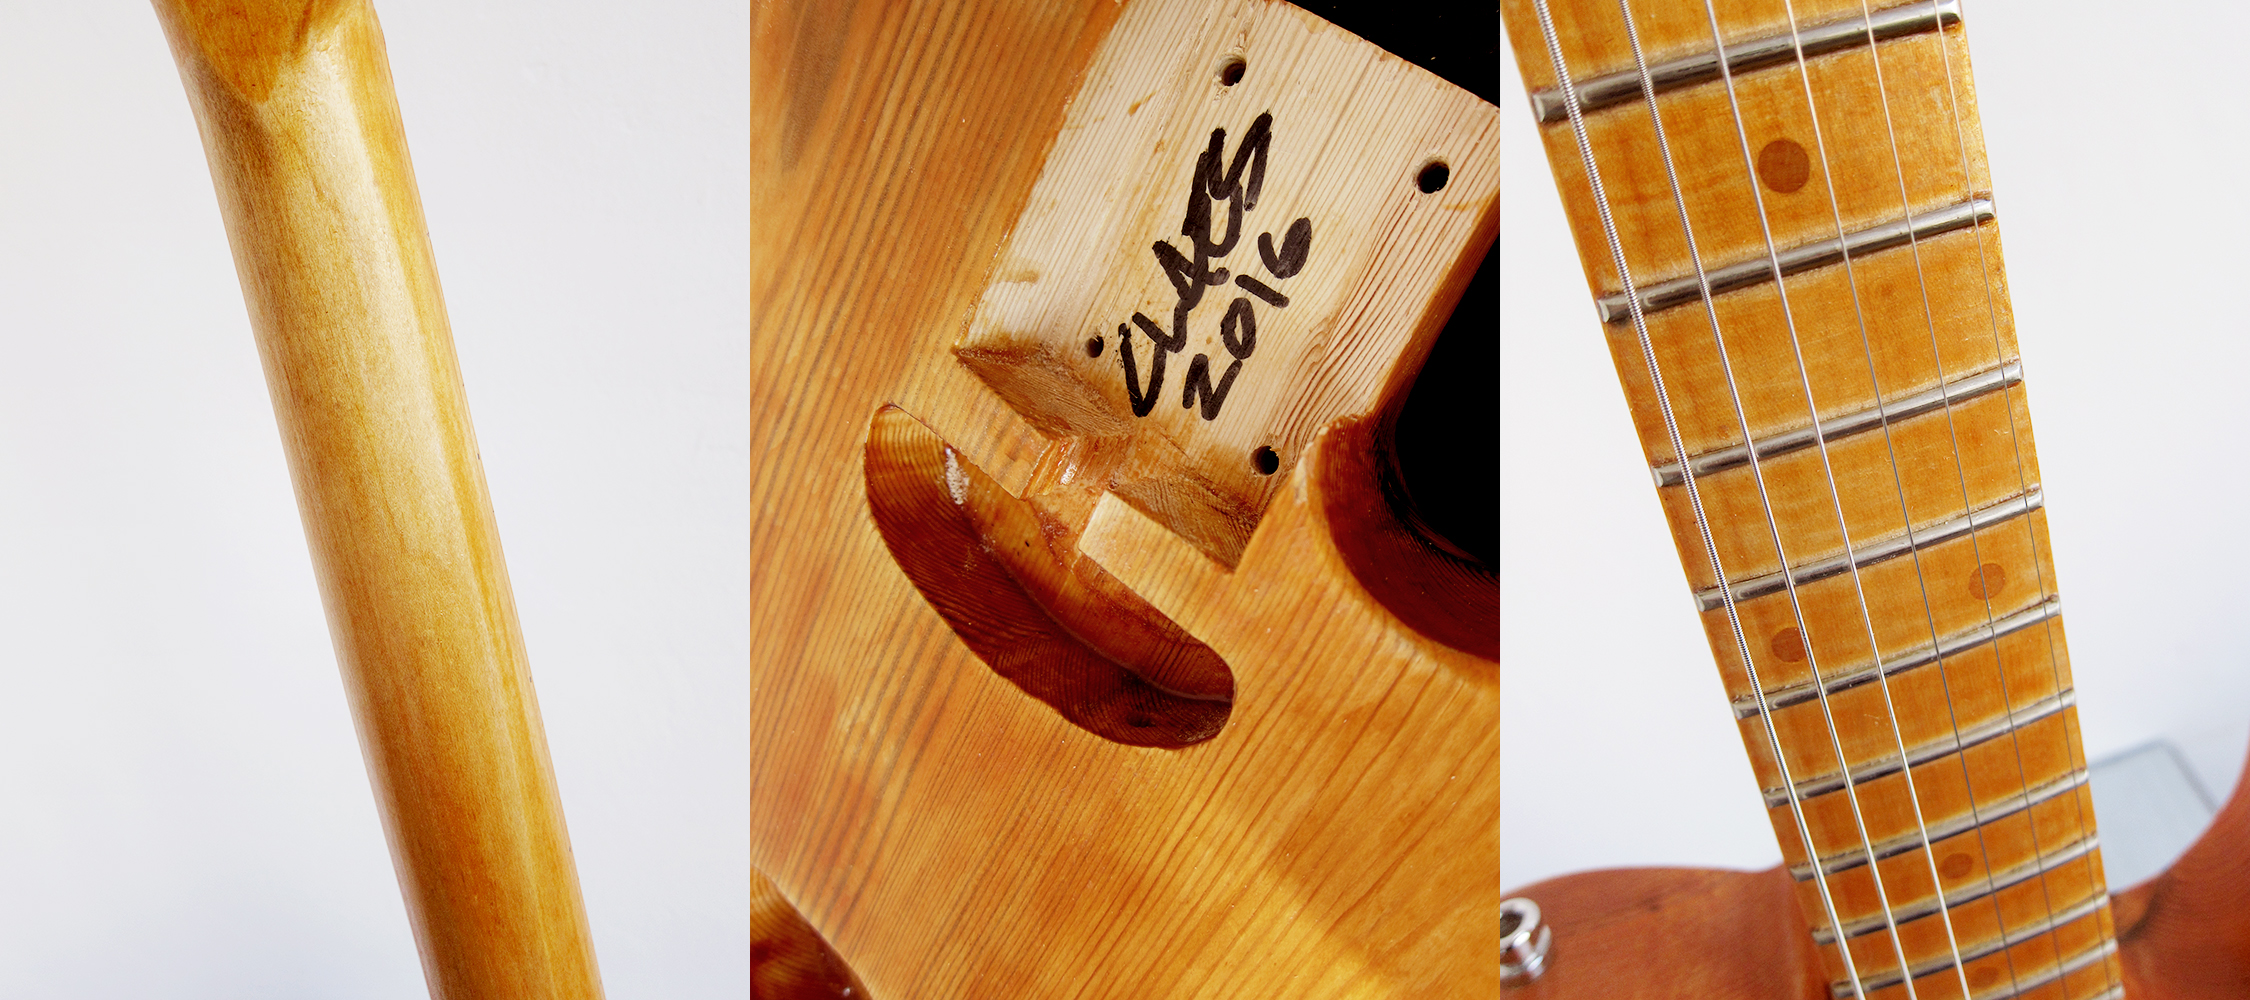
The new Claescaster, my second attempt at building a guitar
Back in 2014 I built myself my first Claescaster, it was not just my first guitar but pretty much the first anything I ever built. It wasn’t great, but it wasn’t terrible either so I decided to give it second try and here is the result, the new Claescaster. The truth is that two years ago my wife was pregnant and I thought that was a great opportunity to build myself a Telecaster to mark the occasion. Unfortunately we lost that child half way through so I named the first guitar Greta after the daughter we never had. Two years later we tried again and were blessed with our little Frida, and just before she saw the light of day in early May I had my second Claescaster ready and gave it her name. My wife asked if I was going to build a guitar every time she gets pregnant and I might very well do that, it’s a great way for a man to keep himself busy during the nine long months of waiting. I will try to find some more pictures of the building progress, if not there are some more on my Instagram.
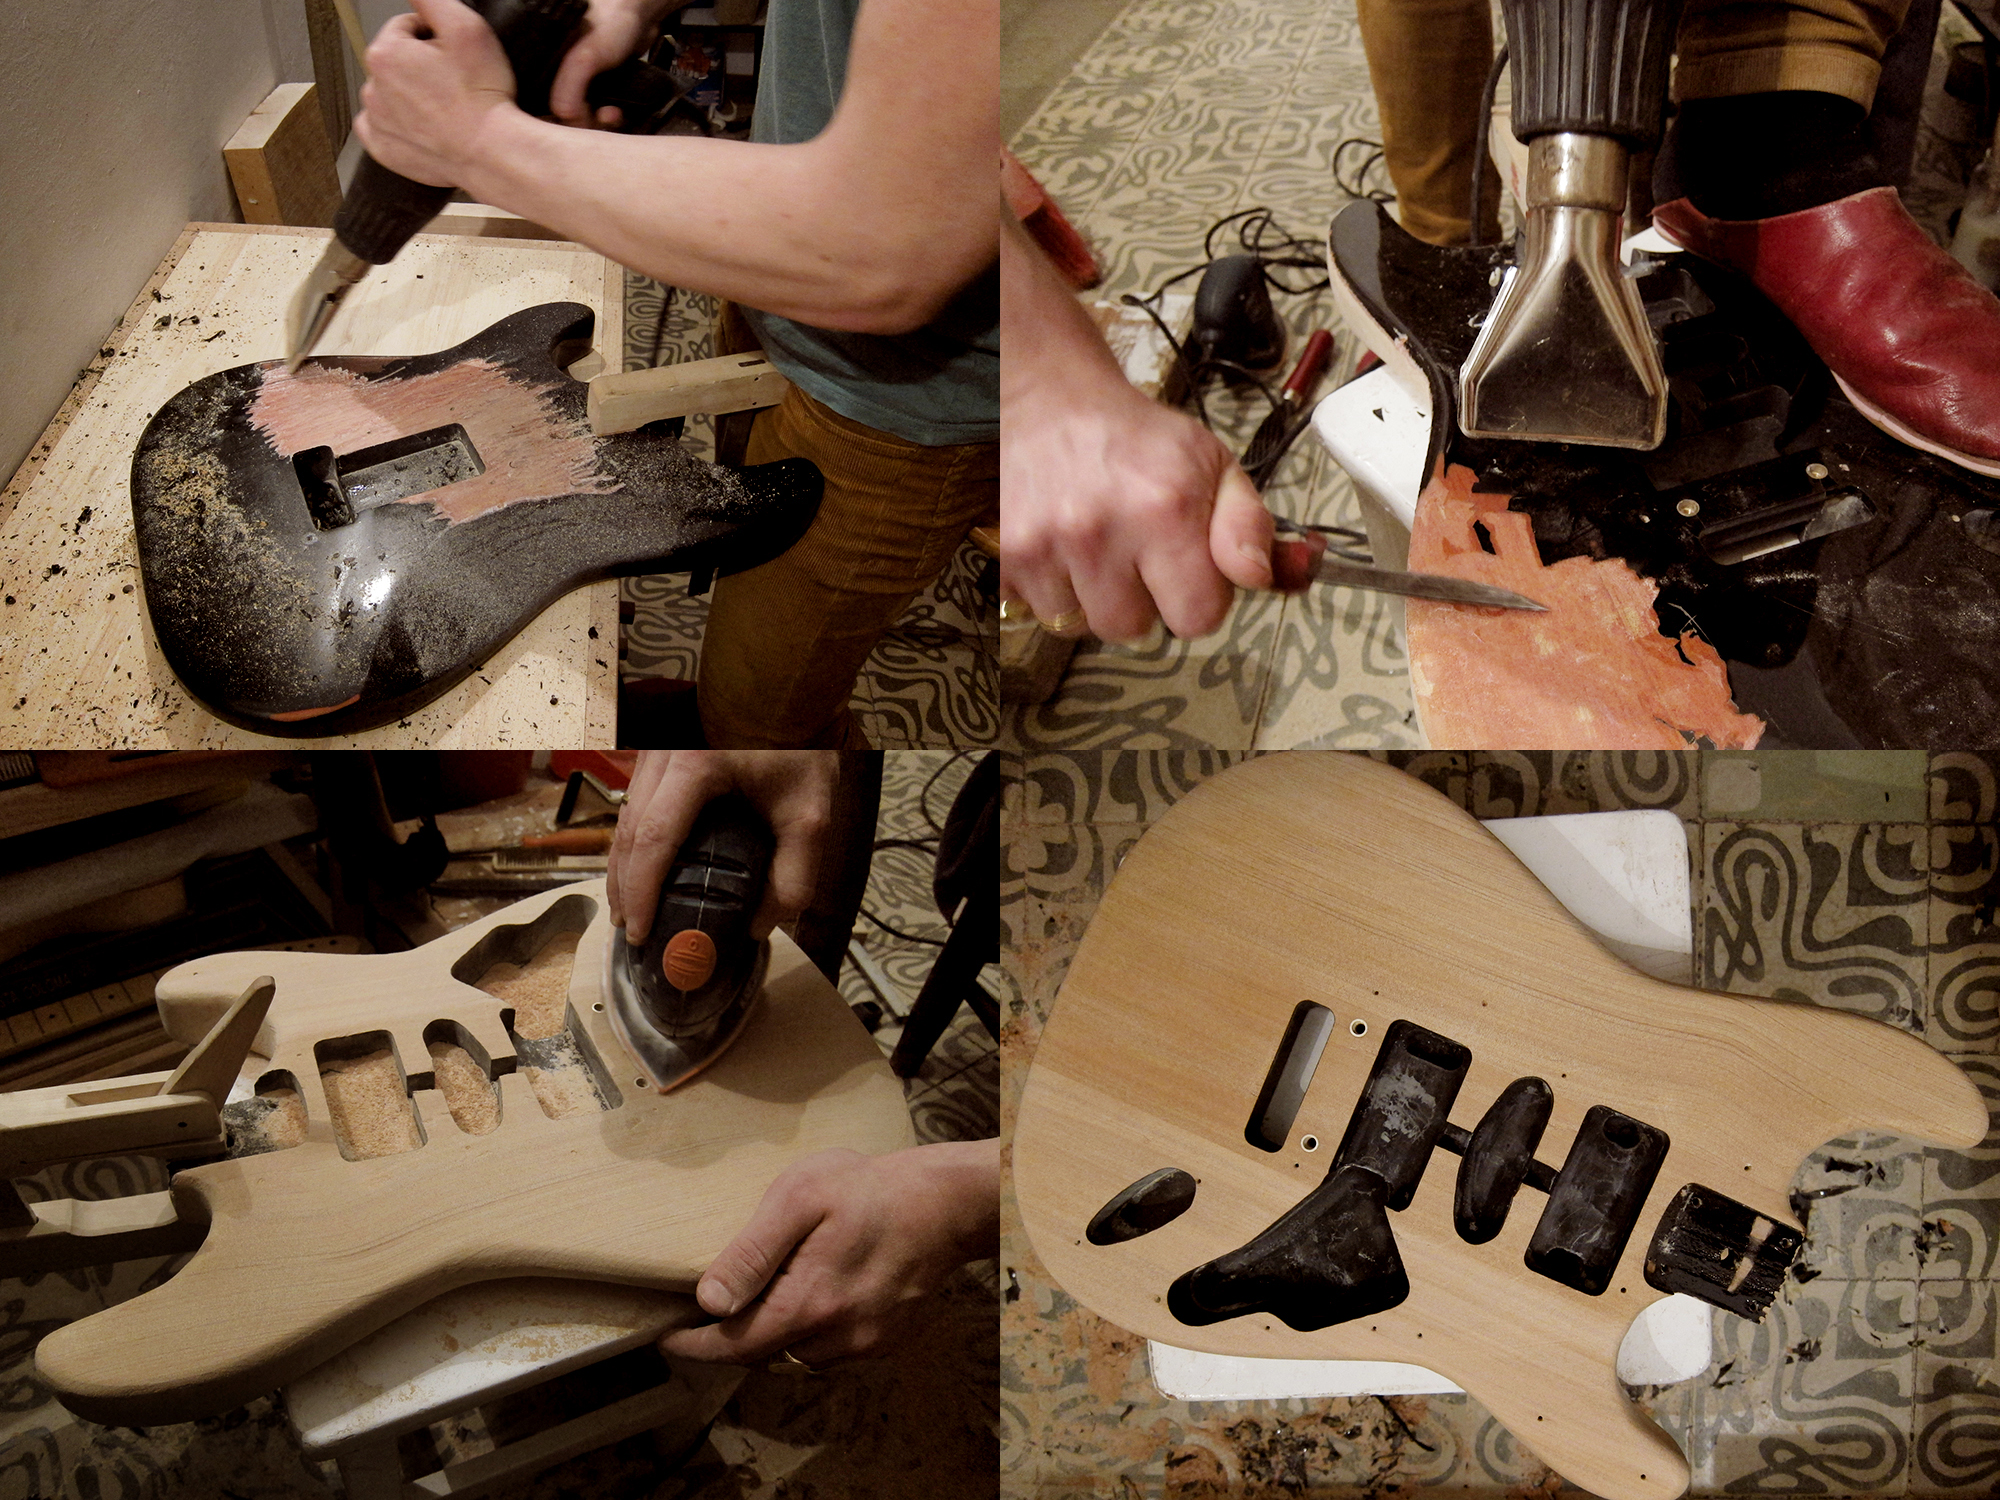
Claescaster – Frida, is not the best Telecaster I’ve ever played but it’s still pretty damn good guitar, and ten times better than the first one I built. My plan was to build a 1952 copy so I could be like Bruce Springsteen, Keith Richards or Roy Buchanan with his Nancy. Unfortunately that never happened, or at least not as close as I hoped for. Everything was going great, I had an awesome baseball bat neck with a 7.25 radius, it was actually so fat that I had to reshape it twice, great grain running along the top, everything felt smooth and the edges were pretty straight for being cut and shaped by hand, then I got to the lacquer. I managed to use the wrong lacquer and even though I tried to scrape it off and try again I never got perfect after that. I decided to give up on the brand new look and went for some form of old and worn 50’s vibe instead, which was my secret plan all along, I just wanted to have it perfect before I made it look old. Anyway, I’ve learnt a lot for my next Claescaster.
The body comes from a wood pile I found in the streets of Barcelona and most likely pine. If I remember correctly it was a beam or a bed frame, that I cut in half on the length and glued together to get the width. The neck was from a block of North American maple that I bought in a wood shop here and that I had to saw by hand, which took forever. I used a 6 mm stick of wood for the fretboard markers and jumbo frets from Jascar. The pickups are Artec and the hardware is all from Wilkinson. I will try to get video up so you can hear what it sounds like.
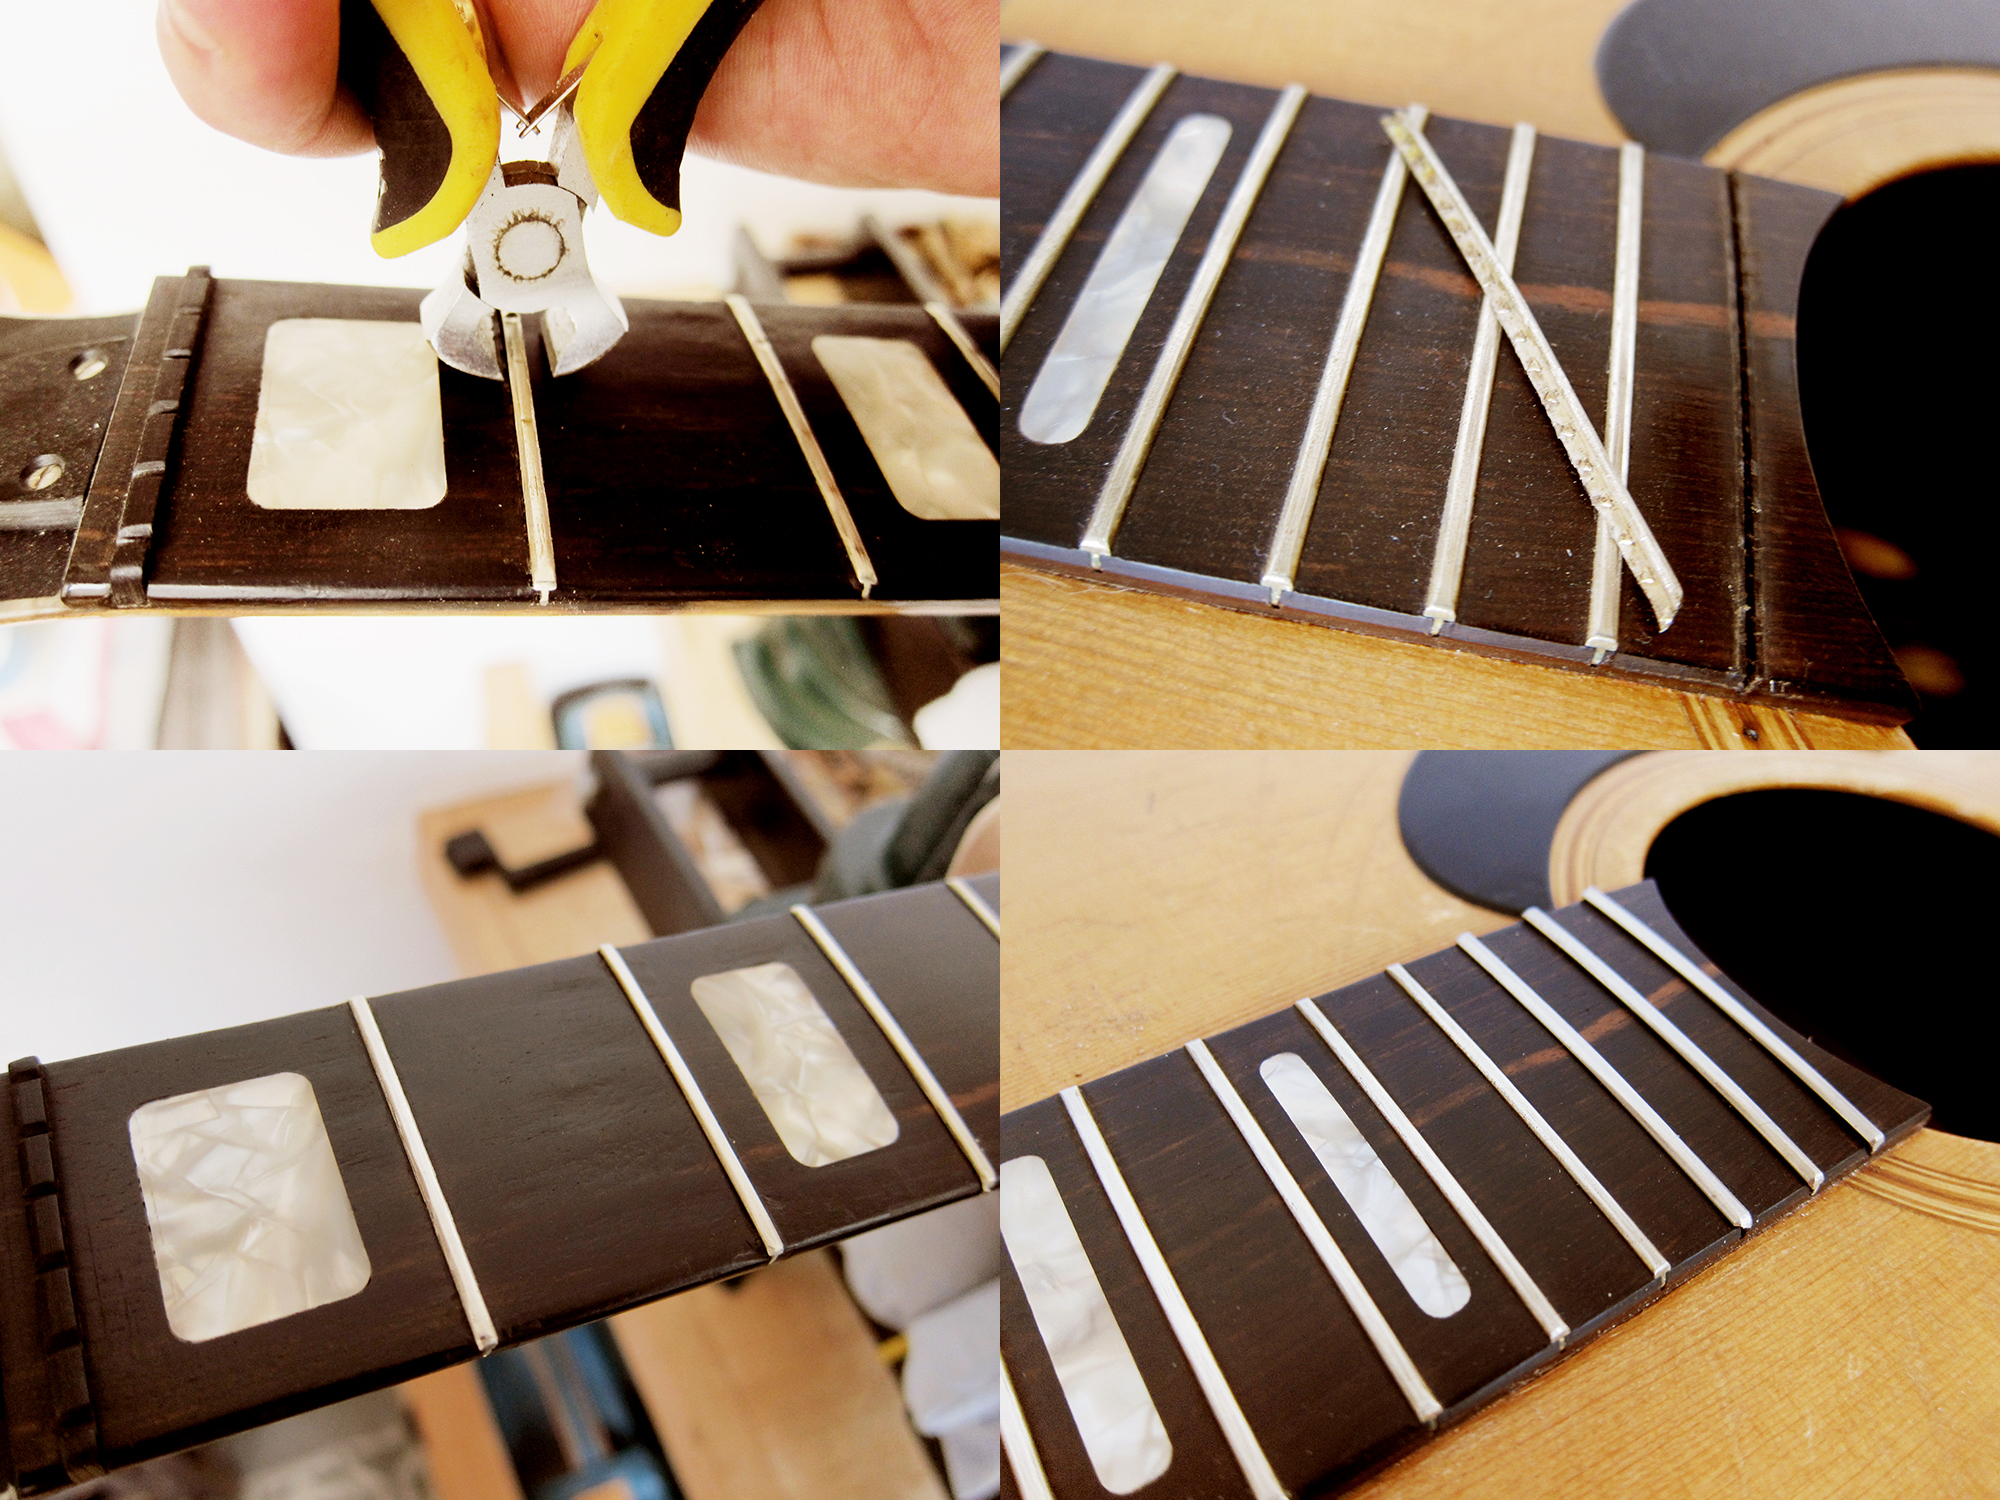
Last weekend I tried a trick that I had seen some old luthier in the US doing on Instagram, replacing the first three worn frets with the last three, instead of re-fretting the whole guitar. This seemed like a really good solutions for my 1978 Hagström Western 6 which had terrible wear on the first three frets.
It seemed a bit pointless to do a complete re-fret when it was just the first three that was worn, I also like to keep things as original as possible. I just pulled out the first three and the last three and replaced the first three with the last three and then added three new frets where the last three used to be, easy peasy. I just had to nip off the edges with some pliers, file them down and round them a bit to get them smooth. Since you don’t play on the last three frets, or at least I don’t, you don’t have to level and crown them too much.
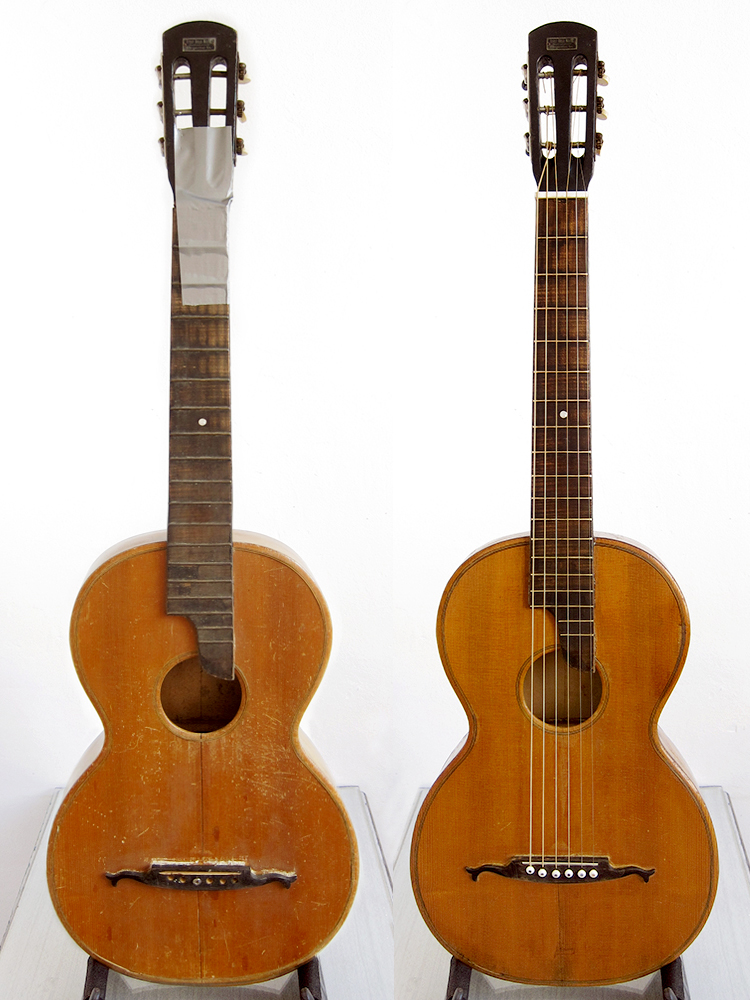
I’ve recently managed to do some more work to the Sonora parlour. I decided to reset the neck to try to get rid of the banana neck and high action and it worked pretty well. I also redesigned the fretboard and added some wooden dot markers. Now the action is low and the guitar is easy to play.
The new Sonora parlour and here is what she looked like before
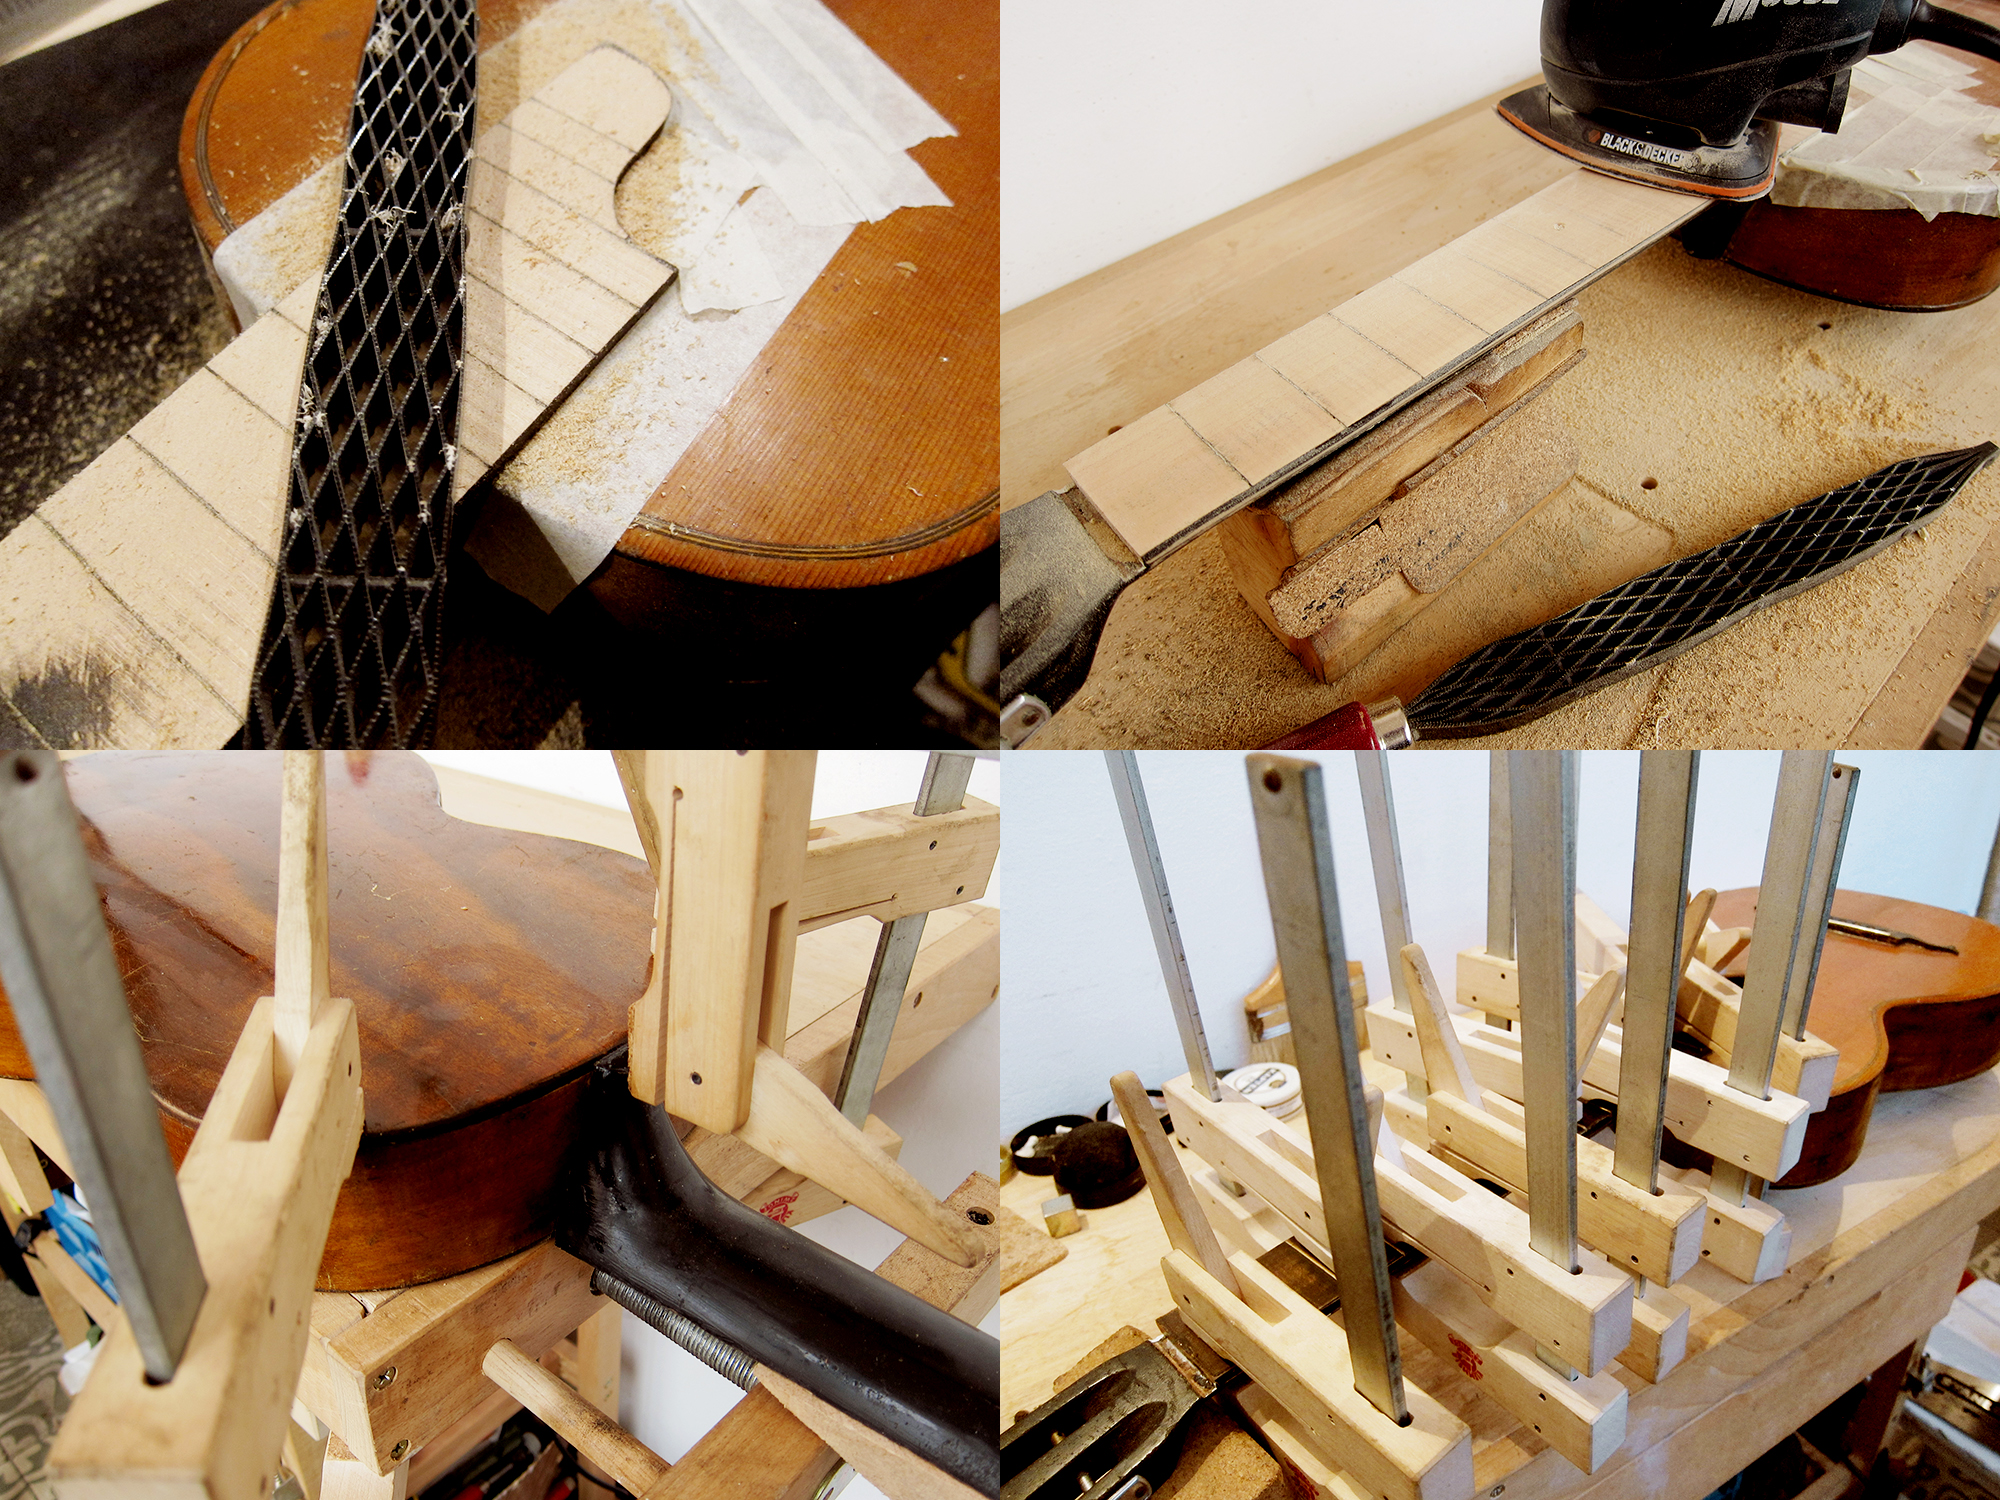
My initial plan was to steam the neck off by drilling two small holes under the 13th fret and that way get steam straight in to the dove tail. That didn’t work, I think it was too much old glue stuck in the joint and also the needle tip I used for my home built steamer was too thin. I decided to remove the whole fretboard instead, I used a spatula heated on a normal clothes iron which worked like a charm. Once the fretboard was off I could just steam the hell out of that joint and eventually the glue softened and then neck came off.
Next I had to try to remove the hump on the fretboard where the neck and body meet. I removed all the frets, and kept them in the correct order to make it easier to reinstall them later. To get rid of the hump I had to remove almost 6 mm of the overhang and then sand the rest to get the fretboard straight.
I re-cut all the fret slots, reinstalled the frets and added four wooden dots in different grain directions as position markers. I gave the fretboard a coat of lacquer and then painted everything black except for the 3rd, 5th, 7th, 9th and 12th fret. I added a layer of lacquer on top and then sanded it smooth and polished out the frets again.
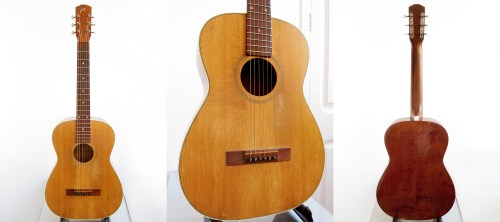
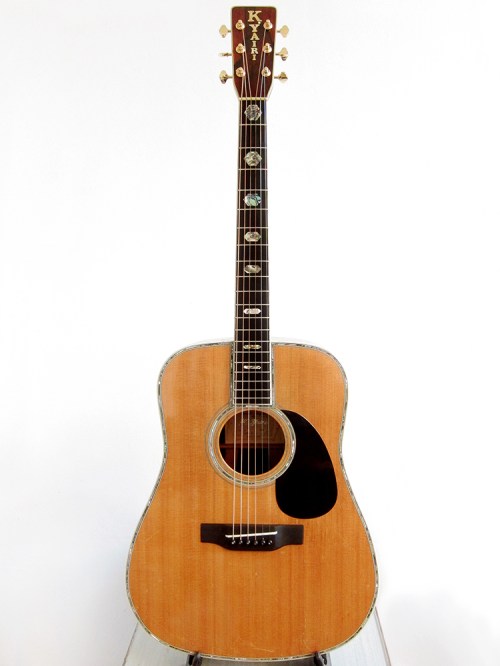
It’s been a while since I posted anything in my little DIY series, How to…, like me previous post about How to… reset a Levin neck or remove a bridge. I did carve a little floating bridge for my Levin 65 over a year ago but now it was finally time to carve a proper ebony bridge for my K. Yairi YW-1000.
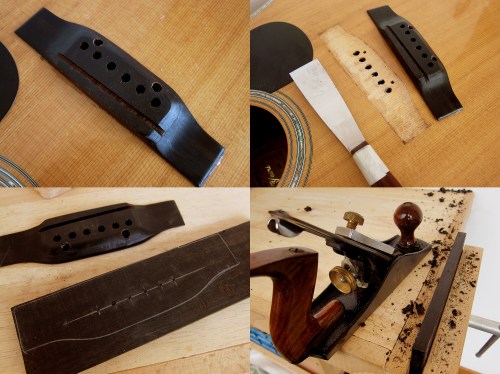
I thought about getting a pre-made Allparts ebony bridge at first but felt that it would be more fun to make one myself from scratch instead. I ordered some rosewood and ebony blanks from Madinter, it thought it could be good to have some extra at home, and got started. First I removed the old bridge, it had two screws that was a bit tricky to get out but eventually I figured it out. I removed the bridge with a spatula that I heated on a normal clothes iron, it works like a charm every time. Start in a corner and work yourself towards the middle and be careful when it starts to loosen up so you don’t break it off and chip the top, it should come off slowly and without force. I planed the ebony blank and then used a cabinet scraper to get it even. I copied the old bridge and drilled the holes straight away. It felt easier to do this before the bridge was shaped, it would also have saved me a lot of time in case I messed up the holes and had to start all over again. Luckily everything went fine.
Once the bridge was sawed in to a good size, I made it a couple of millimetres bigger on all sides, I drew the outlines of the final shape. I mounted the bridge blank on a piece of scrap wood with two screws so I could more easily work all around with the bridge firmly secured. I used a chisel to carve out the shape on the sides and from the top down towards the wings. I got a good round shape with a half round rasp and then it was just a hell of a lot of sanding to remove all the lines from the rasp and to get it smooth and nice.
I glued the bridge on and after 3 days I strung up both E-strings and used a drill as a saddle so I could move it around until I got the intonation right, I forgot to take a picture of that. I marked out the saddle and then sawed a 3 mm slot. Next step was to create a bone saddle to match and string it up. Easy peasy, well it was a hard days work but it was easier that I thought.
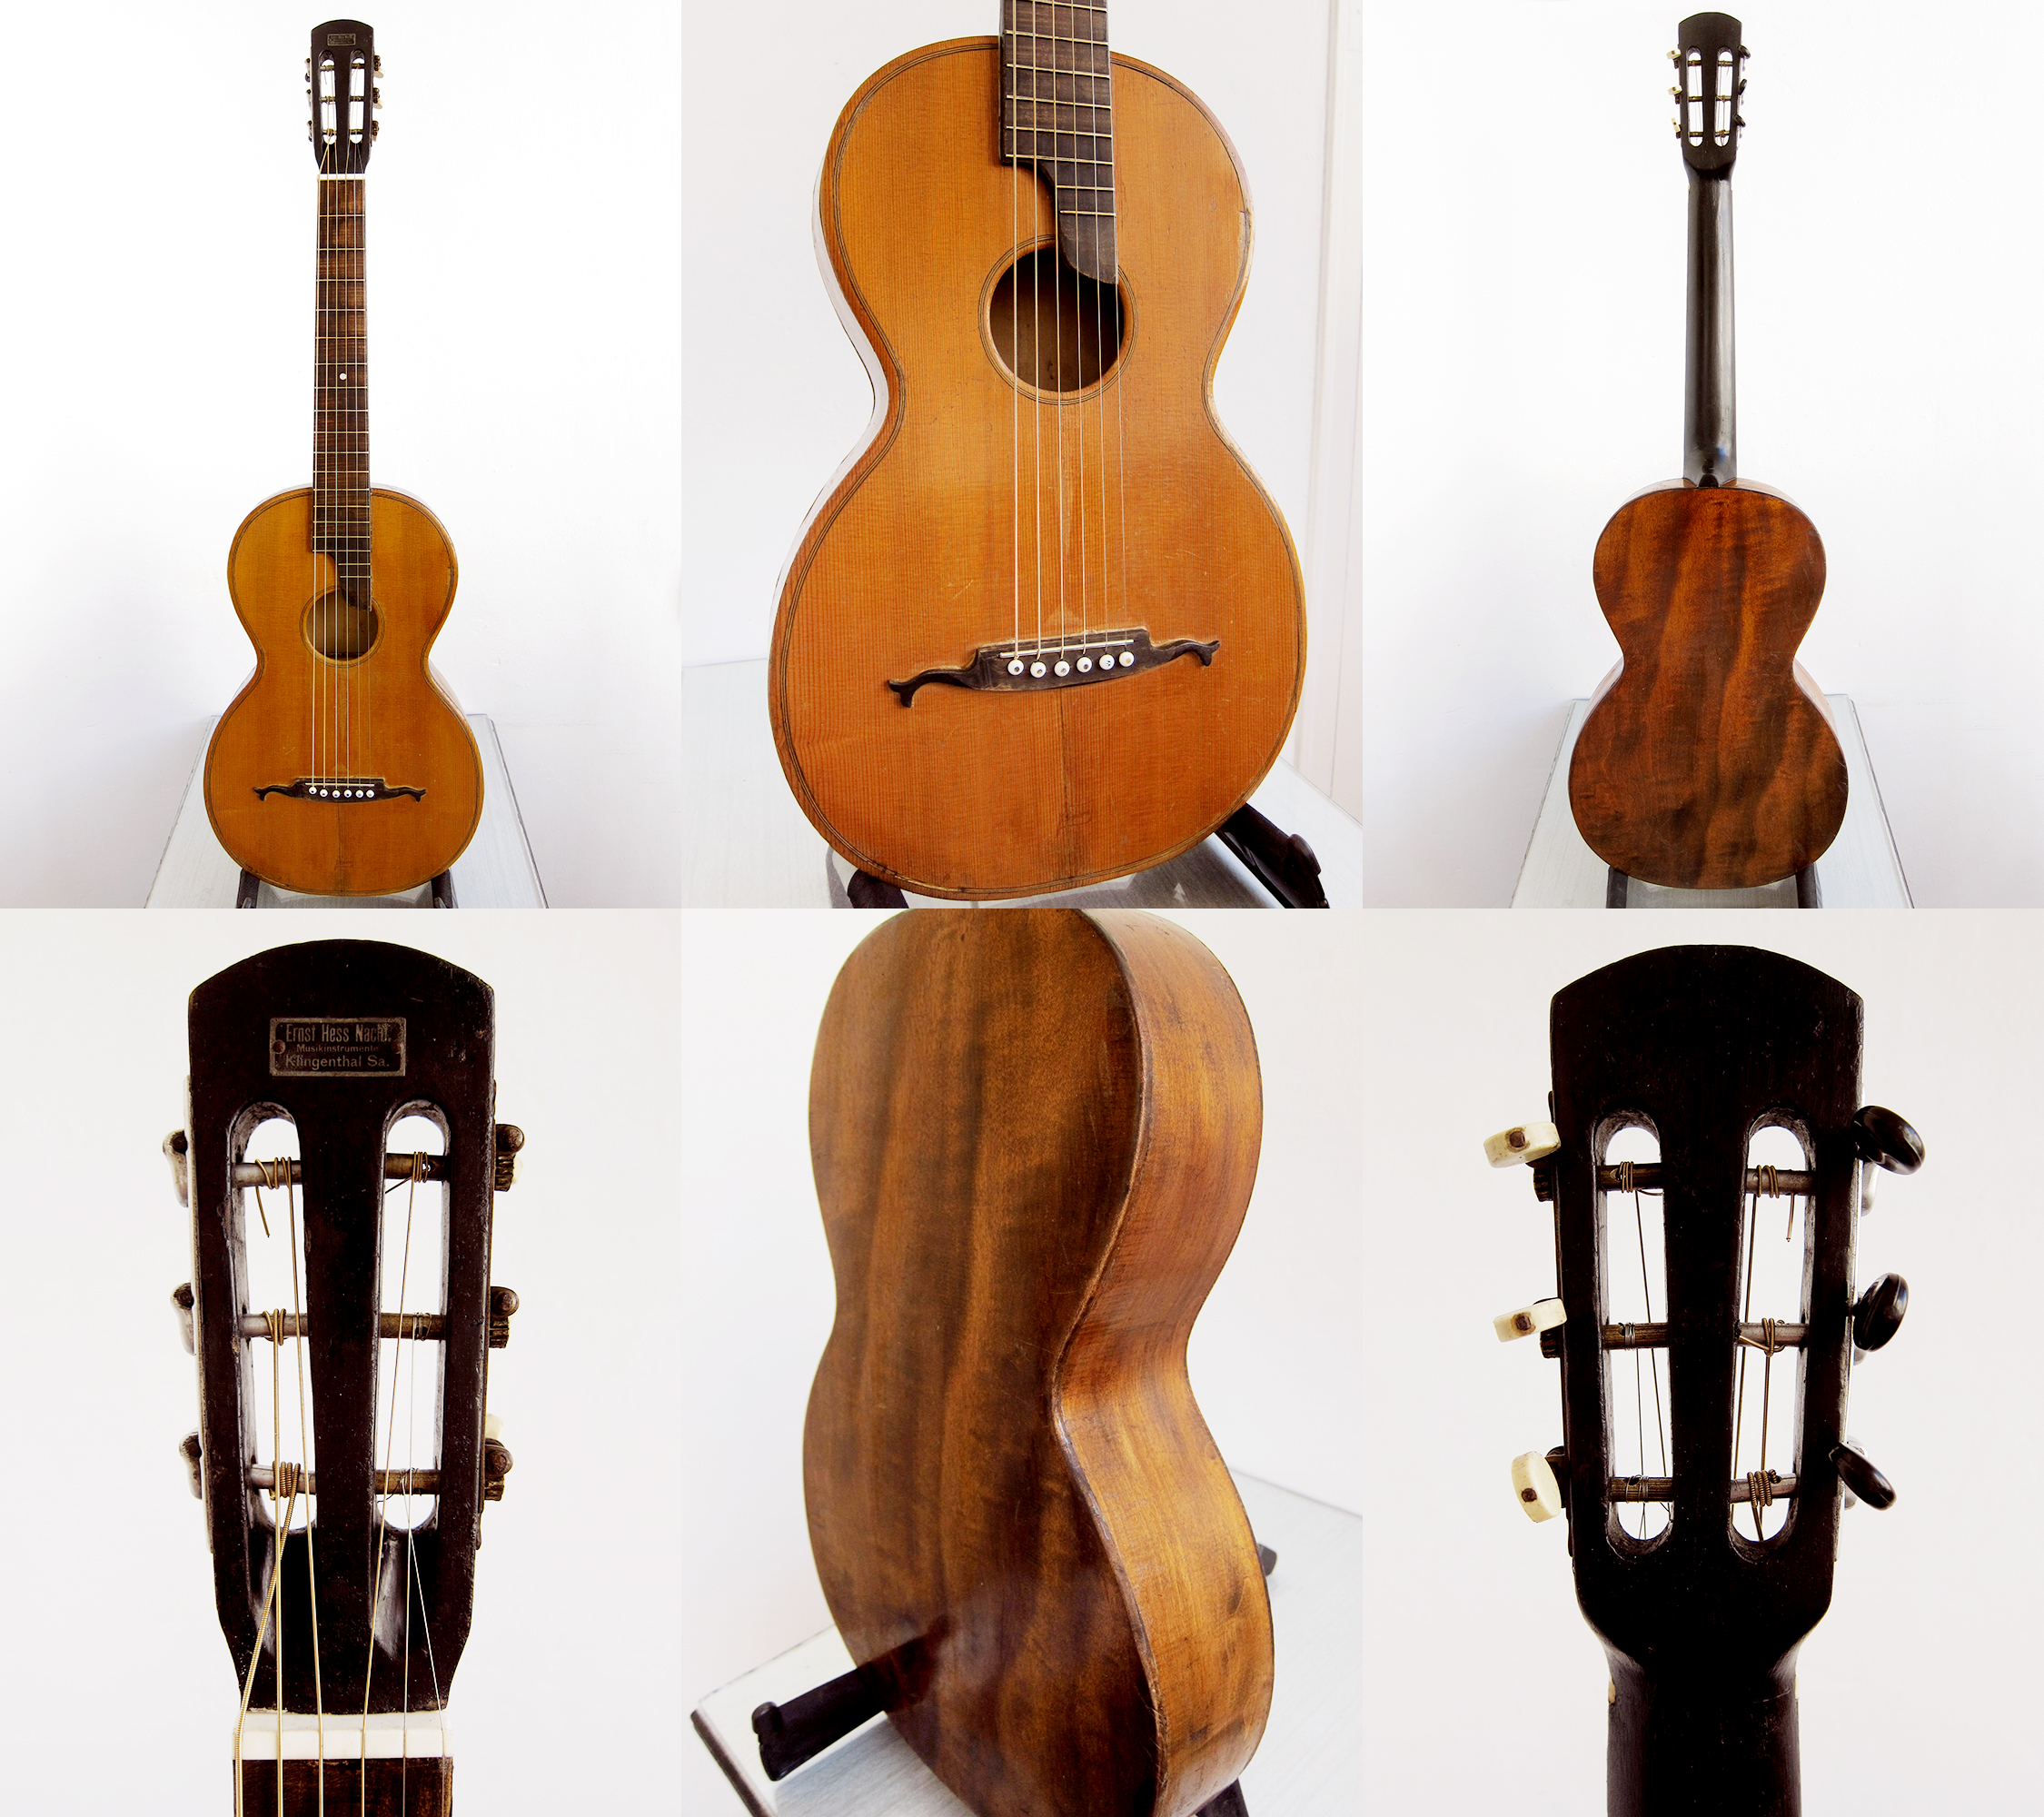
I recently restored a little German parlour that I unfortunately don’t know anything about. The only info the seller gave me was that it was made in Vogtland in perhaps the 1920-30’s. If this would have been a Japanese acoustic or a Levin I would have had a bit more of knowledge but I really don’t know anything about old German parlours. I just bought it to practice my guitar repairing skills and for that it was pretty good, I’ve learned a couple of new things. The idea was to give it to my wife but now we found another one for her so if anyone is interested in buying this then send me an email.
The action is a bit high so it’s ideal for slide playing but you can still play it like a normal guitar if you have light gauged strings on it. It sounds pretty awesome, really clear and loud for being so small. It’s made of all solid woods, spruce top, walnut back and sides and perhaps pine or some other light coloured wood in the neck, I’m not that great at guessing woods. One set of machine heads looks original and seems to be from 1920-30’s and the other is perhaps DDR made from the 1960’s, but both works fine. Overall a pretty nice sounding little guitar with a beautiful patina and the most awesome looking one piece walnut back.
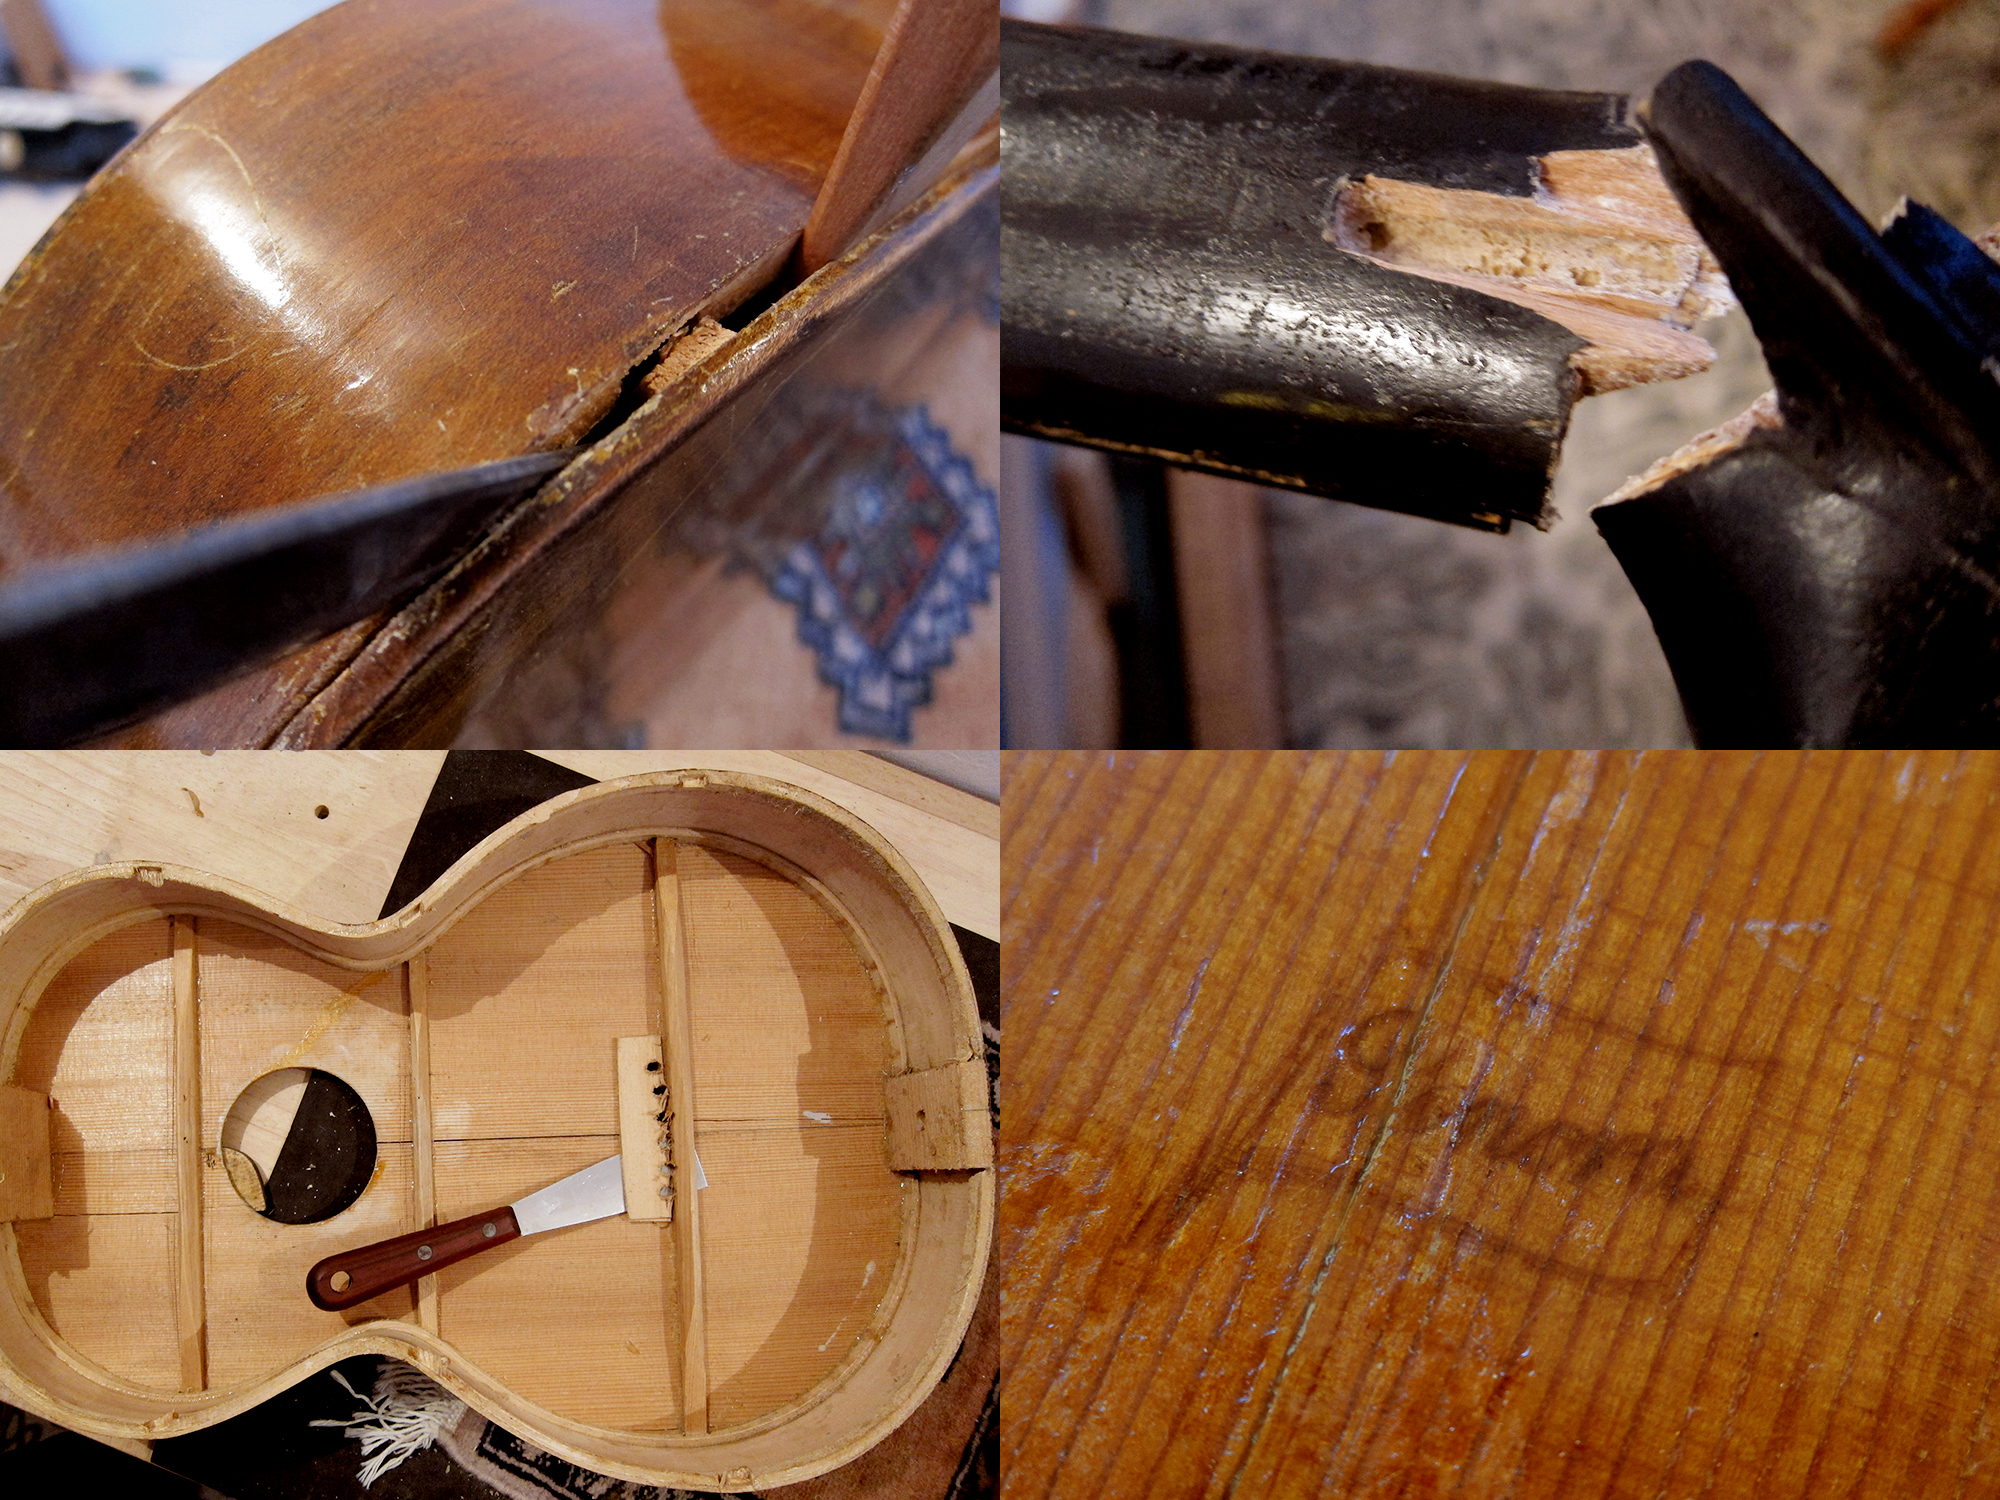
I started with taking the back off so I could re-glue all the braces. It was pretty straight forward to open it, I used a heated spatula and a knife, it worked like charm, I removed all the braces in the same way. The head was broken and pretty much everything that could be lose was lose on it when it arrived. It has a small makers mark under the bridge but I can’t really figure out what it says, if anyone has any ideas please get in touch.
Update: August 27, 2015: The brand is Sonora
I re-glued all the braces and the two cracks in the top with fish glue. Unfortunately the top had been cracked for so long so I couldn’t get it to close perfectly but at least now it’s solid with two cleats running along the cracks.
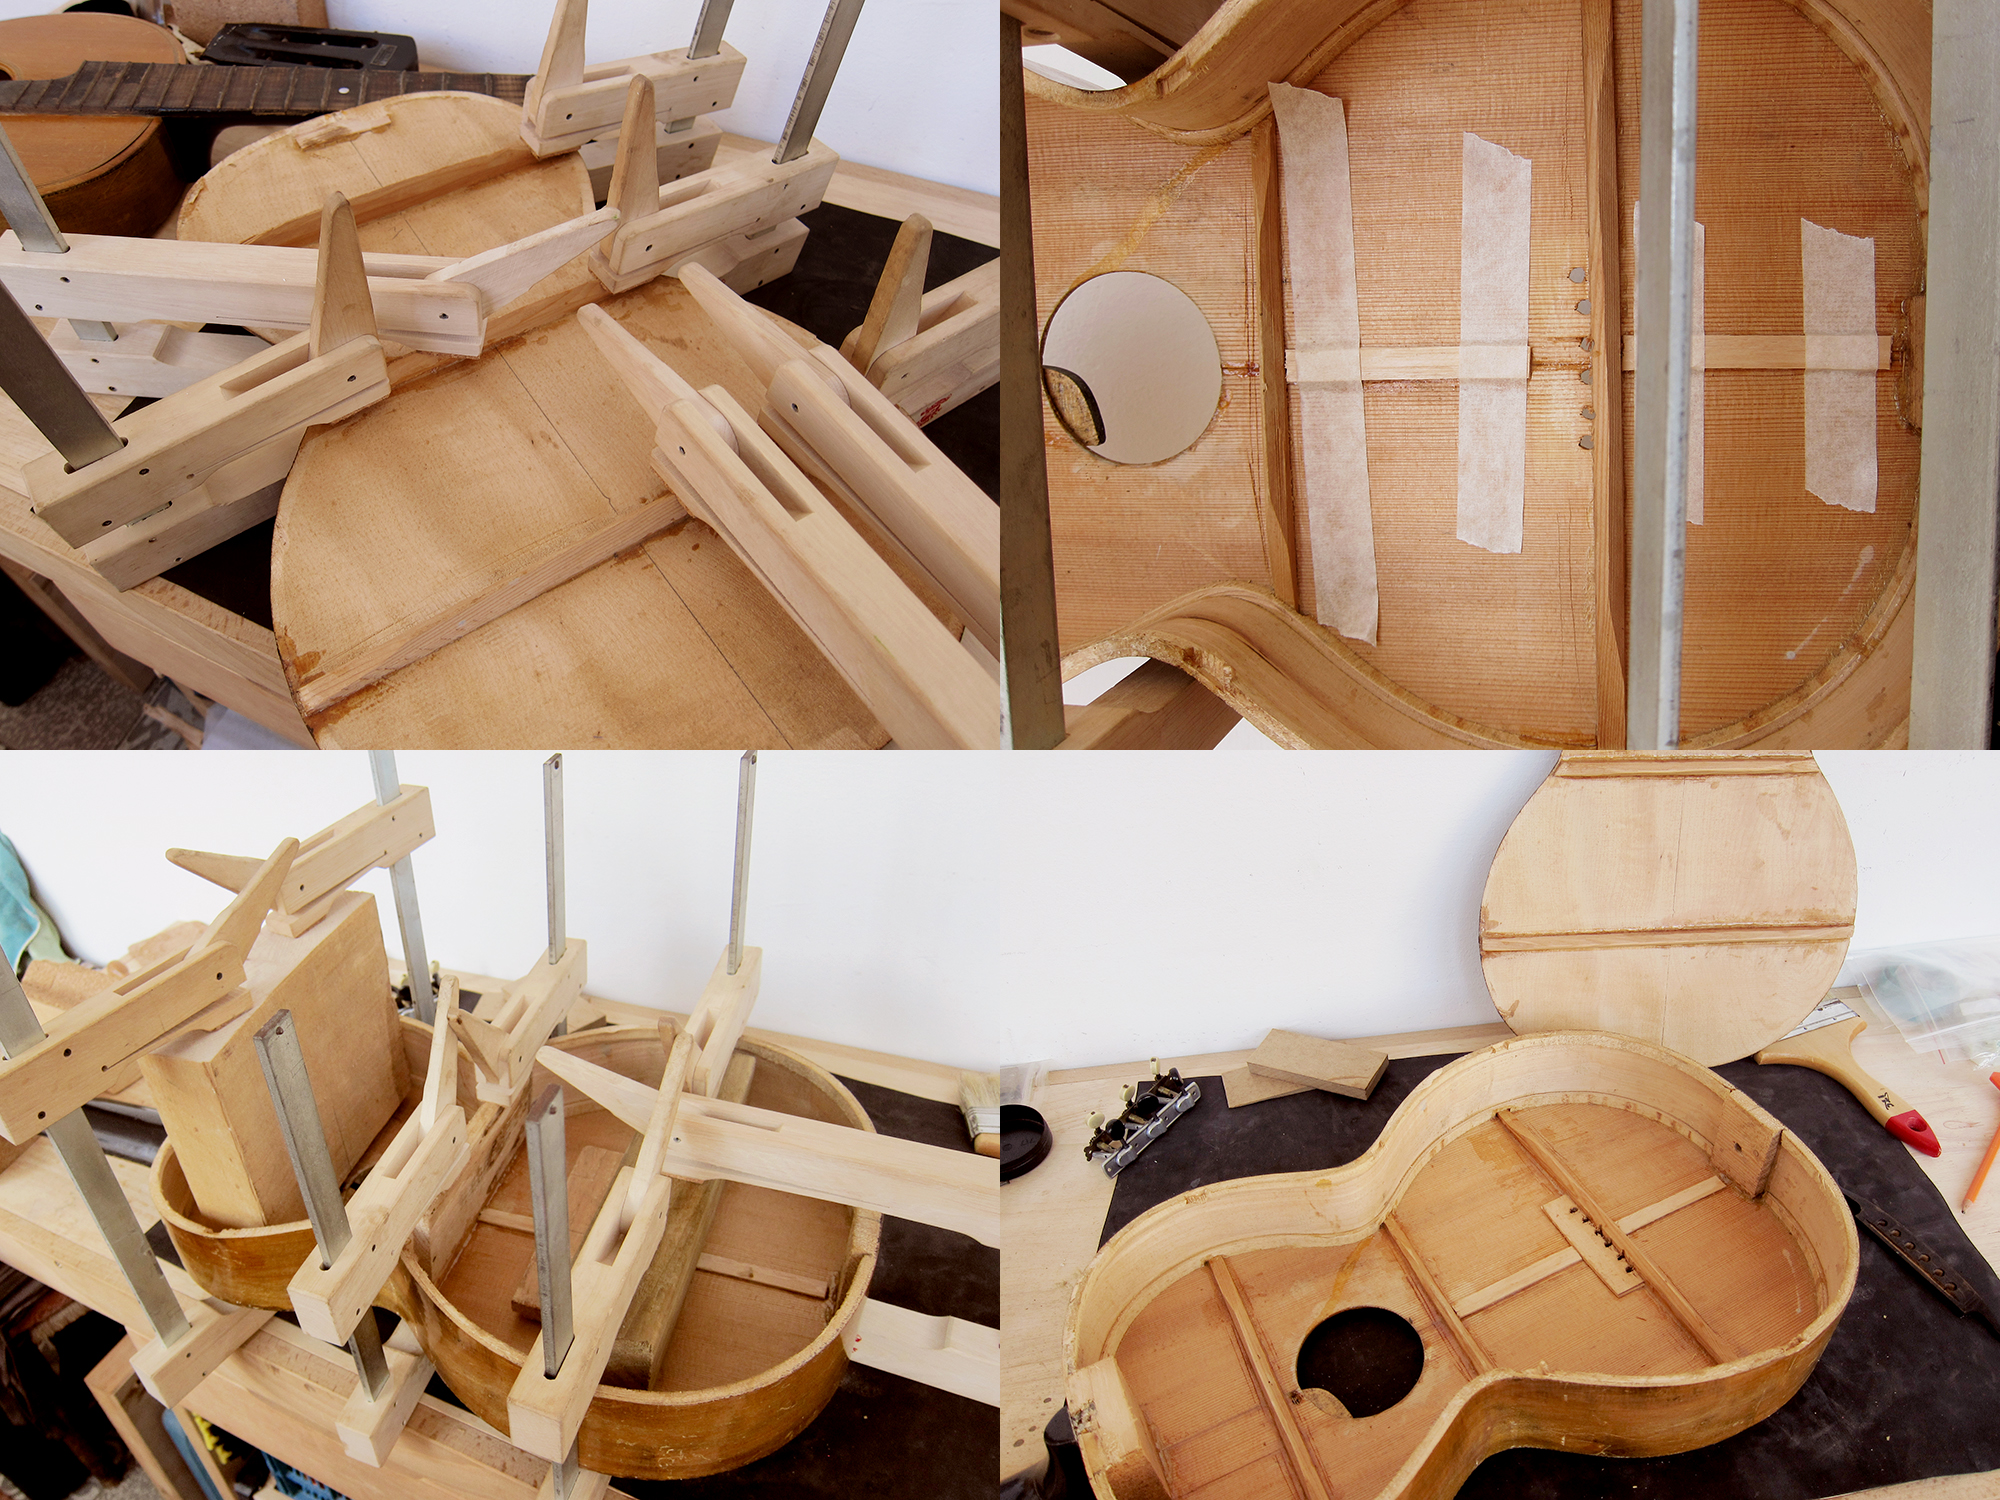
The next step was to glue the head back on. This was a bit harder than the Spanish guitar I glued the head on the week before since the break this time was just under the nut and therefore a lot harder to clamp. I left it for 48 hours and it seems to have worked pretty well so I carved and sanded the back smooth and then painted it black again. I glued the back on and closed the guitar with tape and clamps and this was pretty tricky too, as I’m sure everyone that has ever closed a guitar would know. The sides tend to move outwards so you have to push them in place sideways at the same time as you clamp the top down to the body. A bit fiddly but it worked fine in the end.
Now I just had to make the guitar playable. These old parlours are known for having banana necks since they lack any form of reinforcement in the neck. On top of that they tend to have a hump where the fretboard meets the body. First I heated and steamed the neck under pressure which worked quite well for straighten it out a bit. Then I took out the last 5 frets, sanded down the fretboard, put the frets back and lowered them as much as I could. I painted the fretboard brown and sanded over it to match the rest. After that it was just to level, crown and polish the rest of the frets.
I never got around to mention this but a few months ago I helped my friend Wolf to strip his black Fender Squier Strat body. Everything went fine and it wasn’t too hard, well to be honest it was rather tedious and time consuming but the result was at least good in the end. We were pretty surprised that the body looked so good stripped with nice grain and all, I expected 8 pieces glued together and a lot of knots and crap and that’s why they chose to lacquer it black, but clearly not. Now he is going to burn in some nice country inspired patterns and then we will just ad a coat of clear lacquer.
The heat gun worked pretty well for the black top coat, but there was a red coat under that was almost impossible to get rid of. In the end I used my Japanese Shinto saw rasp for getting through it, especially on the sides, no other rasp or file seemed to bite on it. Once we got rid of all the lacquer it was just down to a lot of sanding and reshaping the edges a bit that I occasionally went a bit hard on with the saw rasp. If you are tired of the colour of your guitar body it could be an idea to strip it but please be aware of the effort involved and that it will smell like burning napalm and toxic poly lacquer that will make you dizzy and freak out the cat. This way of using a heat gun and saw rasp works pretty well but it would probably have worked fine without the heat gun too and that way we would have skipped the unhealthy plastic fumes.
It has been an extremely good Christmas, not only did I manage to find a 1979 Fender Stratocaster, I also received a little Levin LT-14 from 1965. It’s the smallest of the 1960’s Levin guitars and is roughly like a Martin 00 in size. I bought it about two weeks ago from a guy in Heidelberg, Germany and then it got stuck in some warehouse over Christmas until the Spanish post service could be asked to deliver it. It’s an awesome guitar, pretty much like my dad’s old Levin LT-16 but a tiny bit smaller and with a bit less bass but with more clarity in the upper register. It’s also ladder braced instead of X braced which is not necessarily a bad thing in this case, it gives it a pretty great sound. The weirdest thing is that it’s so well kept for being 50 years old, close to mint and it can’t have been played much in it’s life. Well that’s going to change now because I really like it, especially for finger picking and I’m sure it will mature and sound better and better the more it gets played. This is my 10th Levin, or 11th if you count a Levin LS-16 that I have waiting for me in Sweden. Perhaps it’s time to stop buying old Levin guitars but I can’t, they are just too good to turn down. I have liked some of my Levin guitars less and then one day they surprise you and just sound amazing. I guess the more you play them, the better they sound.
It’s the first time I get a 50 years old guitar home and I have to do nothing to it. There are actually no scratches to the top, that’s just in the grain of the spruce.
Levin LT-14 / Goya T-14 Grand Concert size: Body width: 360 mm, body length: 465 mm, body depth: 98 mm
Fingerboard width: 43 mm, scale length: 630 mm
Spruce top, mahogany back and sides, 4-ply bound top, single-bound back
Mahogany bolt-on neck with adjustable truss rod
Unbound rosewood fingerboard with bass side dot inlay
Nickel plated individual Van Gent tuners with metal buttons
Rosewood bridge, matte natural finish and one year warranty
Now I actually have all three, the Levin LT-18, well it’s a Goya T-18 but close enough, my dad’s old Levin LT-16 and this new little Levin LT-14. Taken from a 1965 Levin catalogue. Thanks to Vintage Guitars Sweden
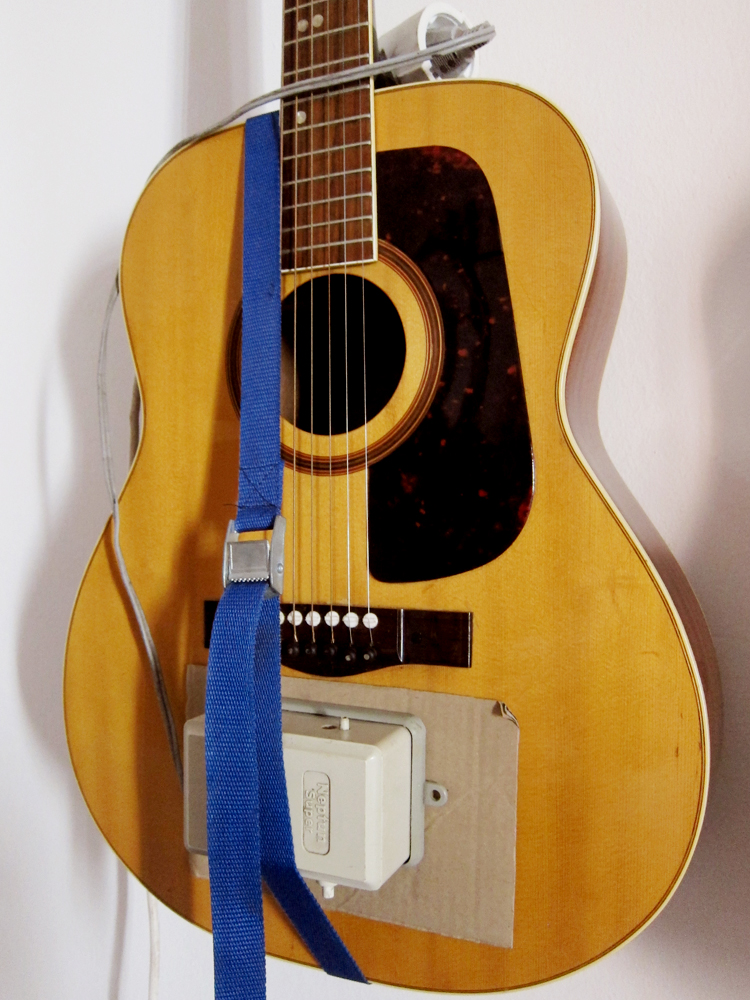
A great way to improve the tone of your acoustic guitar and to get it to open up is to use a normal air pump from a fish tank to give the top a massage. I got an old one, I think the older they are the more they vibrate, that I use on guitars that I buy that hasn’t been played for years. It works great and seems to add both bass, volume and clarity to the guitar. A day or two with the pump is like months of actually playing.
 Levin LT-18 Made in Sweden in 1968
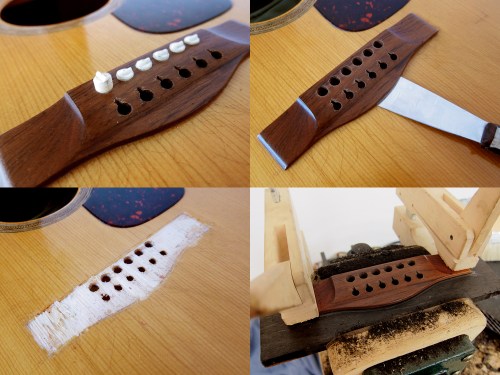 First step was to remove the old bridge with a heated spatula and then copy the bridge and drill the holes.
 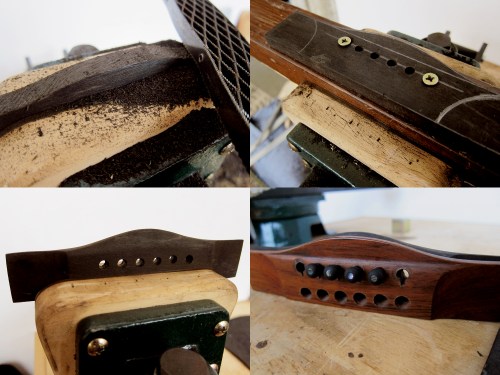 Then shape it as close to the original as possible using my Japanese saw rasp and different files.
 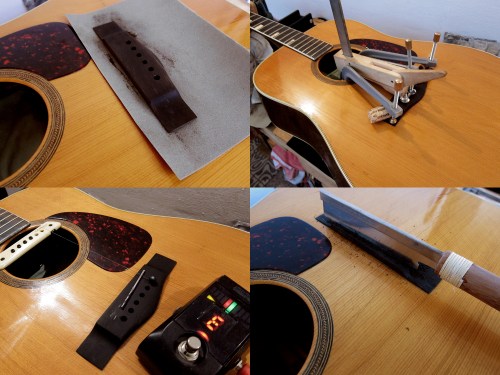 Last step, fit the bridge and glue it down. Once the bridge was in place I could check the intonation to get the saddle slot in the perfect spot. Unfortunately I cut the slot 1 mm too wide so the bone saddle got a bit fatter than I had planned. Perhaps that gives tonal qualities I would have missed with a thinner saddle, let’s hope so. I also installed a LR Baggs M1A so I can use the guitar for gigs.


 I thought about getting a pre-made
 I glued the bridge on and after 3 days I strung up both E-strings and used a drill as a saddle so I could move it around until I got the intonation right, I forgot to take a picture of that. I marked out the saddle and then sawed a 3 mm slot. Next step was to create a bone saddle to match and string it up. Easy peasy, well it was a hard days work but it was easier that I thought.