Claescaster

Month: March, 2013

Guitar of the day

Keith Richards'
Keith Richards’ “Micawber” 1953 Fender Telecaster Blonde

1953 Fender Telecaster Blonde Micawber is named after a Charles Dickens character, no one is exactly sure why. Keith’s had this guitar since Exile On Main St. This guitar is kept in Open G tuning (G,D,G,B,D) low to high with no capo, and of course has the famous 5 strings with the 6th string removed (as do all his open G tuned guitars). Taken from the Keith Shrine

Keith Richards, Micawber, 1953 Fender Telecaster Blonde Keith Richards live at Earls Court in 1976

How to… change the nut

I have never been too impressed with the cheap plastic nut on the Claescaster. When I first got it I brought the guitar to work and used it as my office guitar and after six month of heavy playing most of the string buzz was gone, but not all. I truly believe that if you do any changes and things doesn’t sound perfect straight away then just ignore it for a week or two and let the guitar settle a bit. If I get any slight buzzing or things feels weird after I have adjusted the bridge or saddles on my guitars I tend to leave it until the problem disappears, which it almost always does.  However, after two years of playing the Claescaster like crazy I felt that the last bit of buzzing wouldn’t go away unless I changed the nut. I have drilled, soldered and screwed in my guitars, adjusted necks and changed things around but I have never dared to remove a nut. It just felt like one of those things you couldn’t do by yourself. After 3 glasses of cava at work I felt I had the Dutch courage needed to take on this daunting task so on my way home I went passed Herrera Guitars,  my favourite guitar shop in Barcelona, and bought a TUSQ PQ-5010-00 slotted nut for Strat and Tele. I started with removing the old nut, something that was way easier than I expected. I took some watch tools, finally I found some use for those, and just lightly tapped the nut from one side with a watch back opener and small hammer, it came loose straight away. I cleaned the slot a bit, removed some left over glue with a knife and then sanded the sides to make it slightly wider to fit the new nut. The TUSQ was a lot bigger than I expected, I did measure the old nut a couple of days ago but maybe I mixed up the measurements or I got the wrong nut because this one was almost 3 mm longer than the existing one, even though the string spacing was the same. I took the old nut as a reference and made a mark on each side and then just cut off the excess with a knife on the chopping board, it’s a very easy material to cut and work with. I filed down the edges with a sandpaper and also scratched all sides so the glue would stick better. Now it was just down to put some super glue in the slot, probably not the best glue for this but the only one I had at home, and then gently tap down the nut in its place. Done. I have to say that this was way easier than I expected and everything went really well. I should of course have masked off the wood with some tape not to scratch it but I was too excited to take those kind of precautions. Now with the new nut fitted this neck is a joy to play, it’s a world of difference. I feel that both tone and resonance has improved a lot and I can easily recommend TUSQ.

How to change the nutThe old plastic nut that this cheap neck came with

How to change the nutA watch back opener and a little rubber hammer turned out to be excellent tools for this

How to change the nutIt was way easier than I expected to remove the old nut

How to change the nutI scraped off some leftover glue with a knife

How to change the nutSome sandpaper got the surface smooth and I also needed to widen the slot a bit to fit the new nut

How to change the nutNot the best cut nut slot but I didn’t really expect more from this neck

How to change the nutThe new TUSQ PQ-5010-00 only cost 8€

How to change the nutPerfect fit

How to change the nutA tiny bit of glue and then just gently tap the new nut in it’s place

How to change the nut All set, a new nut is fitted on the Claescaster

Guitar of the day

Buddy Holly's 1944 Gibson J-45 Buddy Holly’s 1944 Gibson J-45

How to… solder electronics

How to change a potentiometer
When I found my Tokai Love Rock it had a broken shaft on one of the potentiometers so I’ve been planning to change that for the last month or two. This weekend I finally got around to do it. I changed the broken one for a Alpha 500k pot, not the most expensive replacement but I had heard quite good things about Alpha so I thought I would give it a try. I have no experience what so ever when it comes to soldering so I decided to play it safe and move one cable at the time from the old to the new pot. My main concern was of course that I would get confused and not manage to get all the bits back in the right place. Everything went fine, well maybe not the cleanest soldering but pretty good for being my first time. I should of course have scratched the new pot with a bit of sandpaper to get the solder to stick better, I didn’t think of that until after.

Tokai Love Rock electronics
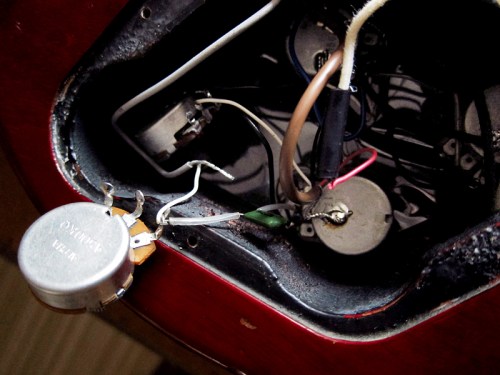
I changed the pot one cable at the time to not mess anything up

Tokai Love Rock electronics
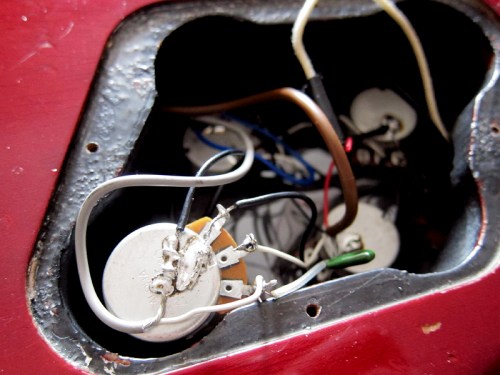
The final result, my newly fitted Alpha 500 k pot. Perhaps not the cleanest soldering but OK for being my first time.

Tokai Love Rock electronics
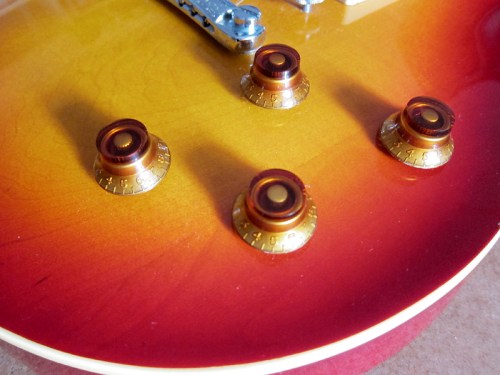
Tokai Love Rock with 4 brand knew knobs, straight from China via eBay.

How to do a 50’s vintage wiring mod for Telecaster
When I had to soldering iron out I thought I might as well sort some other stuff too. I’ve been reading about different ways of keeping the tone on a Telecaster when you turn the volume down and decided to go for the old 50’s vintage wiring on my Claescaster. It’s a really easy procedure since you just need to move one cable but when I opened the Claescaster up I realised that it wasn’t wired like the standard Telecaster, not according to Seymour Duncan’s excellent wiring diagrams, so I had to move the capacitor and another cable as well. The capacitor is the worlds biggest Orange drop but it does the trick, I might go for something smaller and a bit more suitable when I build the new Claescaster.

Telecaster 50's vintage wiring
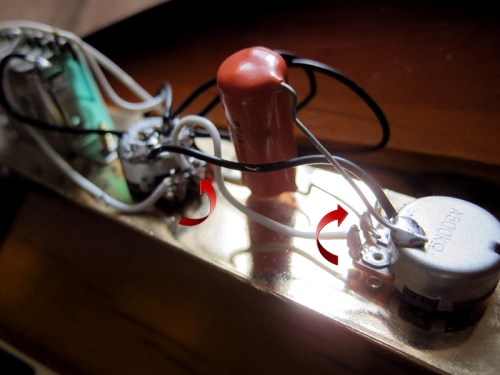
The cables I swapped around on the Claescaster. It sounds great now and keeps the tone when you turn the volume down.

How to solder a endpin jack for acoustic guitars.
I found this nice old Shadow humbucker pickup for acoustic guitars when I was back in Sweden. I have a 12 string guitar from the 70’s that I bought cheap from an old Jazz musician and I had completely forgotten that it was equipped with a Shadow pickup. I brought the pickup back to Barcelona and have spent some time trying to figure out how to fit it in my Cort that I normally use for rehearsals. I bought a gold endpin jack and then I just needed to solder a mini jack cable to connect it. The question was, how the hell do I do that? I found and old RCA to mini jack cable that I decided to slaughter for this project but couldn’t find any info online how to connect it. I tried every single combination I could think of but just couldn’t get any sound out of it. Then it hit me, of course, a guitar cable has only on cable inside and then the shield around, so I have to make something similar to this. I twined the left and right together and then the same with the shield from both and it worked perfectly. It might not be the best cable in the world but it was what I got at home and it seems to work fine.

RCA to mini jack
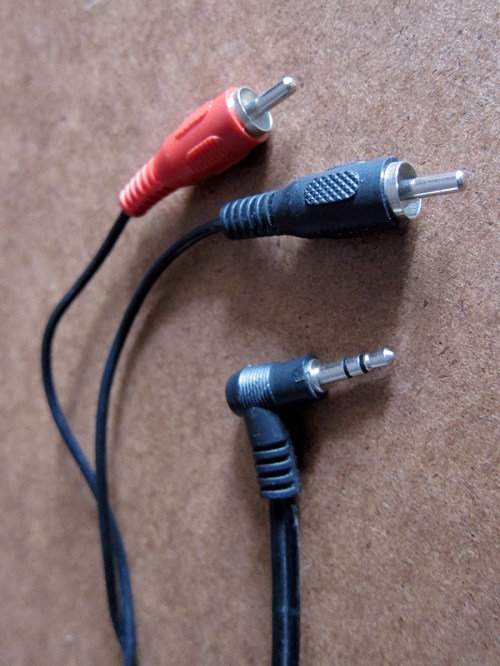
Standard RCA to mini jack.

Mini jack for acoustic guitar
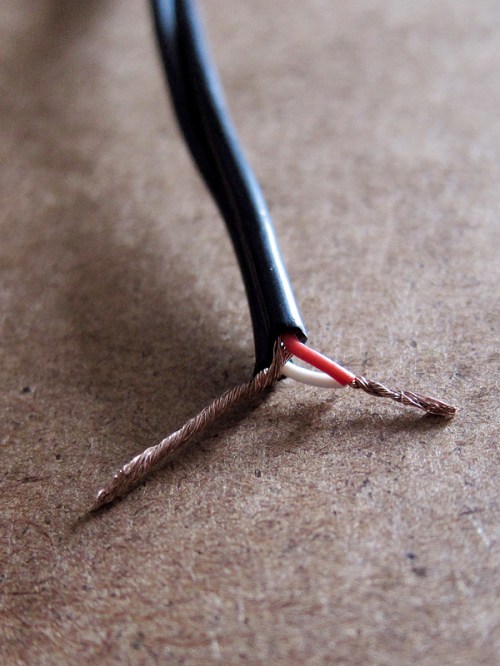
I connected the left and right and then twined the shield together

endpin jack to mini jack
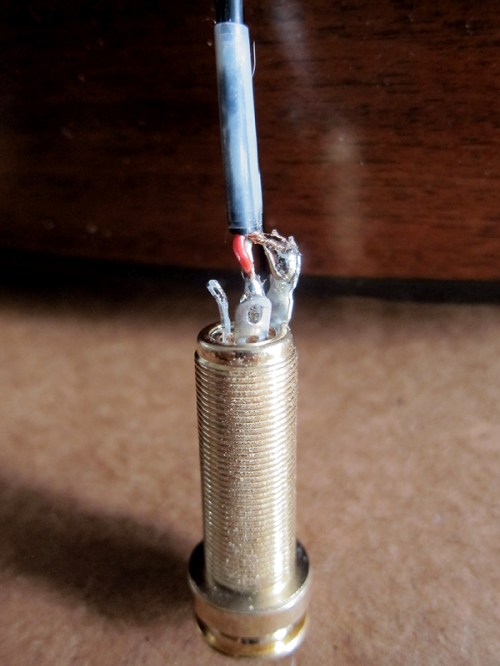
The left and right soldered together to the shortest pin and then the shield to the longest.

Shadow humbucker pickup
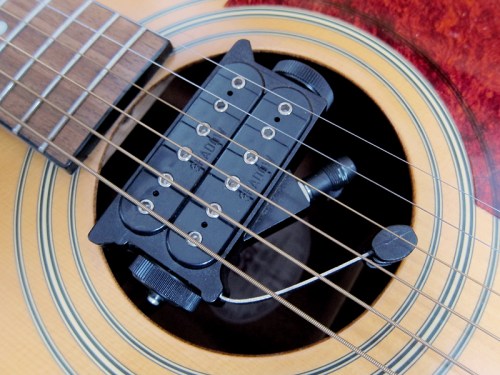
Shadow humbucker pickup for acoustic guitars, newly fitted on my old Cort.

Chest Fever

Araceli and Claes, Chest Fever session, November 2012 © Claes Gellerbrink, photographs can't be used without permission

My girlfriend Araceli and I have a gig with our band Chest Fever this Saturday. If you happen to be in Barcelona come and see our country folk duo warm up the stage for Cobarde. The recipe will be 1 old waistcoat, 1 bottle of old bourbon, 5 old songs, 2 new songs, 1 new guitar and at least 1 new hat.

The Claescaster

Late last night I bought a new body for the Claescaster, or rather I got the first part of my new Claescaster. The idea is to build a new guitar from scratch with the best bits I can afford after the specifications of a Seventies Fender Telecaster. I have thought about this for a while and I really don’t like the grain and look of my Morgan Telecaster, especially not now when she has darkened so much since I moved to Spain, and now I found my ideal body. It’s a Mighty Mite Swamp ash body in 3 tone sunburst and I haven’t seen any Mighty Mite bodies, not even on their website, in this lovely red sunburst.

ClaescasterMighty Mite Swamp ash Telecaster body in 3 tone sunburst

It’s quite heavy for being a modern body, around 3.2 kg, which I really like. Most modern bodies I’ve seen weighs 1.5-2.5 kg, does all guitarist have back problems or why doesn’t anyone want heavy guitars any more? Or maybe it’s just the quality and density of the wood that has changed over the years and you can’t find proper wood nowadays. I’m going to build a nice blackguard Seventies Telecaster out of this with gold hardware, just because I love gold. I can’t afford a real Seventies Fender so the best I can do is to create my own, and I think I might enjoy building it too. I bought it from AZGuitarParts a US eBay seller so let’s see how it goes with import tax to Spain, I shouldn’t have to pay anything since it cost under 150€ but you never know. I bought all the gold hardware for the Claescaster from the US 2 years ago but that was a smaller package so it slipped through customs just fine, I just have to wait and see how it goes this time. I can’t afford to buy a new neck, pickups and all the hardware now so this is going to be my ongoing project over the spring. First I’m going to just change the body, meaning unsolder and move all the hardware, pickups and pots from the Claescaster and take that neck too. Then when I get some more money I will start to collect and exchange all the bits with parts I really like. Cloth covered wires, CTS pots, Oak switch and some swanky pickups, I was thinking of the Tonerider Vintage Plus, in gold of course. I also think it could be a good idea to practice soldering on the old Morgan pots and pickups so I don’t buy anything new and expensive and ruin it straight away. Then in a couple of month I will suddenly have two guitars, my Morgan Telecaster in it’s original form and the new Claescaster, a Swamp ash 1970’s Fender Telecaster copy built from scratch by me. My secret plan is to force my first born to learn how to play guitar on my old Claescaster and when they turn 20 they will inherited the new Claescaster. “Here is a guitar that I built 20 years ago and have been playing heavily ever since just too keep it warm, I built it for you”. How nice would that be, damn it, why didn’t my dad build me any guitars.

Fender Telecaster Sunburst 1977Fender Telecaster Sunburst 1977, the inspiration for the new Claescaster

Update May 6, 2013:Claescaster 
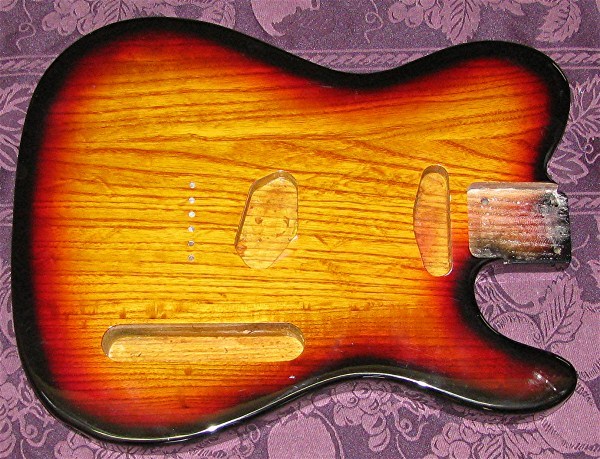
This is what the final Claescaster came to look like

Berklee College of Music

Last night my girlfriend and I started a free online Songwriting course at Berklee College of Music. We found it through Coursera, they have a lot of different free ones to choose from so we picked this 6 weeks course in songwriting. Hopefully we will learn a lot of useful things so we can start to write even better songs and become rich and famous so I can buy all the guitars in the world. If this course is good I might actually sign up for Introduction to Music Production next time the course is given, I didn’t want to do two at the same time.