Claescaster

How to… refret a guitar

How to… refret a guitar
The shiny new Jescar FW47104 frets I put on my Tokai Love Rock LS-55 Les Paul Standard “Made in Japan” 1991

Here is a little update on my previous post on How to… refret a guitar. It turns out that maybe it wasn’t as easy as I first thought to level, crown and polish the frets on a guitar. I have had some small issues with both the Tokai that I refretted and my old Claescaster that I levelled the frets on. I didn’t pay enough attention to the height of the frets and I hardly used the fret rocker the first time around. This resulted in some buzzing when some frets were pressed down. I have now levelled, crowned and polished both guitars again and checked every single fret with the fret rocker to make sure they were all the same height. It would probably have helped if I had glued in the frets on the Tokai when I refretted it, which I didn’t in case I needed to take them out again for some reason. I think the frets not being glued in combination with the difference in the neck with and without the tension of the strings was enough to cause problems with on the Tokai. Now I when I levelled it again I pushed down the guitar to simulate the tension of the strings and that worked pretty well. The Claescaster was a lot easier, that was just a case of paying a bit more attention when I levelled the frets and actually use the fret rocker properly. When I first attempted to level, crown and polish frets it was evening so it got pretty dark and my main light source was the ceiling lamp above me. I have since learned that it’s a lot easier to get this done properly if you have light coming from the opposite side of you. This time I was working in front of the windows and had an even flow of natural light coming in which made it a lot easier to see if the frets were even and later during the polishing stage, if they were smooth enough. Both necks still feels a bit weird but I think that after a couple of hours of heavy playing, not playing heavy music just playing a lot, they will settle and even out a bit. Normally guitars feels weird even after just adjusting the bridge saddles, imagine after changing all the frets.

How to refret a guitar
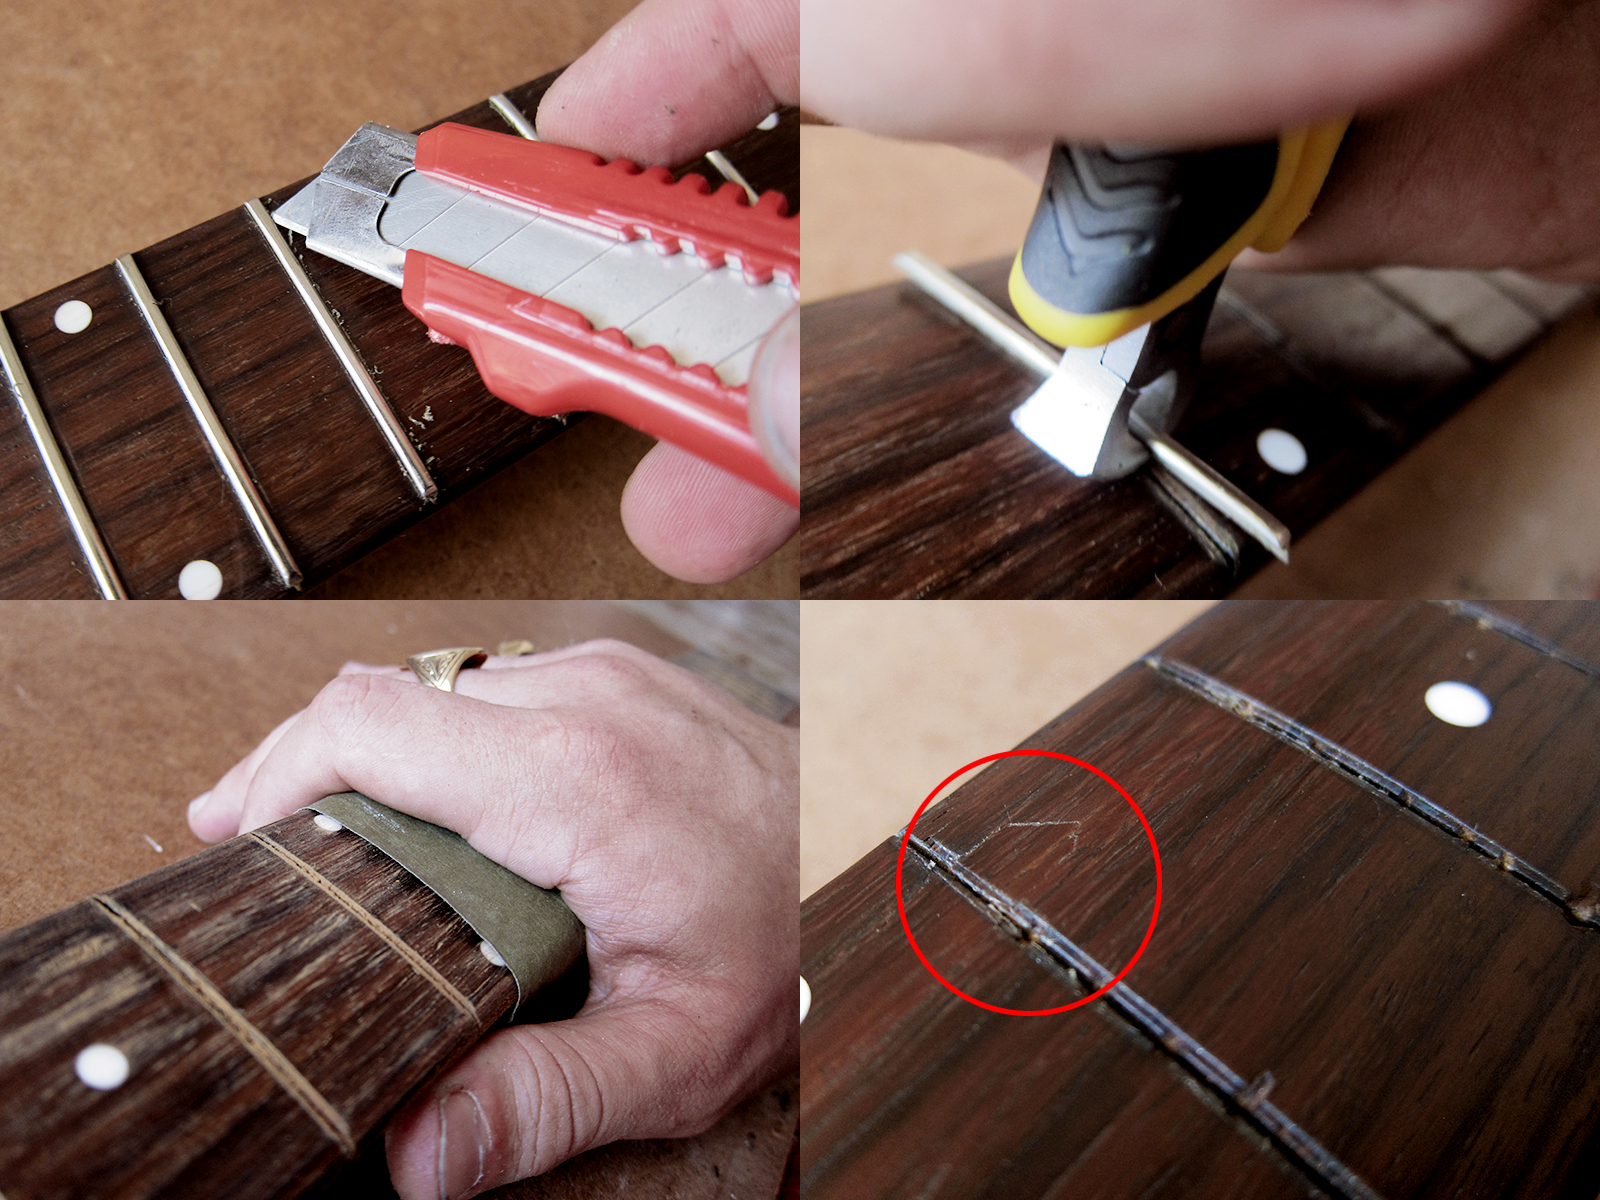
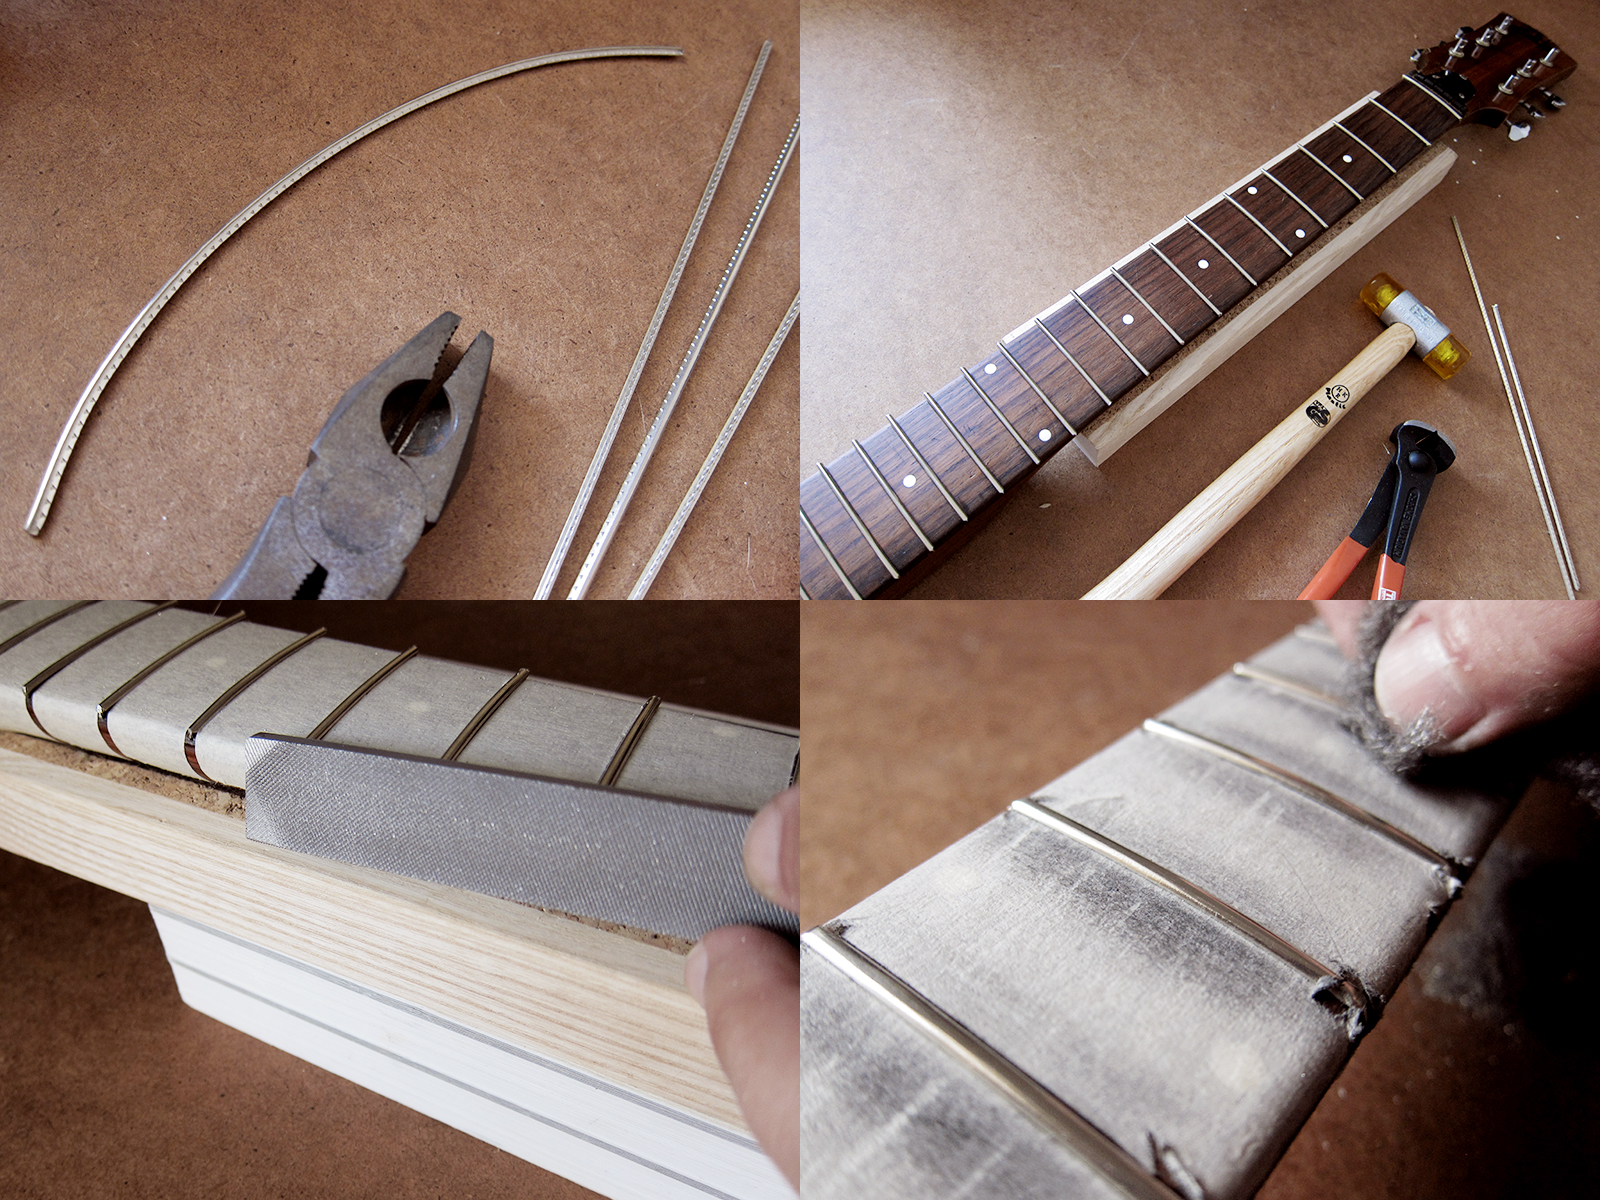
I checked every single fret with the fret rocker and then marked any parts that was higher with a black marker. I levelled the frets and took extra care with the problem areas. I used a small Bahco file this time instead of the long fret leveller that I used last time. I checked with the fret rocker, levelled a bit more and then checked again until it was perfectly even.

How to refret a guitar
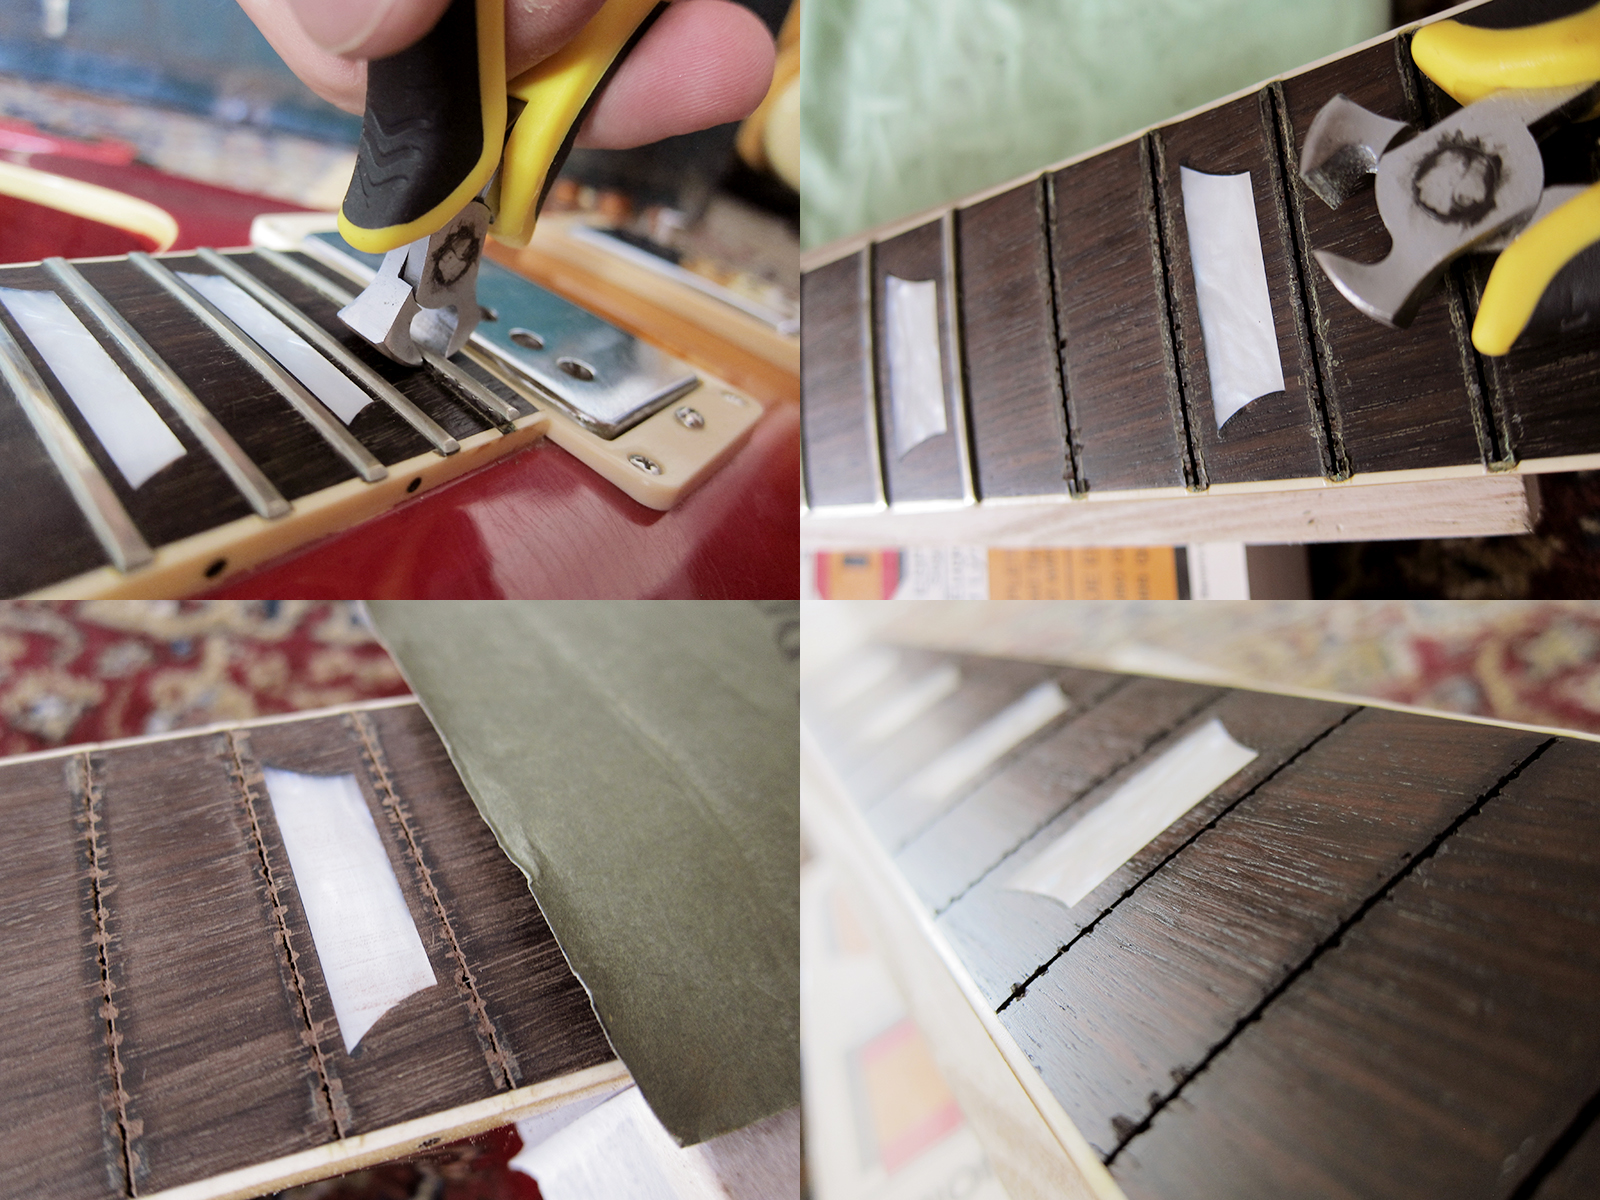
When everything was levelled I just had to crown the frets again and then polish them. I’ve realised that these little aluminium fret board protectors that I have used in the past doesn’t really work. If you have levelled and crowned the frets you have to run a sandpaper over the whole fretboard, feeling every single fret with your fingers to round them off, that’s the only way to get them smooth and nice. For that you really need to do it properly and tape the whole fretboard to protect it.

Hondo II P-bass

Hondo II P-Bass
Hondo II P-bass copy, it’s a bit roadworn but the neck is in a really good state and it feels great to play.

Hondo II P-Bass
The machine heads could do with being replaced too, it seems like Hondo II have great necks but cheap hardware and electronics.

As I mentioned before I got a Hondo II P-bass for my colleague Verushka, she plays in an awesome punk group called Sect. The bass arrived last week and I took it home and had a look at it. It was sold as untested so I presumed that nothing worked, and I was right. The wood seems really solid and good, just like the Hondo II I got for Dani a few months back but the electronics seemed to be pretty bad. I took it a part and cleaned it, polished all the metal and then started to go through the electronics. It turned out that the pickups doesn’t work. Or rather they work, but the output is so low that you can hardly hear them. We ordered a new set of Artec P-bass pickups, new pots and jack from my favourite Hong Kong store EY Parts so as soon as they arrive I can get the bass sorted.

Hondo II P-Bass
I cleaned it, polished the frets and all the hardware with wire wool and metal polish. I have to say that this cheap little bottle of Harley Benton Hardware Polish has proven to be extremely worth the 1.90€ I paid for it. I put in a little shim when I assembled it, just like I did with Dani’s and it made wonders to the action. Now it’s really low and easy to play.

Hondo II P-Bass
I took all the electronics apart, cleaned the jack, cut the ends of all the wires and replaced the mini pots with some newer mini pots I had at home, I did everything I could to make sure that all the connections would be as good as possible but it didn’t help. Well I got rid of the extremely loud humming noise that was there before but the pickups are still way too weak for being usable. Let’s see what it sounds like when the new full size pots, jack and Artec pickups arrive.

Guitar strings

How do you chose what strings to use? Do you listen to others, read reviews or actually try all the brands available? In my case I guess it has been a combination of what others are using, what I’ve read good things about and what I actually realised that I like. I don’t really know much about different materials or how some type of strings affect the sound in certain ways. I guess a big part for me has always been the price since I’m a hard hitter and tend to break strings a lot. When I was young I was poor and had to stick to the cheaper brands and now when I’m older and less poor I have too many guitars to afford to string them up with the best brands. I’ve always been stuck in the middle and changed brands many times depending on what’s affordable and popular in the country I’ve been living. I used Rotosound (Roto Reds 11-48) while I lived in the UK and now in Spain I’ve changed to Ernie Ball (Regular Slinky 10-46). The main reason why I changed from 11’s to 10’s was because I felt that I was old enough to use what I wanted and not care about what everyone else said. My whole life people around me have told me that the thicker the better, and that you are less of a man if you play on anything thinner than 11’s. Remember that Billy Gibbons uses 08’s and still has a pretty descent tone on his ‘Pearly Gates’ 1959 Les Paul. When I started to use 10’s my guitar playing changed completely, not only could I play faster but I also started to bend more and play in ways that I hadn’t been able to or bothered with before. My Telecasters stringed with 10’s are pure country heaven and way much more fun than before. I still use 11’s on my Hagström Viking and the Gretsch copy I have. At the moment I’m using Martin M175 (80/20 Custom Light Bronze Acoustic Strings 11-52) on my acoustics. Mainly because my girlfriend Araceli liked 11’s on her parlour guitars and it was easier to buy the same strings in bulk for both of us but also because I like to play acoustic like I play electric and don’t want to feel held back with too thick string gauge. I’m planning to put a set of 12’s or 13’s on one of my Dreadnoughts just to try if it really makes a world of difference to the tone. I would love to know what others are using and why. Please write a comment below and let me know.

Roto Sound roto reds 11
I used these for years but have now given up on 11’s

Ernie Ball Regular Slinky 10-46
My new found favourites, so smooth and easy to play without being too flimsy. I tend to buy them in bulk on eBay from USA

Martin acoustic guitar 11-52
Araceli and I tend to stick to these since you can get a 3-pack for 9,90€ from Thomann

Peavey electric guitar strings

Peavey acoustic guitar strings
I’m not proud to admit it but I do use Peavey’s discount strings occasionally. In Alfasoni you can get them for 2€ and they are perfect when you break a string or you just need to string up a guitar that you don’t use that much.

L.R. Baggs M1

I just ordered myself a L.R. Baggs M1 and I really hope it’s as good as people say. I have only tried cheap magnetic soundhole pickups so far, like Artec and Belcat and they worked ok both of them but sounded a bit thin, hopefully the M1 will be more full and warm without sounding muffled or muddy. I have an old Shadow humbucker from the 1970’s that I kind of like but it’s a bit too dark for dreadnought guitars. The undersaddle ARTEC PP-607 I installed in the parlour was way too uneven when played hard, and a bit thin sounding as well. My favourite magnetic pickup is still the old Japanese 1960’s one that my dad fitted in his Levin LT-16. I got the L.R. Baggs M1 new from dont_tell_the_wife_guitars on eBay and it only cost $139.00 with free shipping so I felt it was worth a try. If it’s good enough for David Gilmour then I’m sure it will be just fine for me.

Update 2013-09-10
I just received my new L.R. Baggs M1 and it looks awesome. Cheap, quick shipping and no customs issues, couldn’t be better. I noticed that the M1 Passive doesn’t have a volume control but I’m pretty sure I can live without since I have never used that on any of my acoustic pickups. I’m really excited about rehearsing with Chest Fever on Thursday so I can try it out loud. I hope it sounds as good as it looks. 

Update 2013-09-20
Last night I finally got to play the L.R. Baggs M1 loud, we had to cancel the rehearsal last week since Araceli’s and I celebrated 6 years together. I fitted it in my Kiso Suzuki WE-150 and it sounded pretty good, well it sounded just like the Suzuki does unplugged. It was the first pickup I have ever tried that could handle my hard hitting solo playing and I’m really impressed with how responsive it is, loud enough when picking and not too loud when strumming. I can’t wait to put it in an even better guitar and really hear it’s full potential.

Levin LT-16 1966
The Japanese pickup fitted in my dad’s old Levin LT-16 from 1966


A nice example of L.R. Baggs M1


David Gilmour playing L.R. Baggs M1, skip to 1:06

Kiso Suzuki WE-150, Made in Japan

Kiso Suzuki Violin Co. LTD. WE-150 Made in Japan
Kiso Suzuki Violin Co. LTD. WE-150 Made in Japan, 1980

Last night I restored a Kiso Suzuki WE-150. There wasn’t anything really wrong with it, it was just extremely dirty and the frets seemed to have been lying around in aquarium. I cleaned it for 2 hours, polished the frets and set it up and now it plays and sounds great. I changed the nut too, from plastic to bone, which improved the tone a lot. It’s actually one of the easier guitars I have played in a while even though it’s a dreadnought. I strung it with 11’s which I normally do on all of my acoustics so I can play them like electrics but this one felt extra easy to play. I tend to find dreadnoughts a lot stiffer compared to folk- and parlour sized guitars even with light gauged strings. I would like to keep it but it has to go so if you are interested you can find it in For sale.

Kiso Suzuki Violin Co. LTD. WE-150 Made in Japan
The frets was extremely dirty and full of something green that almost looked like moss. I cleaned, dressed and polished them and then oiled up the fretboard with lemon oil. I adjusted the neck and set it up so now it plays really well with low action without any buzzing. A great Japanese made Kiso Suzuki WE-150 from 1980 that looks almost new.

Levin model 65

Levin Model 65 parlour guitar Made in Sweden 1942

Last weekend I decided to try to improve the playability a bit on my little parlour Levin model 65 from 1942. It doesn’t have an adjustable trussrod, few guitars did before the 1960’s, and would probably benefit from a neck reset but I thought I should start with the easy things first. Like making a new bridge that is a bit lower and that way get the action down and it worked really well. The easiest would have been to just file down the original bridge but I felt I rather make a new one than mess with the old one.

Update: July 31, 2014
I actually carved a new bridge from scratch, you can read about it here: How to… carve a bridge, that worked out ten times better.

Levin Model 65 parlour guitar Made in Sweden 1942

Levin Model 65
Body width: 315 mm
Spruce top, birch back and sides.
Unbound top, back and headstock.
Unbound walnut fingerboard with mother-of-pearl dot inlay
Rosewood bridge, brass tuners, nickel plated tailpiece
Dark brown finished neck, back & sides.
Sunburst finished top and one year warranty

Levin Model 65 parlour guitar Made in Sweden 1942
Since the strings were off I thought I mights as well even out the fretboard a bit and polish the frets. I cleaned the edges of the frets with a toothbrush and then oiled up the fretboard with lemon oil. I managed to cut through the old glue with a razor blade and that way get the old bridge off.

Levin Model 65 parlour guitar Made in Sweden 1942
I think this bridge has been re-glued a couple of times since 1942 and that’s why some of the nitro lacquer came off. It’s hard to tell, it might have looked like that for 60 years under the bridge, who knows. Either way there isn’t much to do about it so I will just try to ignore it for now. If I can’t stand it I can always put the original bridge back. I got a cheap replacement rosewood bridge from eBay, straight from China for 3.50€. Now I just had to get the angle right, Levin always has their floating bridges in an angle, maybe it’s the same for all floating bridges. I copied the old bridge to get the angle right and started to make it as low as possible. Of course I cut my thumb after about 12 sec and had to rethink my methods of getting the bridge lower. In the end it was a combination of knife, a Swedish Morakniv of course, and sandpaper before I oiled it up with lemon oil to get it dark and nice. I read on Swedish forum that a great trick to get this parlour guitars to sound less jangly or rattly is to mute the tail piece. Apparently the main reason why these small bodied guitars sound like they do is because of the rattling tail piece. I muted mine with half a black sock that I tucked in so you can’t see it and it really made wonders to the sound. It’s a lot warmer and more woody now.

Levin Model 65 parlour guitar Made in Sweden 1942
I copied the string spacing from the old bridge, made a notch with a knife and then filed it down with folded fine sandpaper and a round file. I also realised that since I had to take so much off in the bottom on the high E side, the bridge looked really unbalanced so I cut of a chunk on the other side and rounded off all the edges to try to create a nice looking bridge.


How to… refret a guitar

How to… refret a guitar
Tokai Love Rock LS-55 Les Paul Standard “Made in Japan” 1991

It’s done, it’s all over, I can retire and put my luthier’s tools on the shelf now. Everything I’ve been doing for the last year has been leading up to this moment, to refret my beloved Tokai Love Rock. I decided about a month ago to learn how to refret, crown, dress, polish and care for the frets of my guitars. A fairly wise decision I think since it turned out to not be as hard as everyone said and it has saved me ridiculous amounts of money since people charge 300-400€ for refretting guitars here. I did spend about 170€ on tools but hopefully they will last me a life time and if I refret a couple of more guitars it has soon paid for itself.

How to… refret a guitar
I decided to replace the humbucker rings as well since they were in such a bad state. When I got the Tokai I had to drill out the screws in order to replace them, so I could adjust the pickups, so the plastic rings was kind of super glued together and I have been meaning to replace them ever since. Now I did, with a fancy 3€ pair from China that I scratched with wire wool and then soaked over night in tea and later with coffee, to try to get them to look less new. The cat didn’t fully approve of my decision to spend 6 hours on Saturday refretting my Tokai when I could be rolling around on the floor with her instead. I tightened the pots too, I hate when the knobs feels wobbly, this is actually on my Westone Les Paul, I tightened the screws on quite a few guitars while I was at it. This is how bad the frets were before.

How to… refret a guitar
First step, removing the old frets. It went pretty easy, I was scared they would have been glued in so I would have to heat them with a soldering iron but the weren’t. I got a bit of chipping, I think it’s pretty hard to avoid on an old and well played rosewood fretboard. It wasn’t too bad and since the new frets will cover most of it I decided to just ignore it, sand the fretboard smooth like a babies bottom and the oil it up with lemon oil.

How to… refret a guitar
This was the part I was dreading the most, how to get the frets to fit without ruining the binding. You can get a fancy tool for doing this but I felt I didn’t want spend 85€ since I only have one guitar to refret with binding. I came up with the idea to take on fret at the time, match it to the old fret, cut it, then try to file down the under side so it wouldn’t cut in too much into the binding. I tried my best to file the edges and corners as well, since it would be hard to reach once the fret was in place. It took forever, it hurt my fingers and I hated it but it worked and I guess was worth the 85€ I saved on doing it by hand, fret by fret.

How to… refret a guitar
I made sure the neck was straight with my straight edge and then I marked the top of the frets with a black marker, just to see how much I was taking of when I later leveled the frets. Next step was to crown the frets, make sure everything was straight and even with a fret rocker, file the edges a bit more and then just polish the frets with sand paper and later wire wool.

How to… refret a guitar
How shiny, smooth and awesome is that? New Jescar FW47104 pre-radiused 12″ frets installed on a 1991 Japanese Tokai Love Rock LS-55. Just look at those freaking edges, I’m so proud I could burst. I doubt anyone could have done a better job, even if they would have charged me 400€.

How to… refret a guitar
I decided to go over my old Claescaster as well. This is the good part with having all the tools needed for taking care of your frets. It cost nothing to make sure that things are in a perfect state. I bought both Claescaster necks from the same guy in the UK, First Avenue Guitars. When I bought the first one it was pretty hard to find cheap necks with a vintage tint, especially with a logo fitted under the lacquer. I really like the profile of these too, it’s a normal C but it feels pretty fat and nice so I got a second one for the new Claescaster. The only problem, as with all cheap necks, is that the edges aren’t that smooth so I decided to level, crown, dress and polish them, with extra detail to the corners. Now it feels better than ever.

How to… refret a guitar
Looks pretty good. I decided to put a couple of drops of dry Teflon lubricate in the machine heads before I tightened all the screws and restrung the guitar. I read that these types of dry lubrication for bicycles are good because the attract less dust and crap than normal wet oils so for 4€ I thought it was worth a try. A quick adjustment of the Wilkinson brass saddles and then we are all set. Ready to play.

How to… refret a guitar

I finally did it, I refretted my first guitar, well I actually did it twice. First out was my old Morgan Telecaster neck, a leftover from my first Claescaster. I don’t use it so it felt like a perfect neck to practice on, especially since it doesn’t have any binding. It was actually less hard work than I expected it to be, well it took some time to get the old frets out but still, no major issues. I just had to get over that first fear that I would break something and eventually build up some confidence that I knew what I was doing.

How to refret a guitar
First I checked that the neck was straight with a straight edge and adjusted the trussrod until it was perfect. It was a lot easier to get the old frets out if you cut in a bit on each side with a sharp knife, it gave the pliers something to grip, but be careful so you don’t slip and scratch the fretboard, as I did. I used normal wood glue and then gently tapped the new Jescar FW43080 fretwire in place. When the fret edges were cut I taped the fretboard with masking tape and then filed down the edges, first straight and then angled the file 45°.

How to refret a guitar
I checked that all the frets were the same height with a fret rocker and since they were I didn’t bother to level the frets, maybe I should have. I crowned them with a Uo-Chikyu medium fret crowning file and then softened the edges with a Uo-Chikyu edge file. I went of the frets with 400 and 800 grit and then polished until I couldn’t feel my shoulder with wire wool.

How to refret a guitar
I’m pretty damn pleased and proud of my first refretted neck.

How to refret a guitar
I decided to change the frets on my EKO Ranger VI as well, even thought I had just crowned and polished them two days ago. I want to get as much practice as possible before I start with the Tokai and to get a feel for the difference between rosewood and maple fretboards. I made a deep cut on the side of the frets which made it really easy to get a grip and pull out the old frets. It was actually so easy that I forgot to be careful and just ripped them out and managed to chip the fretboard. Which in a way was good so I got the chance to glue the chip down, sand down and then polish the fretboard, now I know how to deal with that as well.

How to refret a guitar
Unfortunately I had bought some cheap non pre-radiused fretwire which meant that I had to try my best to get the correct radius by bending it which wasn’t that easy. I will never get that again, but at least now I know how annoying it is with fretwire that isn’t pre-radiused. I ended up with pretty rough edges, it felt like it was harder to cut than the Jescar, so I had to work a lot to file them smooth. Then I levelled the frets, crowned them, filed the corners and polished with 400, 800 grit and then wire wool.

How to refret a guitar
The final result, a refretted EKO Ranger VI. It used to have some dead spots around the 12th fret which disappeared straight away with the new frets.

Movie of the day

I'm with the Band: Confessions of a Groupie

Araceli and I spend the Saturday night watching two awesome groupie documentaries. We had both read Pamela’s book, I’m with the band, so we kind of knew what to expect. We also saw Gram Parsons: Fallen Angel but I can’t seem to find that on Youtube, I had to download it.

Hondo II P-bass

Hondo II P-bass

I just bought another Hondo II P-bass on eBay, this time for my work colleague Verushka from the Barcelona based punk band Sect. The listing stated that the bass was untested so hopefully it doesn’t work and I got a lot of work to do before it’s ready to be played. Dani is selling his Hondo II but Verushka and I decided that black was more her and then we found this beauty.