Claescaster

Category: How to

Levin LM-26

Levin LM-26 1959Levin LM-26 1959Update: January 26, 2014 My Levin LM-26 from 1959 is now finished

Levin Goliath ad 1962
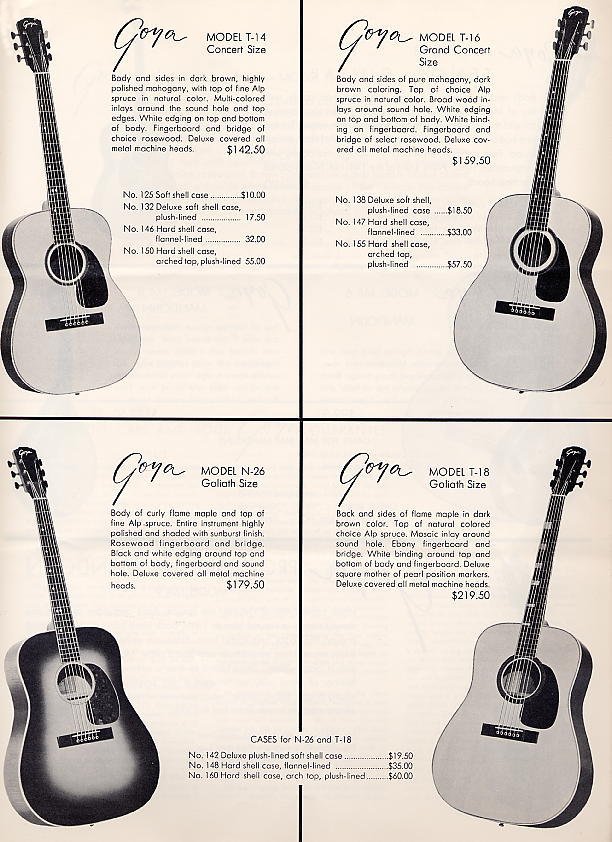
Bell ad from 1962 for the wonderful extra large sized Levin Goliath Model 1795

As I mentioned in my previous post about Levin I managed to win a Levin LM-26 on eBay back in December. It turned out to be in a worse state than I expected which I guess is both good and bad. Bad because it’s unplayable so I still don’t know how it sounds, good because I’m forced to learn a lot of new things, like how to remove the neck on an acoustic guitar. The Levin LM-26 was sold as The Levin Goliath Model 1795 in the UK and I think they sold pretty well, even Pete Townshend had one. They have spruce top with flame maple back and sides, all solid as always with Levin. If you want to know how old your Levin or Goya is then check Vintage Guitars Sweden. Levin serial numbers / Goya serial numbers

The Who in 1963 as the Detours, Pete Townshend playing a Levin Goliath LM-26
Pete Townshend is playing a Levin Goliath LM-26 in 1963 with Detours, later The Who

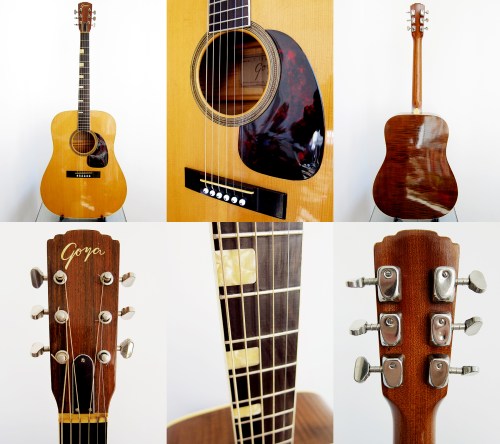
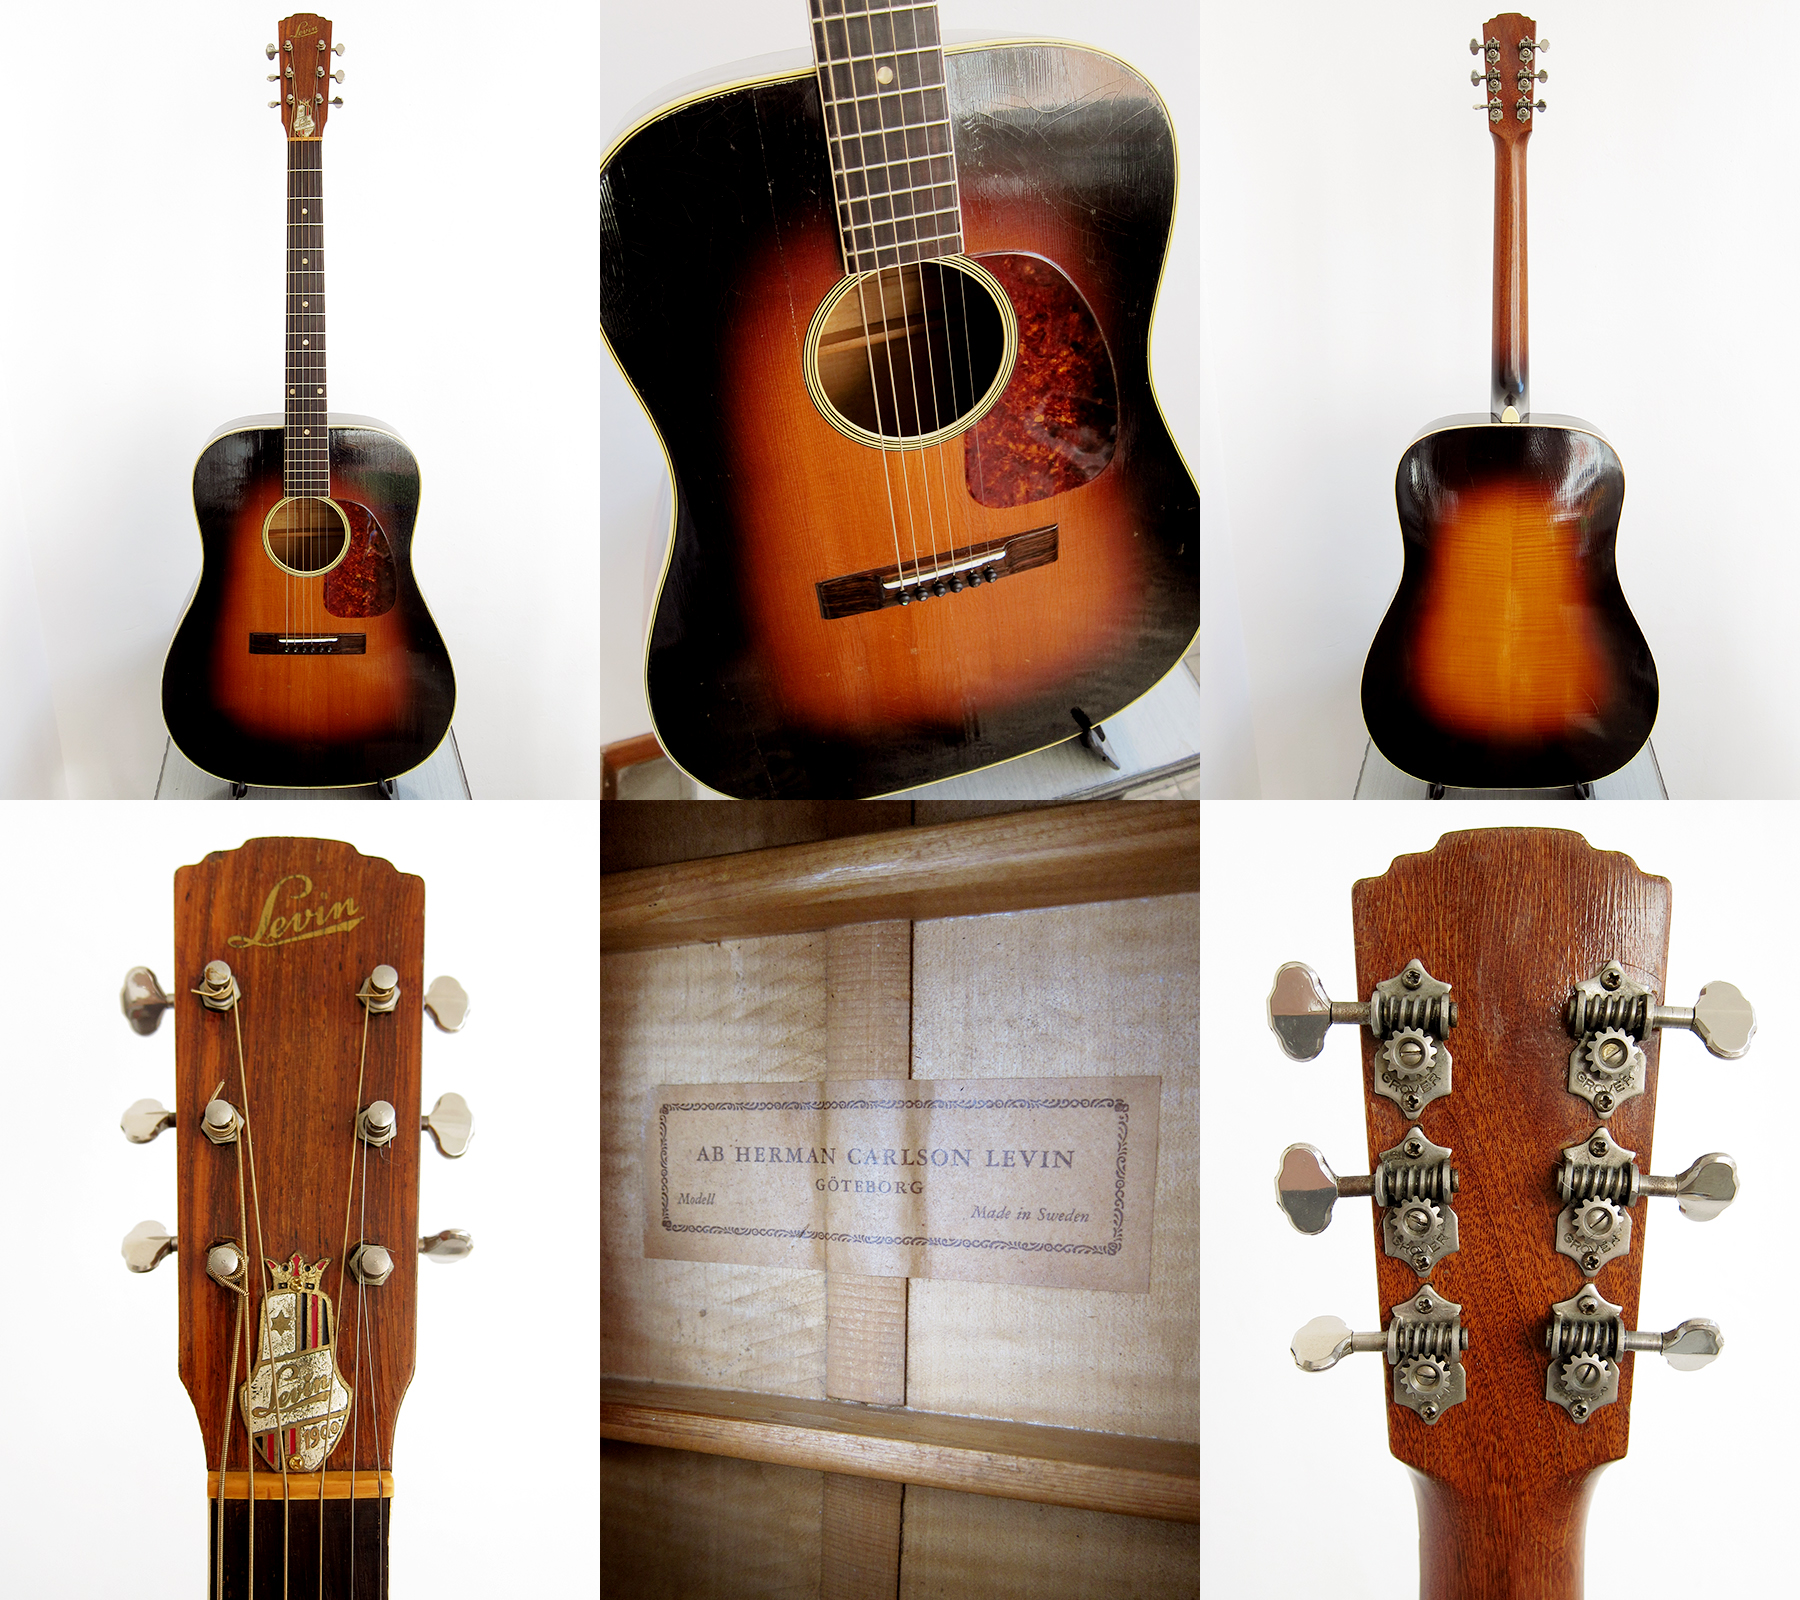
Levin LM-26 / Goya M-26
Goliath size: Body width: 400 mm, body length: 505 mm, body depth: 95/120 mm
Fingerboard width: 43 mm, scale length: 630 mm
Spruce top, flame maple back and sides, 4-ply bound top, single-bound back
Mahogany bolt-on neck with adjustable truss rod
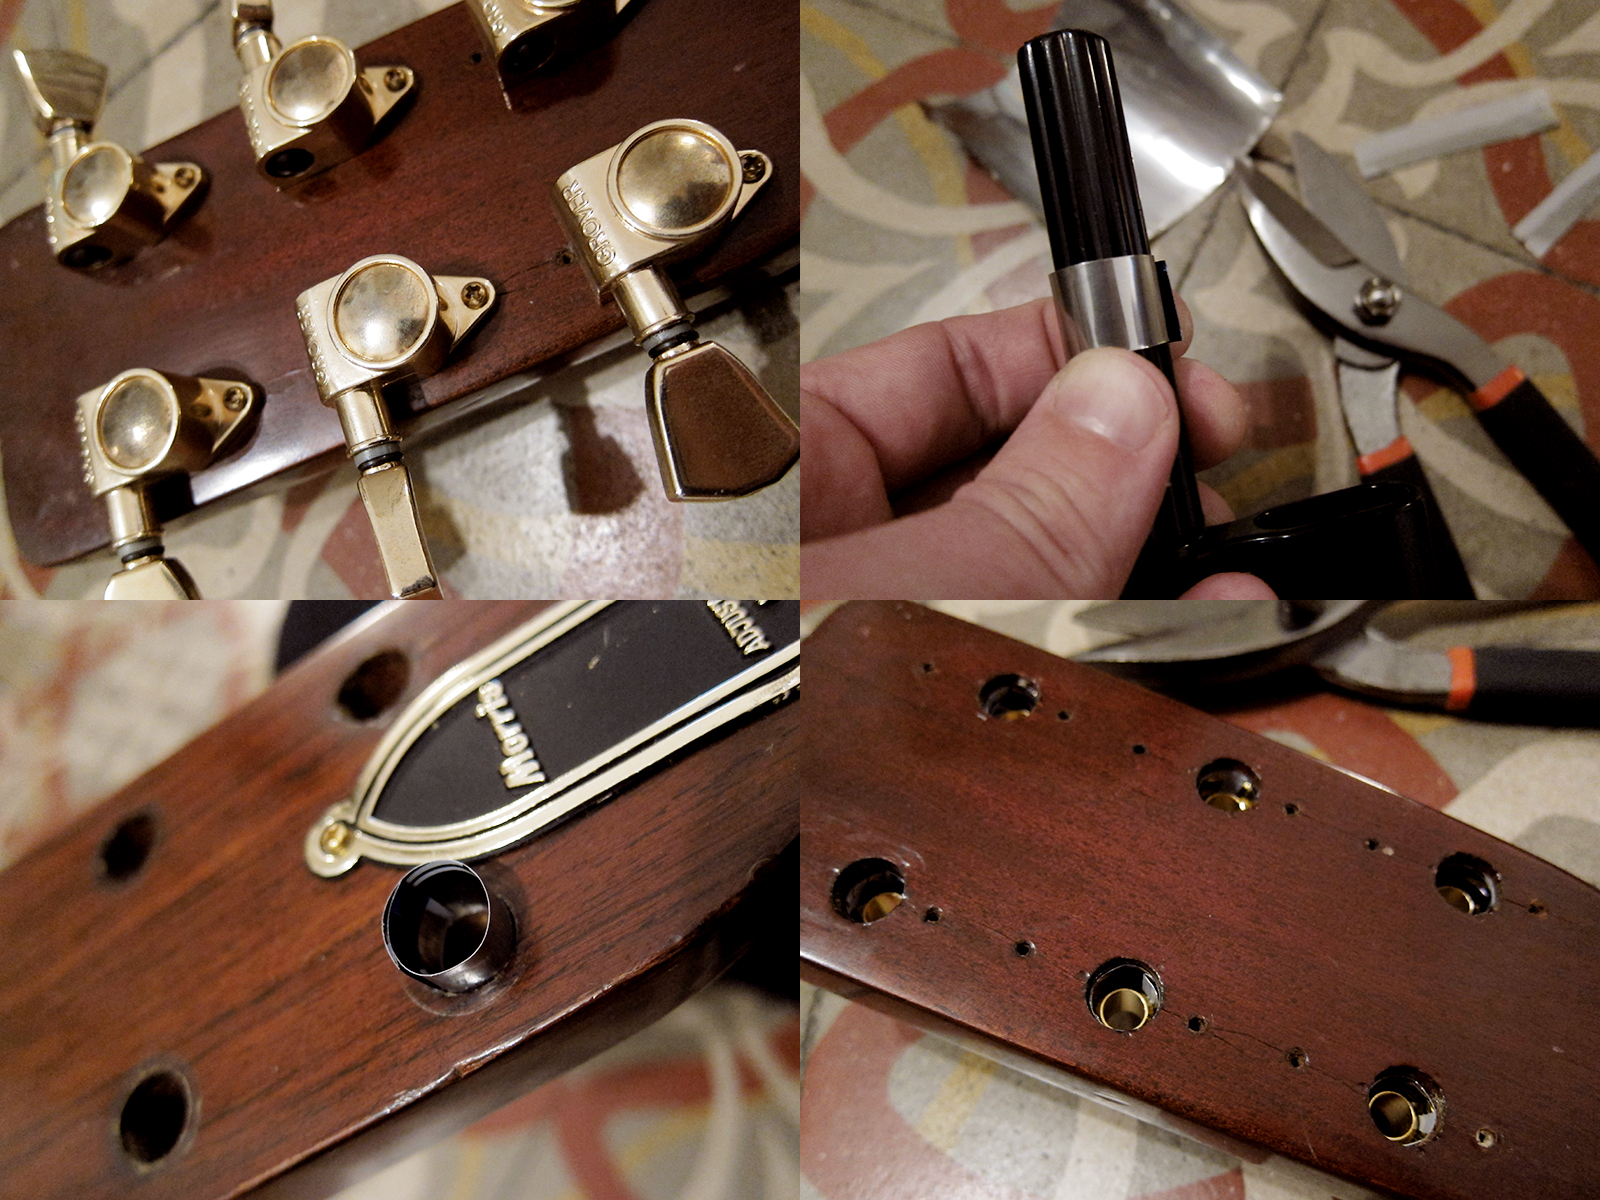
Metal truss rod cover with a star and “1900”, nickel plated tuners
Single-bound rosewood fingerboard with centered pearl dot inlay, rosewood bridge
Sunburst finish and ten year warranty

Marketed by U.K. distributors as Goliath Model 1795.

Levin LM-26 1959
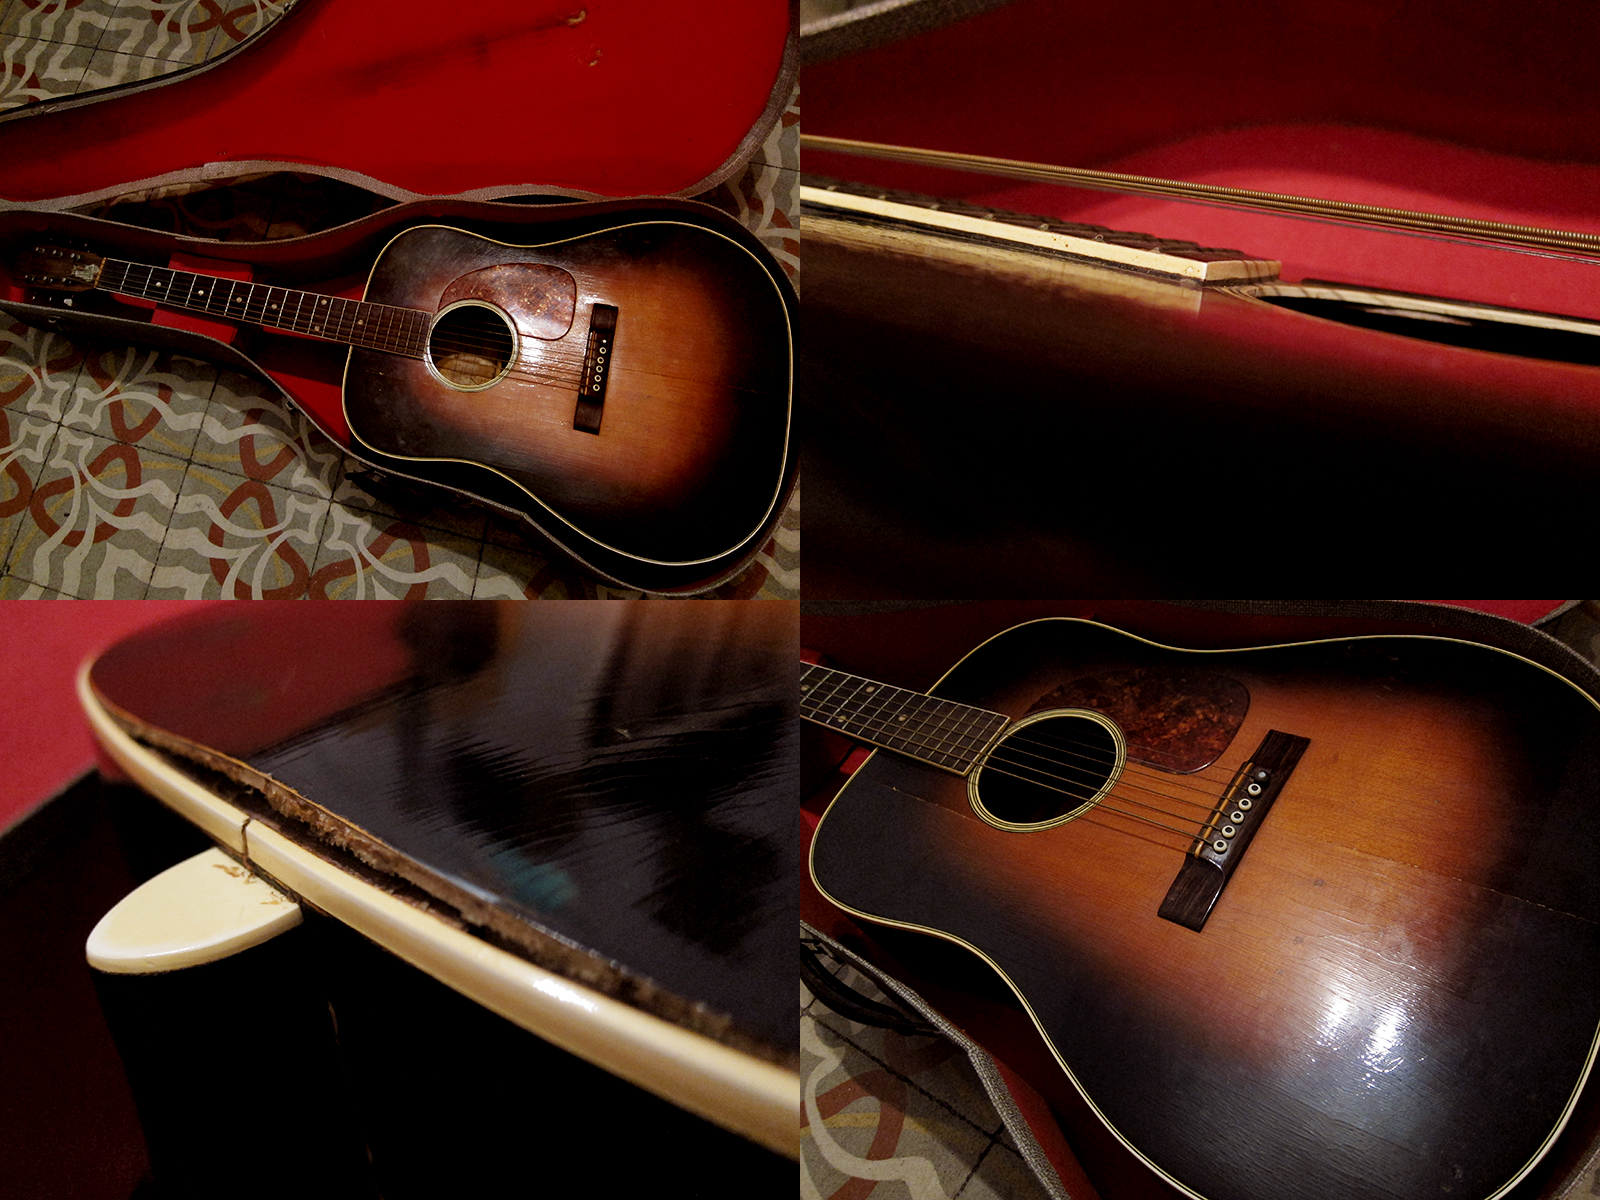
Levin LM-26 from 1959, well the body is actually stamped with a number from 1958, the year this model was introduced. I’m not sure if they used an old body when they put they guitar together at the Levin factory in Gothenburg in 1959 or if someone changed the neck when the guitar came to the UK. The previous owner for the past 51 years, Roger, bought the guitar second hand in 1963 for £40 from Bill Greenhalgh Ltd, 125-127 Fore Street in Exeter. Roger changed the original machine heads to Grovers in 1965, it’s otherwise all original. The action was so high that I could almost fit my hand under the strings so I had to remove the neck and reset it. There are a few things that needs to be glued as well, the back is lose and there are 2-3 cracks in the top.

Levin LM-26 1959
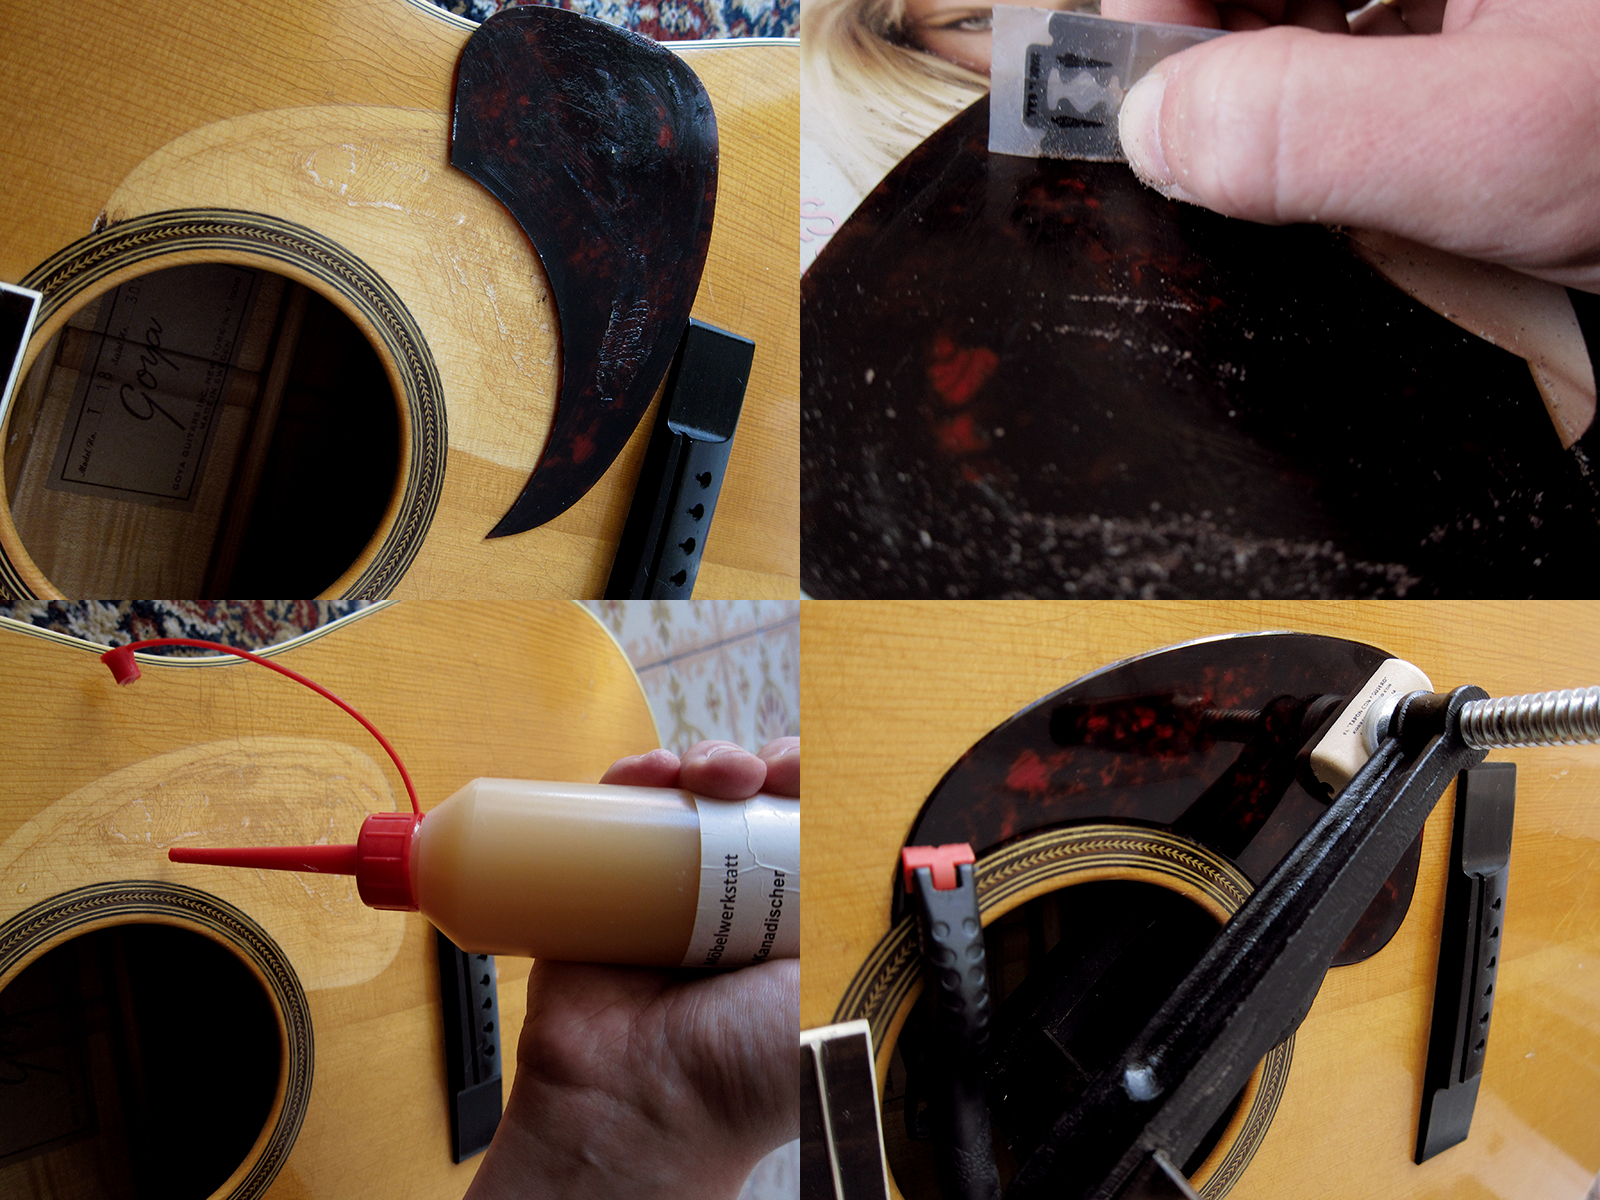
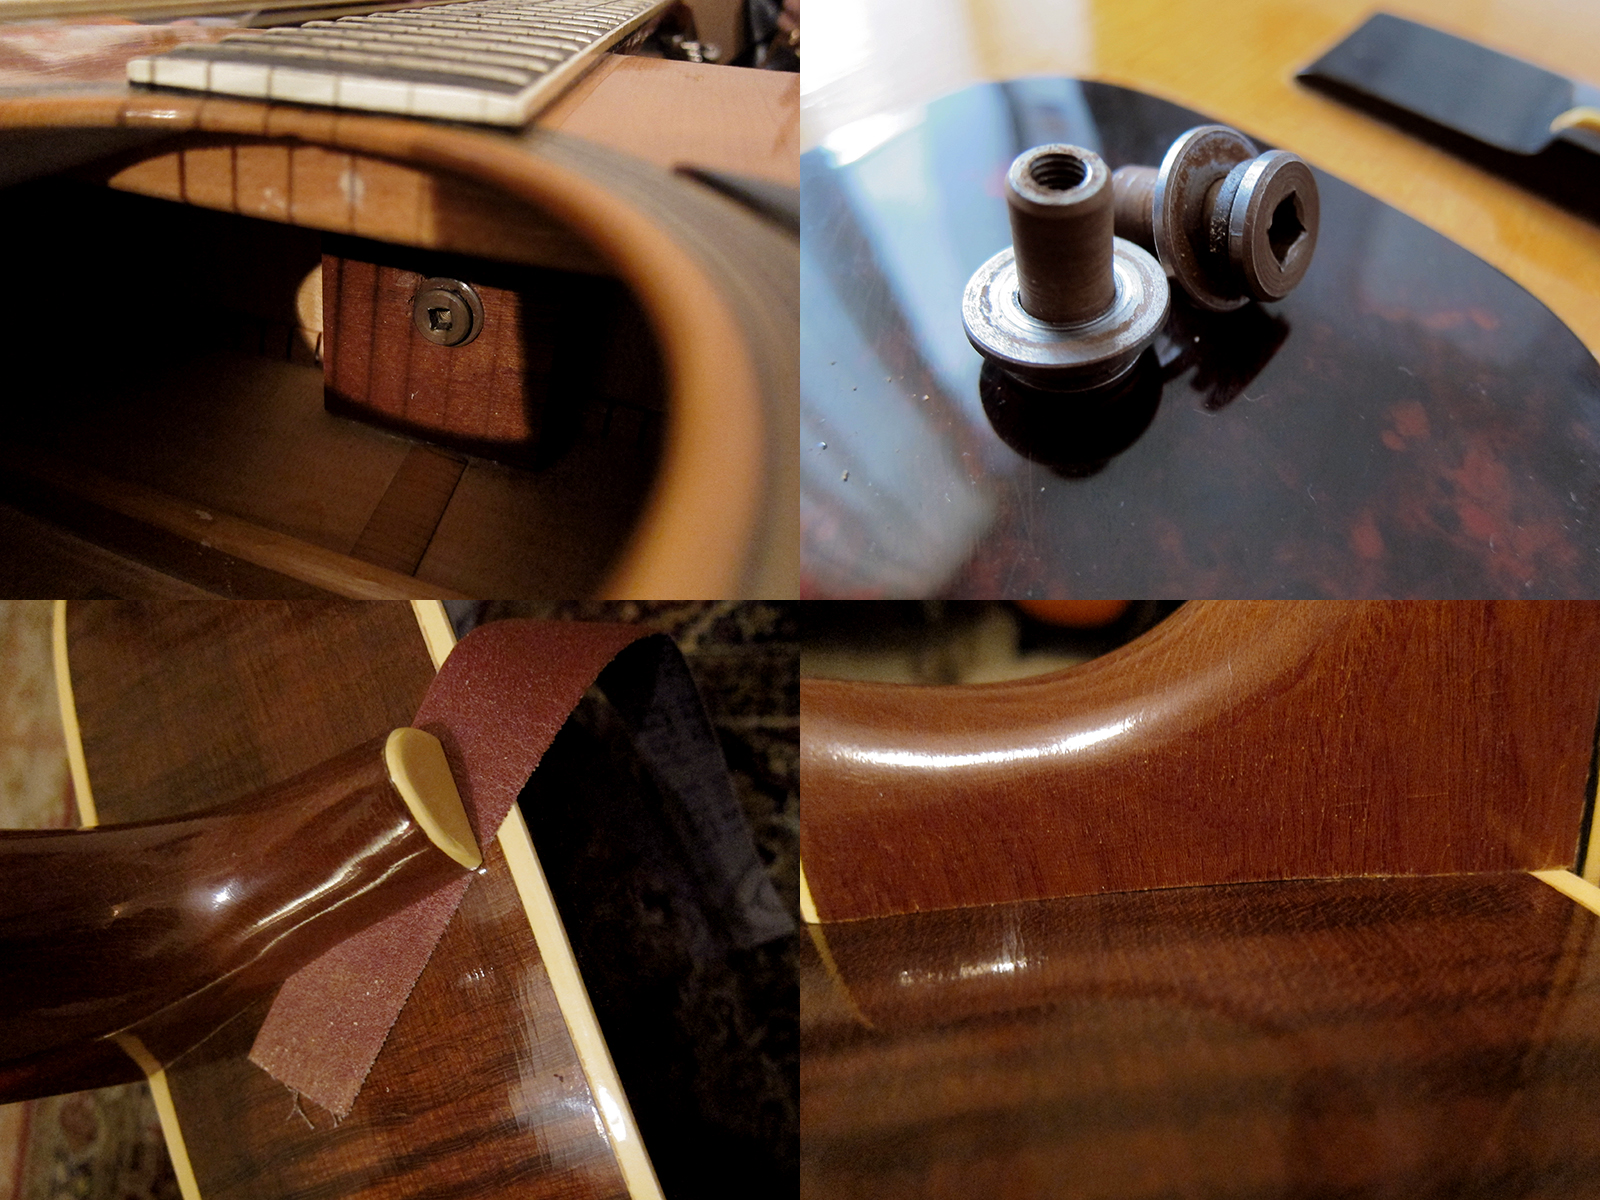
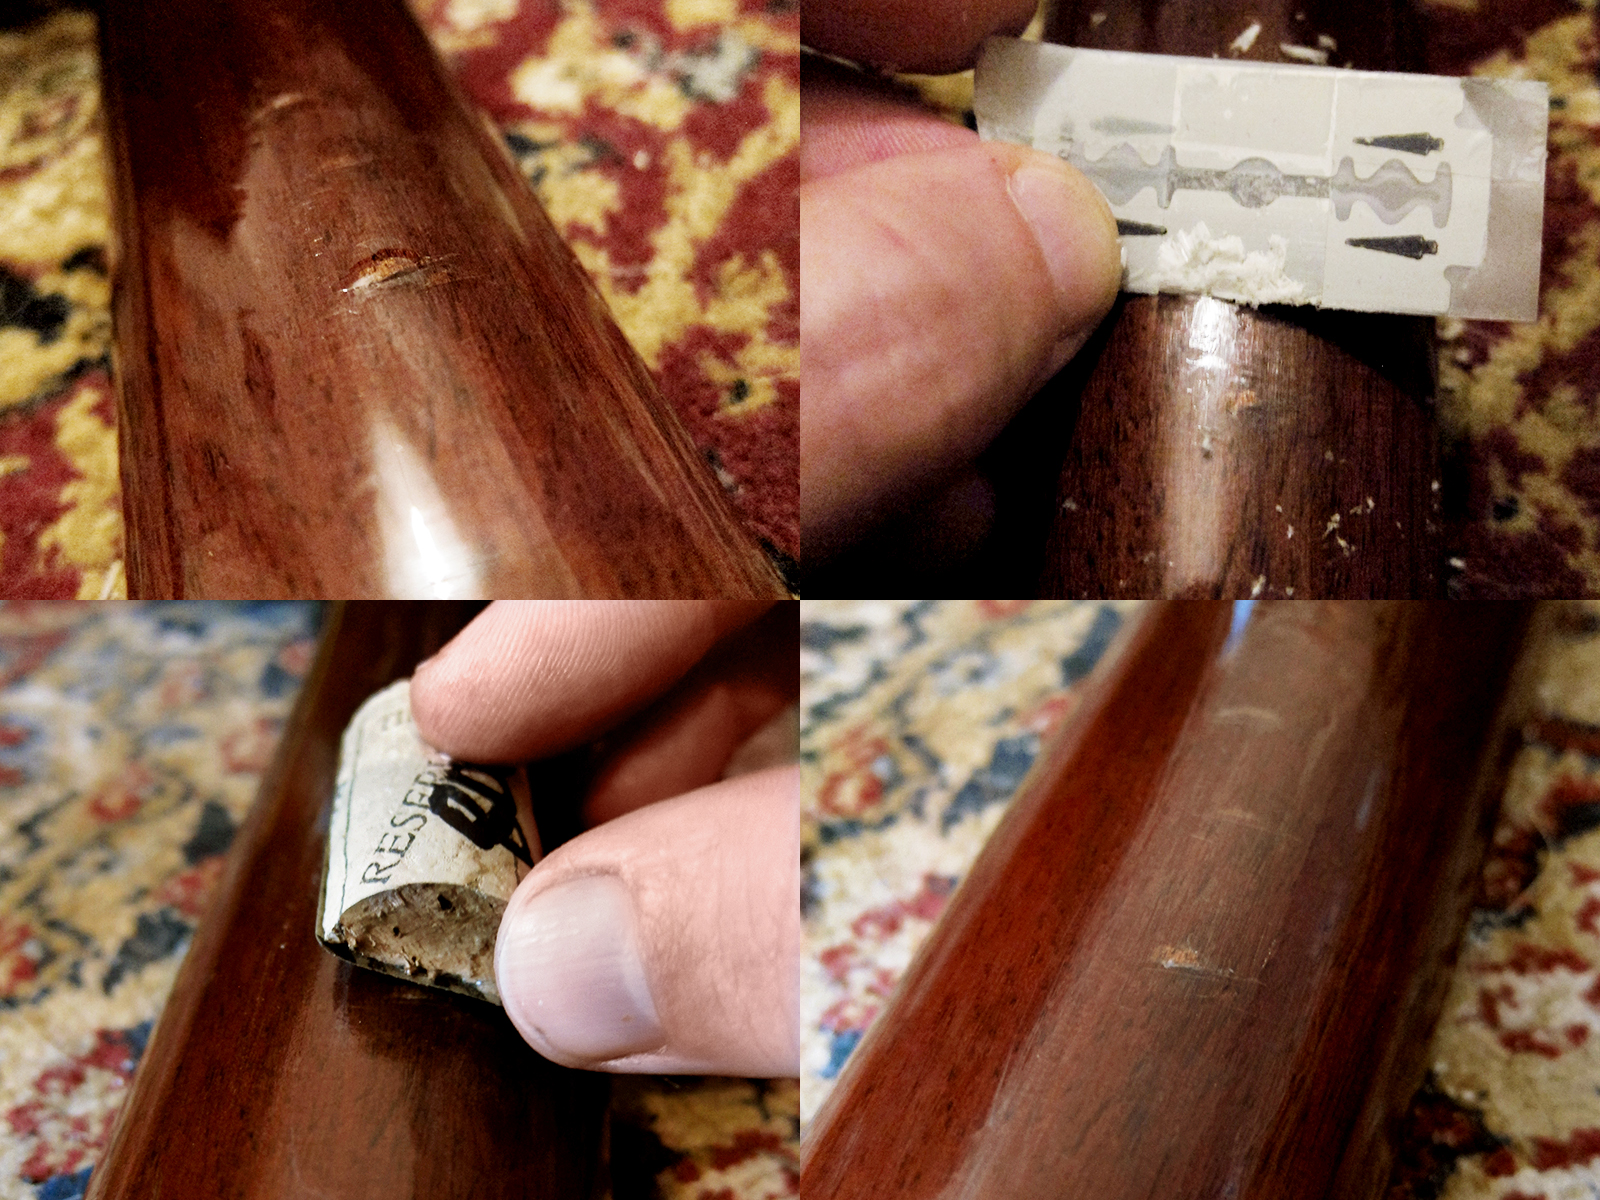
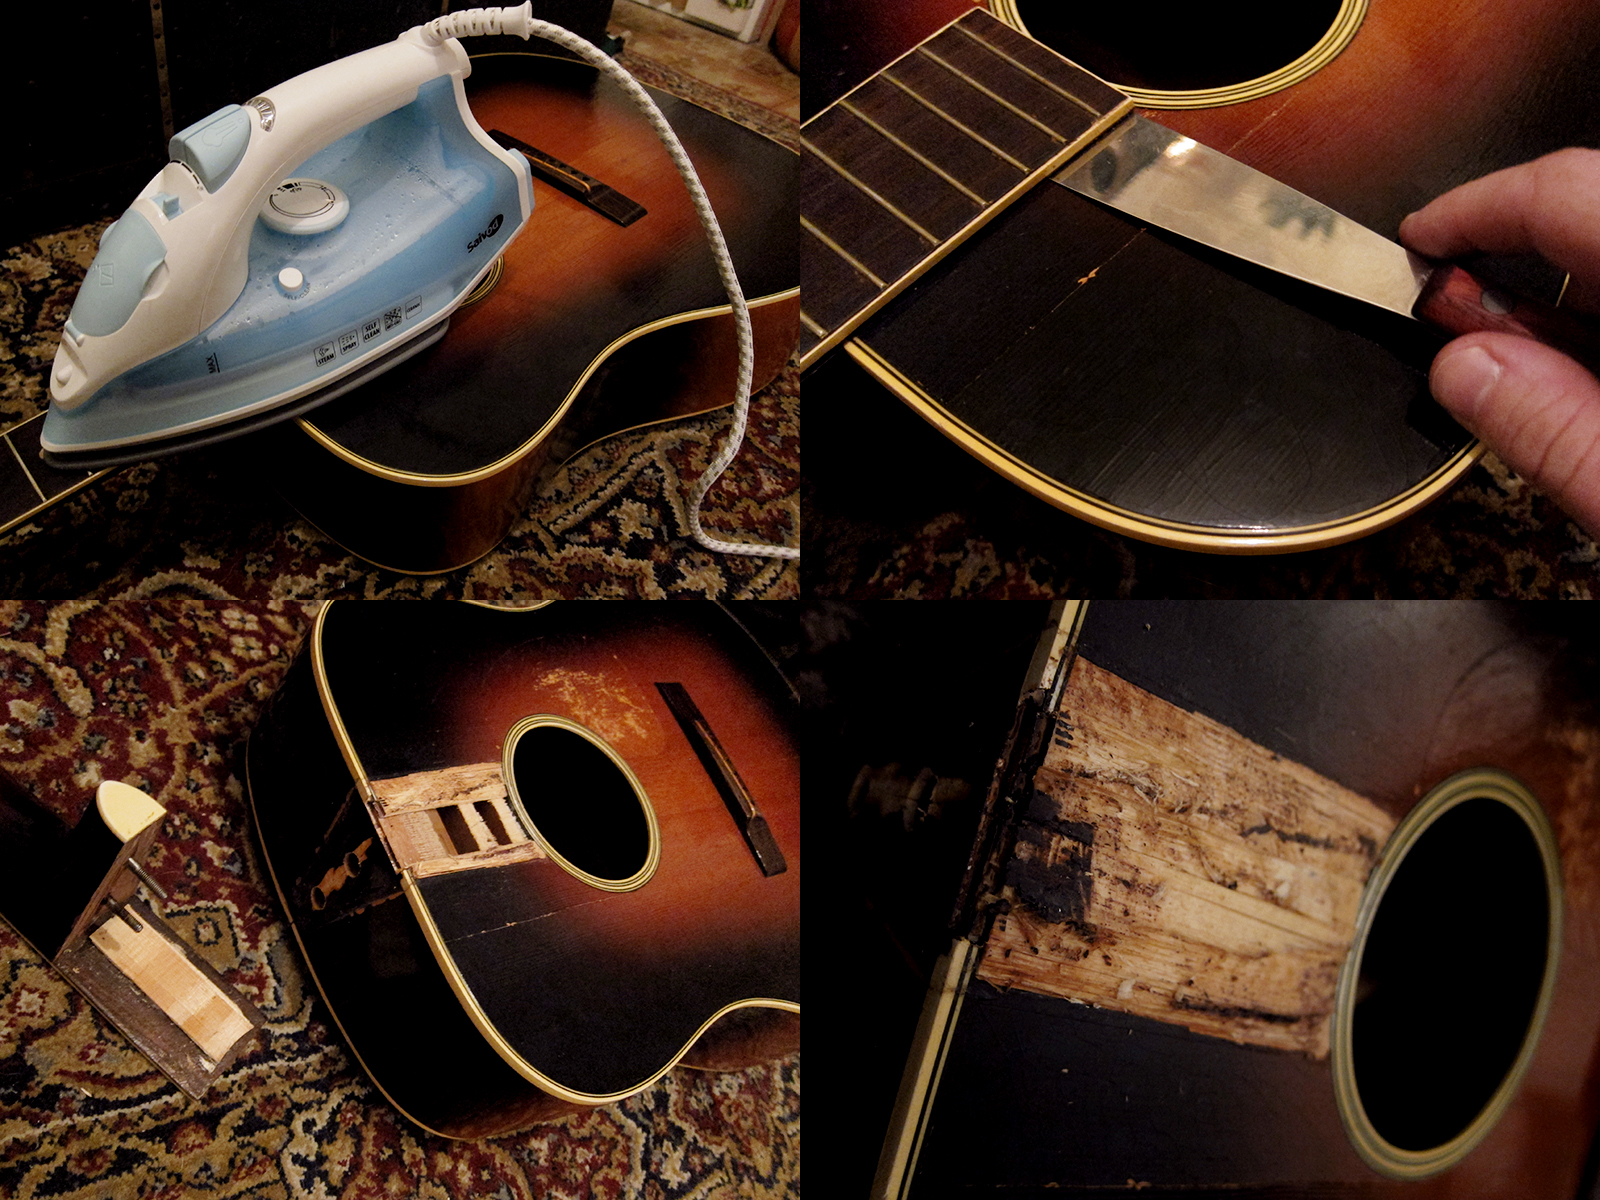
I have never removed a neck before so I was pretty nervous about this part. It’s supposed to be one of the trickier things to sort on an acoustic guitar but luckily this neck was fixed with the Levin bolt-on neck system which made it a lot easier. I removed the two bolts inside and the heel came lose straight away, now I only had to loosen the fretboard overhang. I removed the pickguard with a razor blade, cutting under the edge, just to make sure I wouldn’t melt or damage it while removing the neck. Then I used a normal clothes iron to heat up the fretboard, I don’t have any fancy pants Stew Mac tools or special gadgets. I heated up the fretboard for 1-2 min and felt with my hand every 30 sec to make sure it didn’t get too hot, I thought if I could still touch it maybe I wouldn’t burn or damage the lacquer on the top. It took ages to get it off, I think I probably spent 1-2 hours per night for 3 nights in a row on this. The glue loosened more and more and in the end I could get a flat screwdriver in and bend it loose. Unfortunately a chunk of spruce decided to stick to the neck instead of the body but to be honest I expected worse damage than that on my first attempt to remove a neck. I used my clothes steamer and steamed the spruce loose from the mahogany neck, it peeled right off, and just glued it back in the neck pocket again.

Levin LM-26 1959
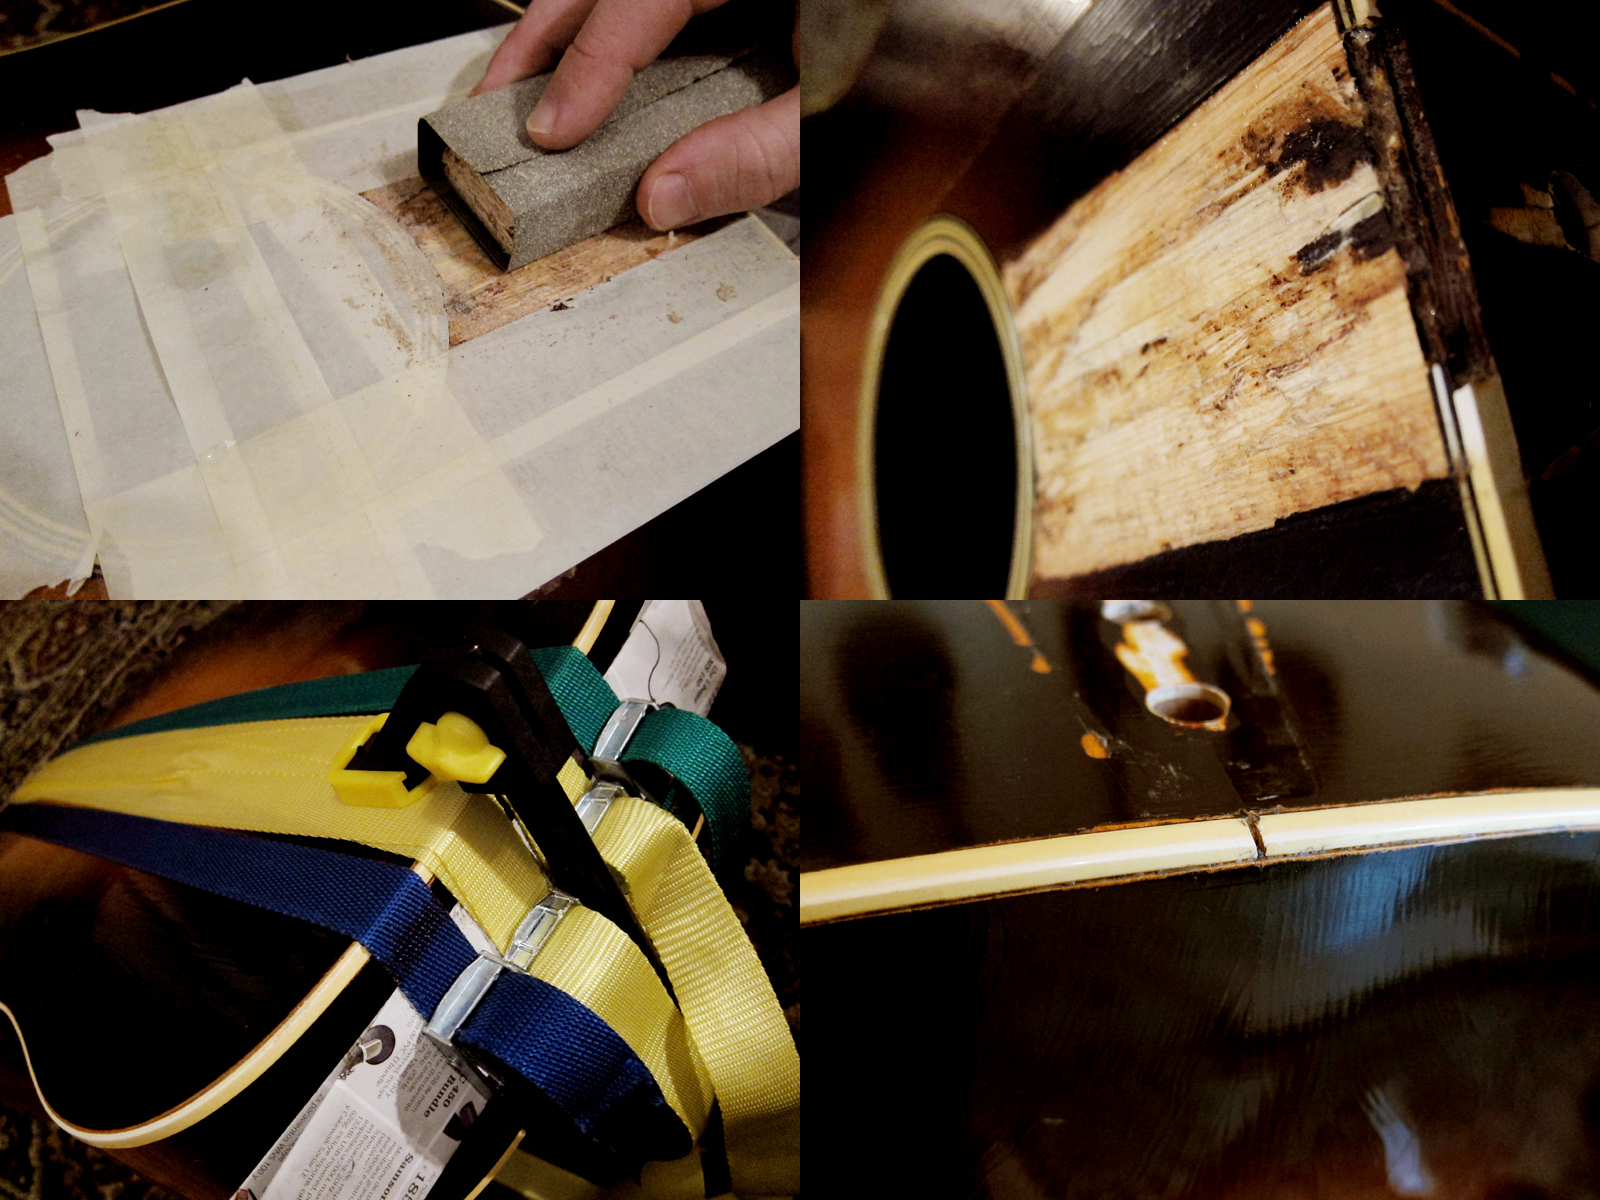
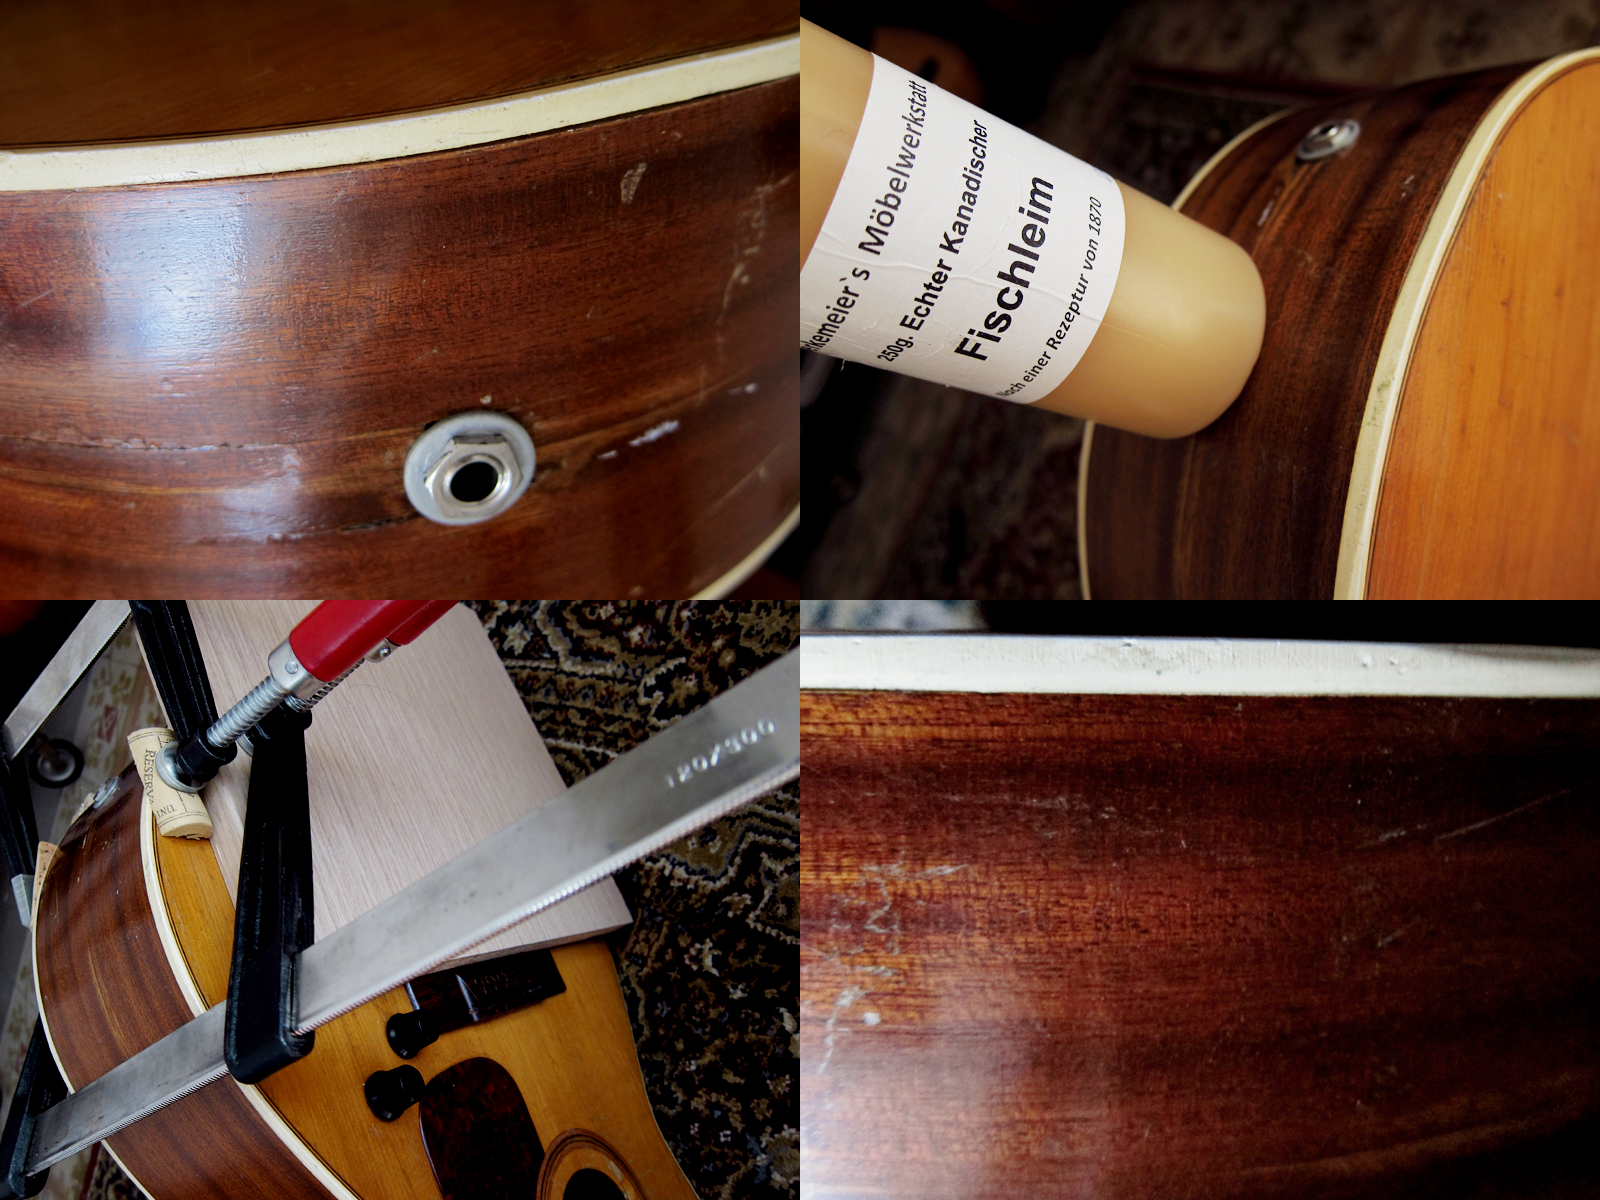
I masked off the top and sanded the pocket even so now the neck will fit fine once I’m ready to put it back on. I had to get the gap on the back closed. I’m not a master gluer and since you pretty much just get one shot, or rather it’s really annoying to remove and re-glue things if they aren’t perfect, I was a bit concerned about this too. I used plenty of fish glue and then 4 strong straps that could not only press in the back but also press down the the sides to close the gap as much as possible. I’m pretty pleased with the result, the gap is gone and it seems pretty solid.

Levin LM-26 1959
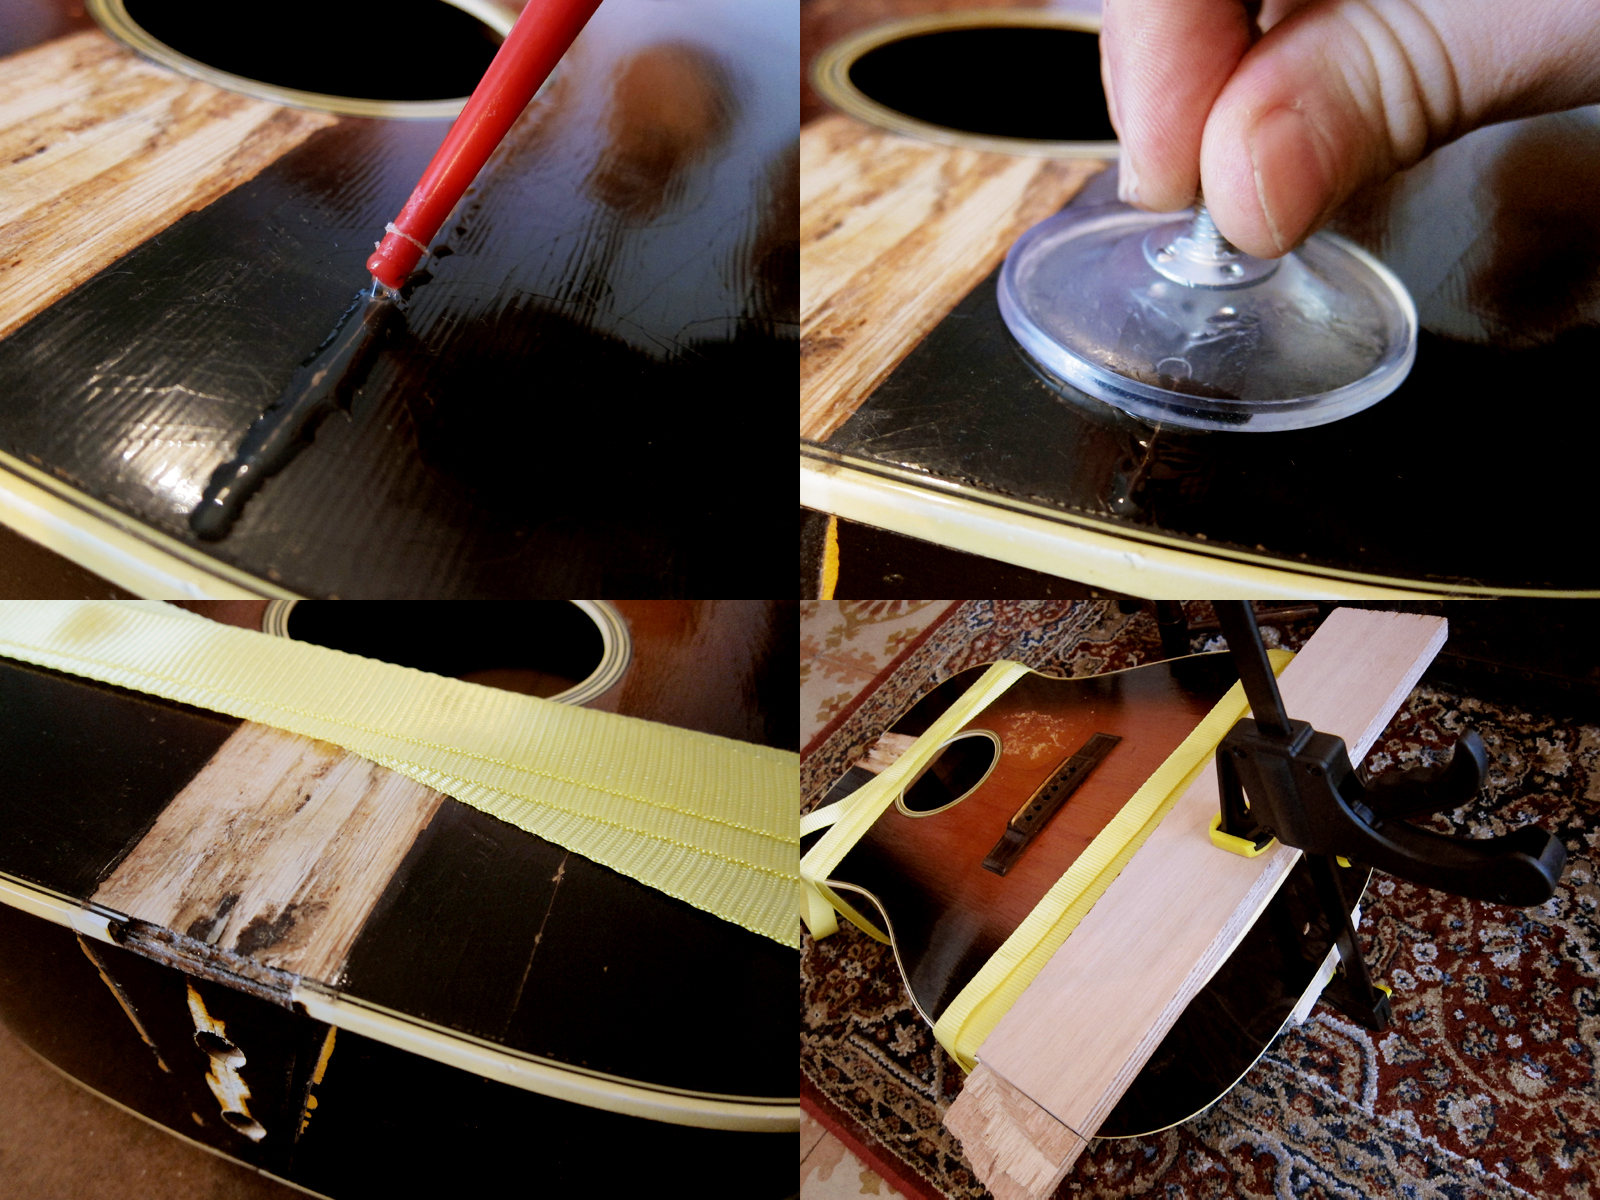
Next thing was to try to close the cracks on the top. One was all the way through and two was smaller hairline cracks. I filled everything with fish glue and used a suction cup to try to push in the glue in the cracks, I saw this on Youtube and it made sense to me so I tried it. Then I just strapped everything up and put a piece of wood the keep the main crack flat while it dries.

Levin LM-26 1959
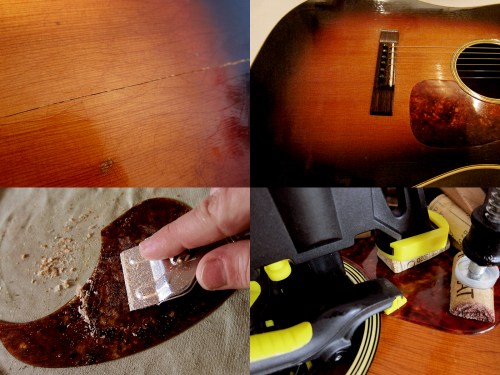
Once I had glued the cracks in the top, the first image shows before I started, I painted and lacquered the crack. I used normal matt black acrylic paint for the dark parts and just darkened the rest with furniture oil before I applied the nitrocellulose lacquer. Once the lacquer was dry I sanded the surface smooth with 400, 800, 1500, 2000 and 2500 grit. It worked really well, it’s actually hard to even see the big crack that went all the way from the edge to the bridge. I removed the old glue from the pickguard and then glued it back again. 

Levin LM-26 1959
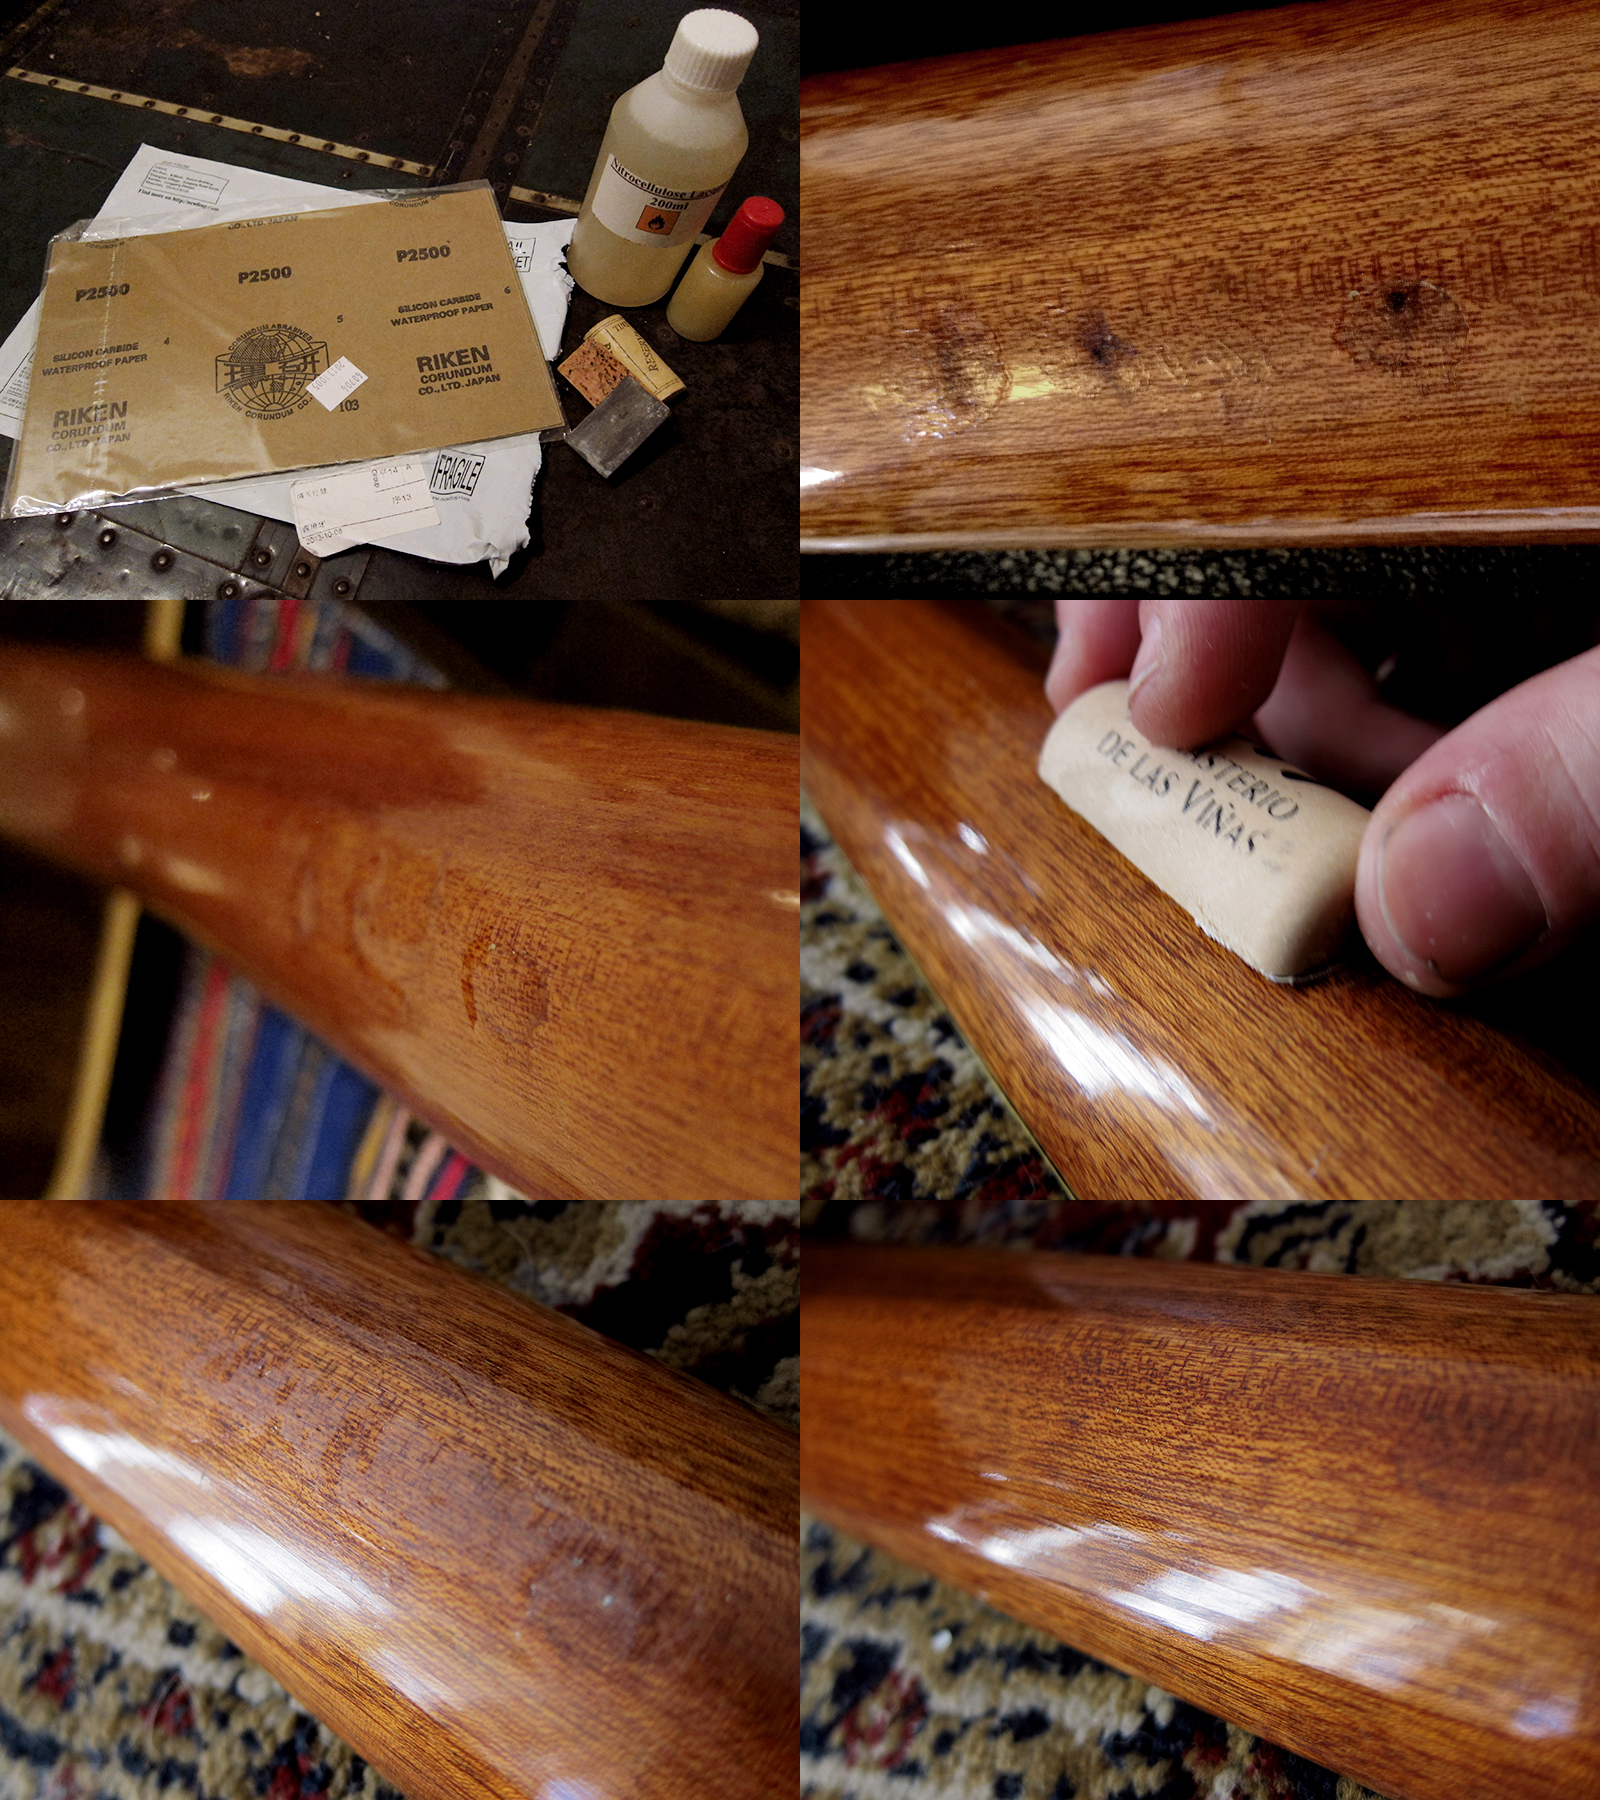
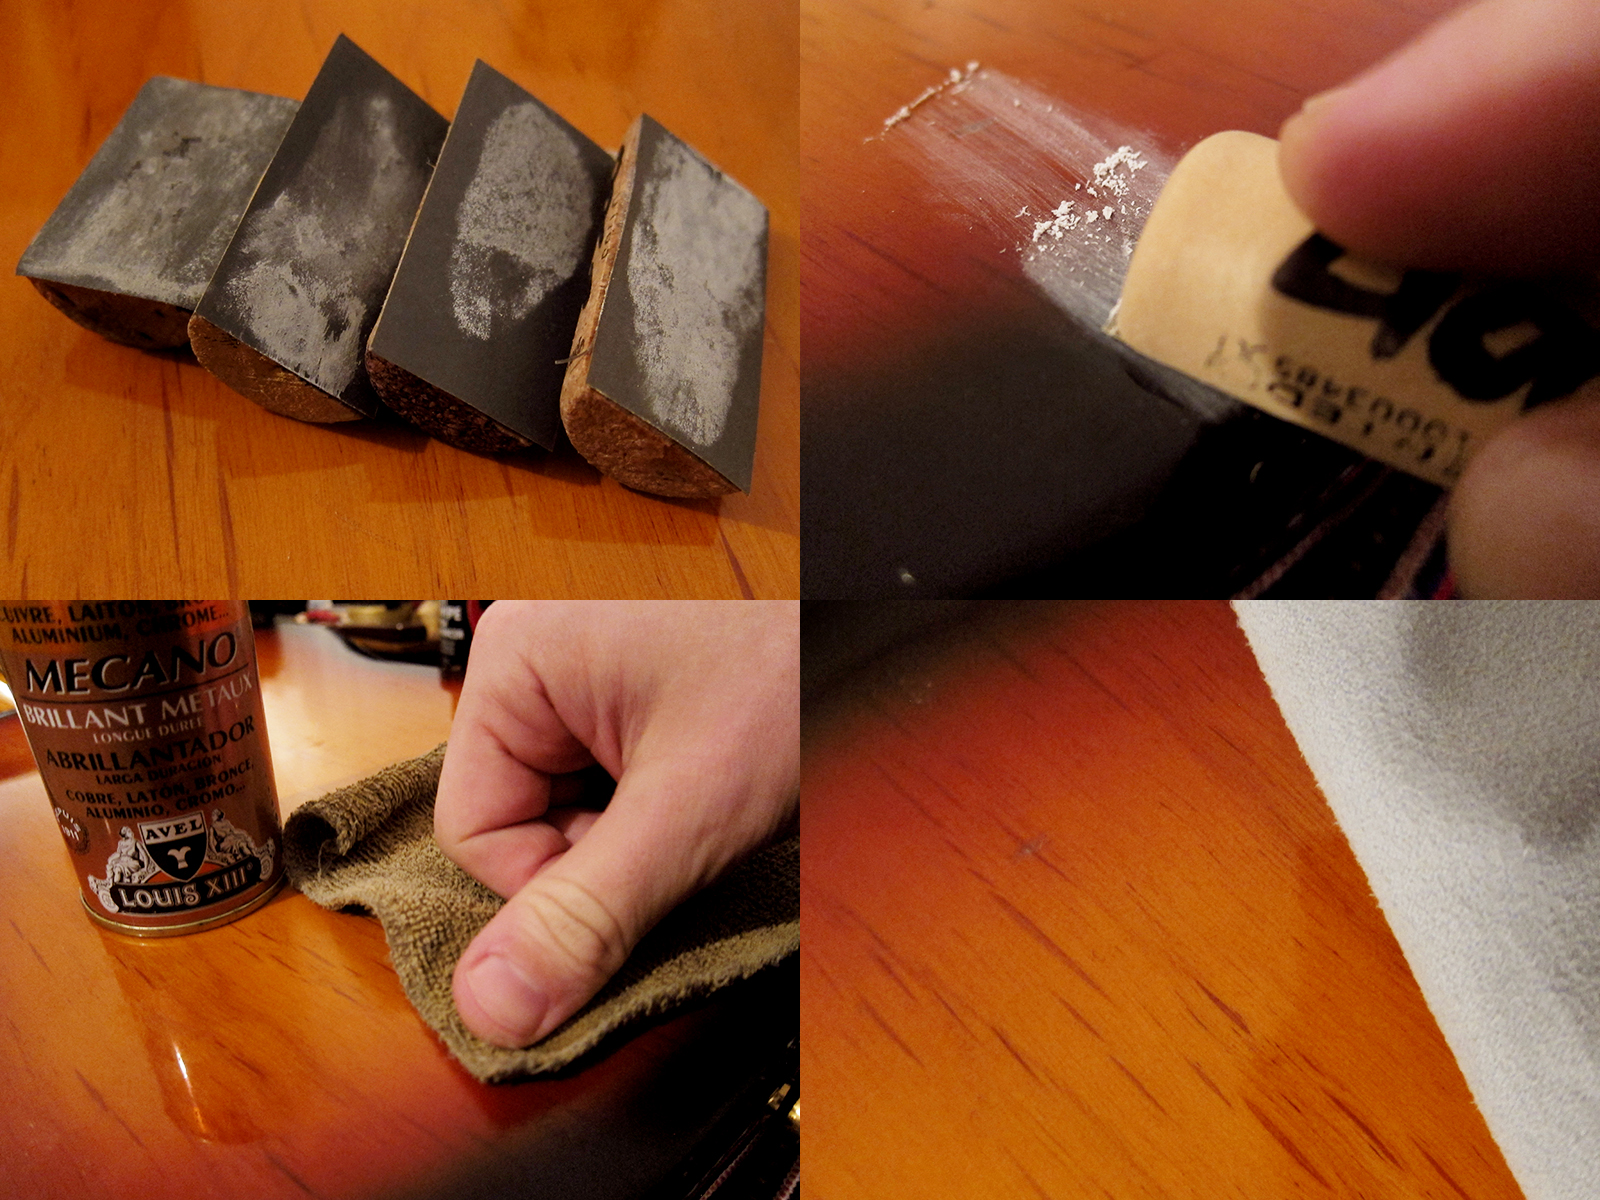
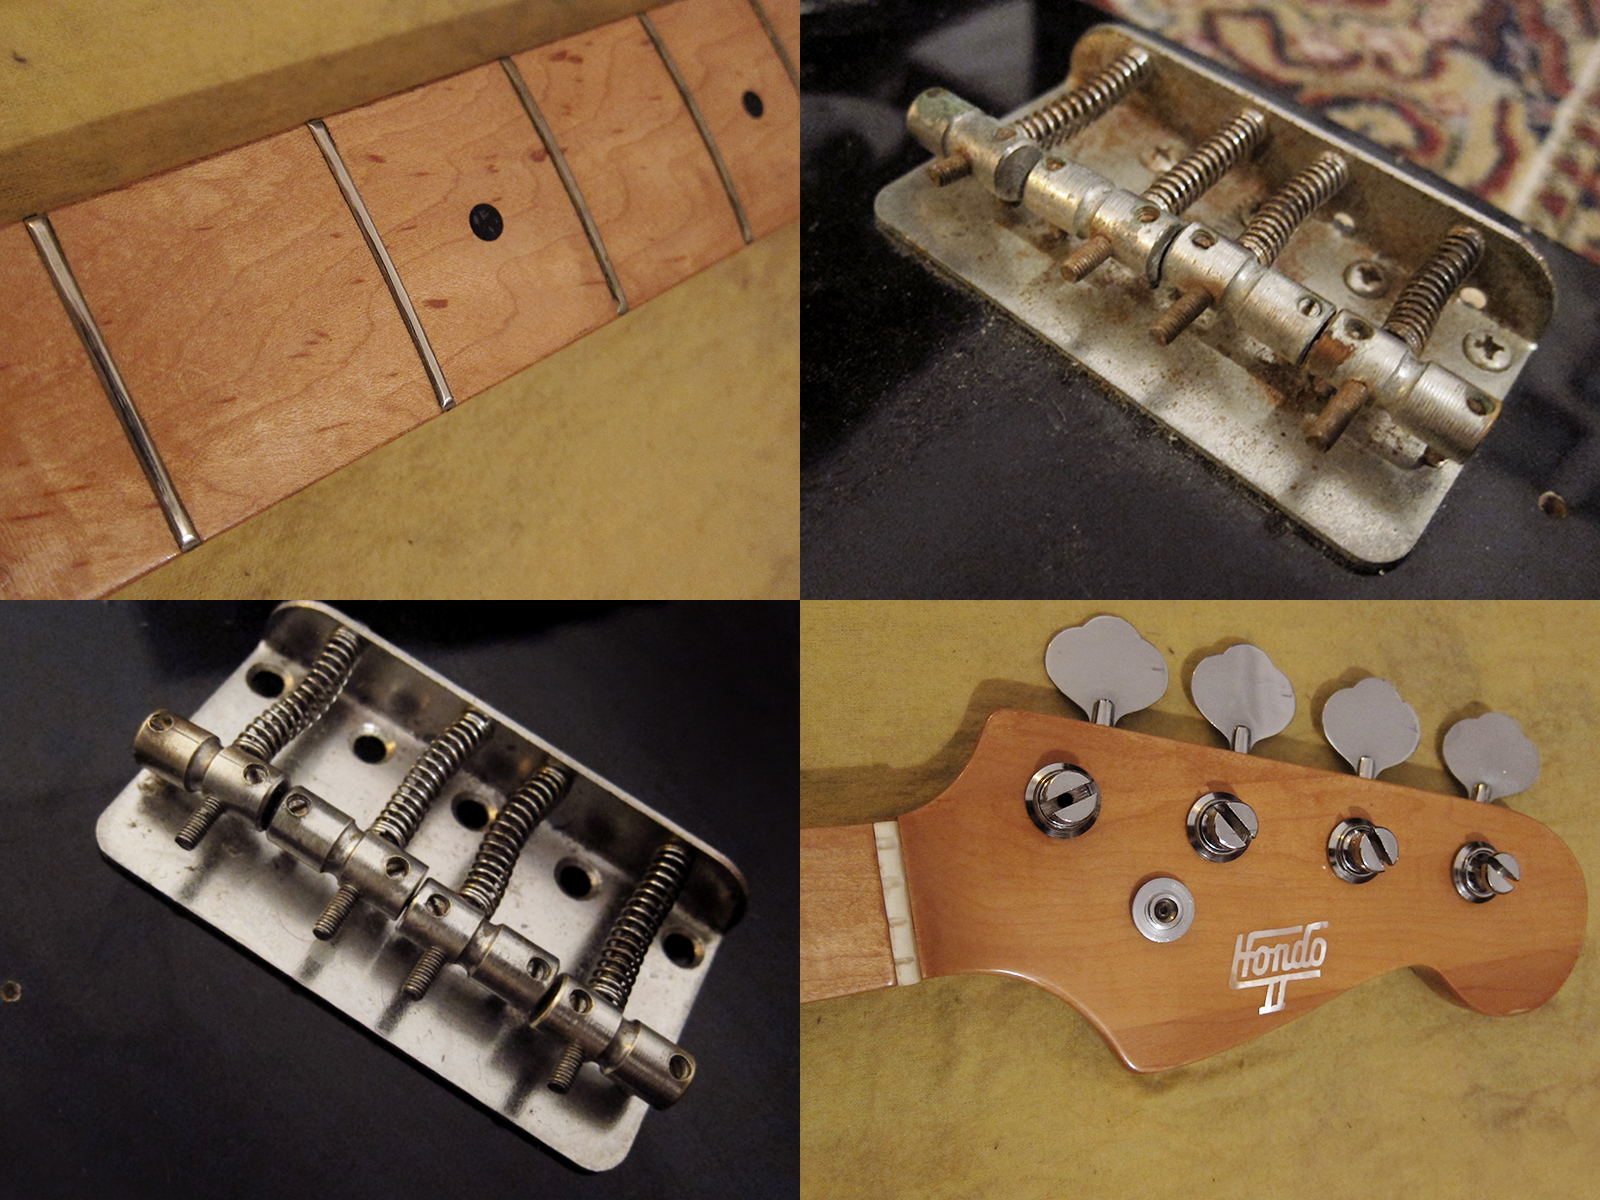
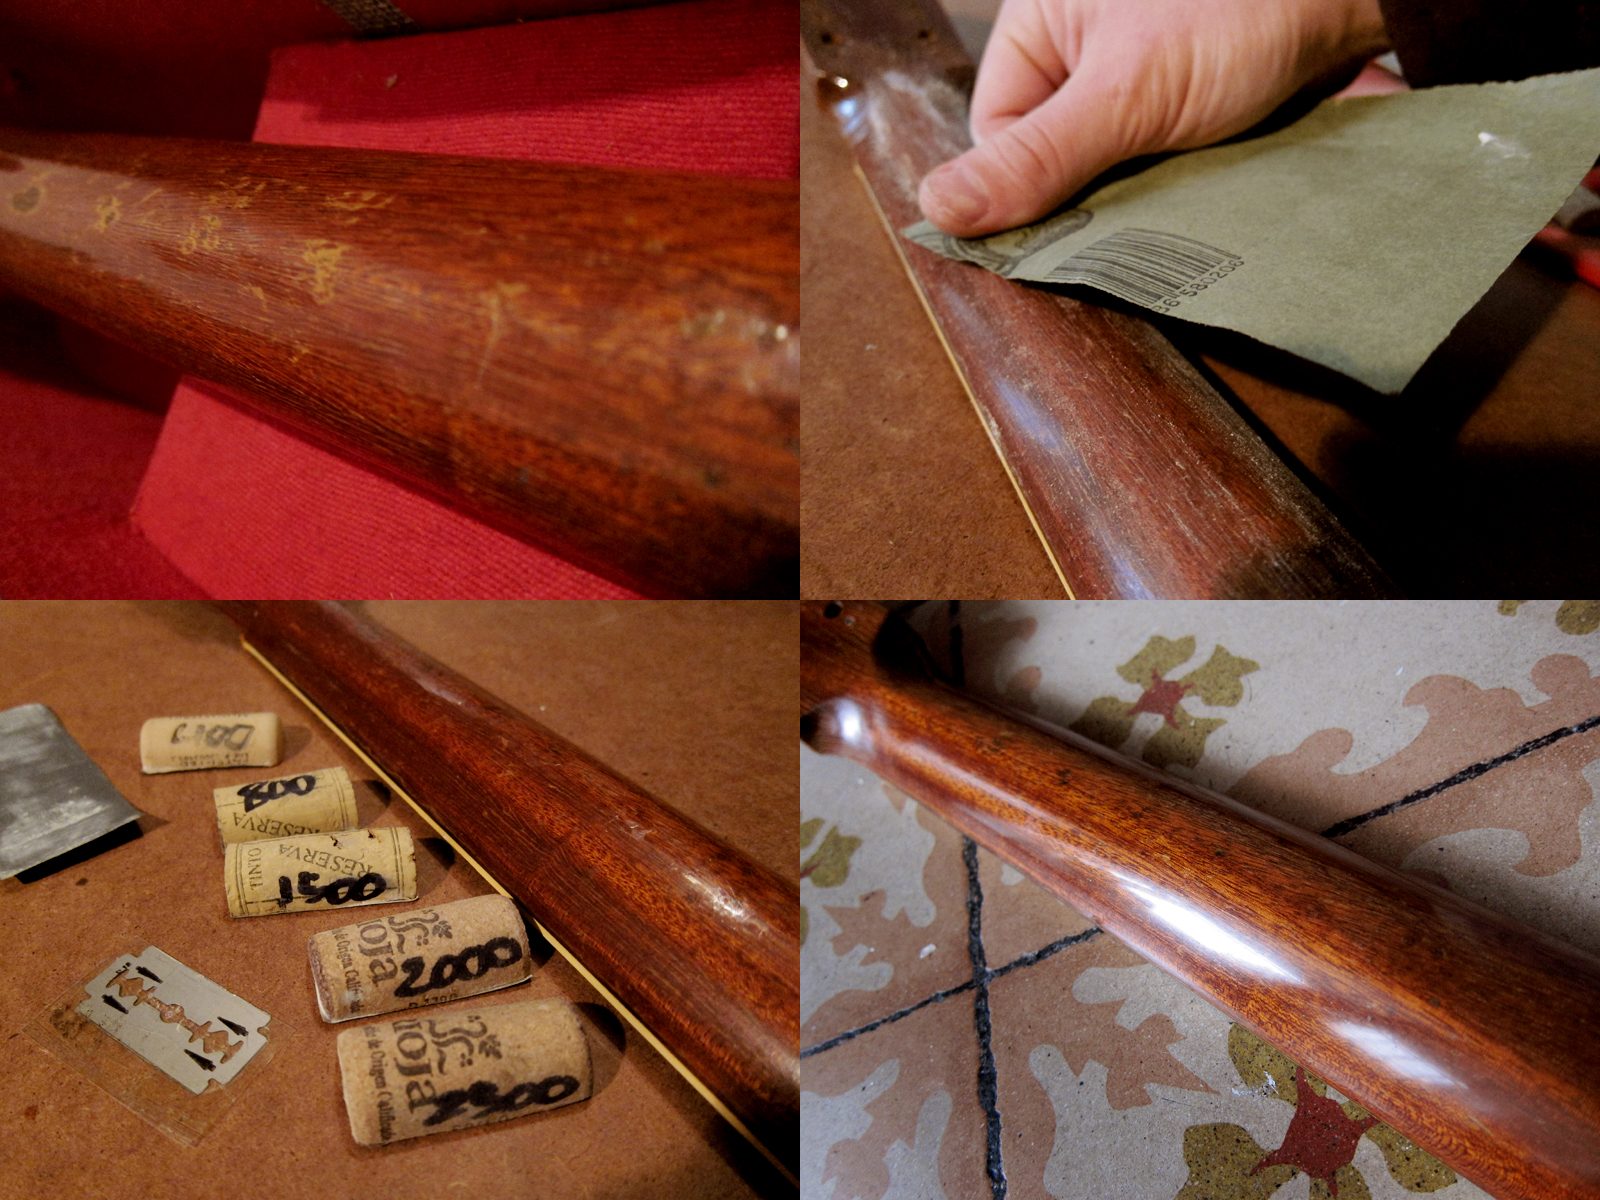
The neck was in really poor state, deep groves and marks all over it. I filled it with nitrocellulose lacquer, as mentioned in my previous post about how to repair lacquer damage. I had to take out the heavy artillery in order to get the neck smooth and used 180 grit. Then it was just a matter of sanding it back to it’s former shine using 400, 800, 1500, 2000 and 2500 grit. You can still see the marks but the neck is perfectly smooth and shiny again.

Levin LM-26 1959
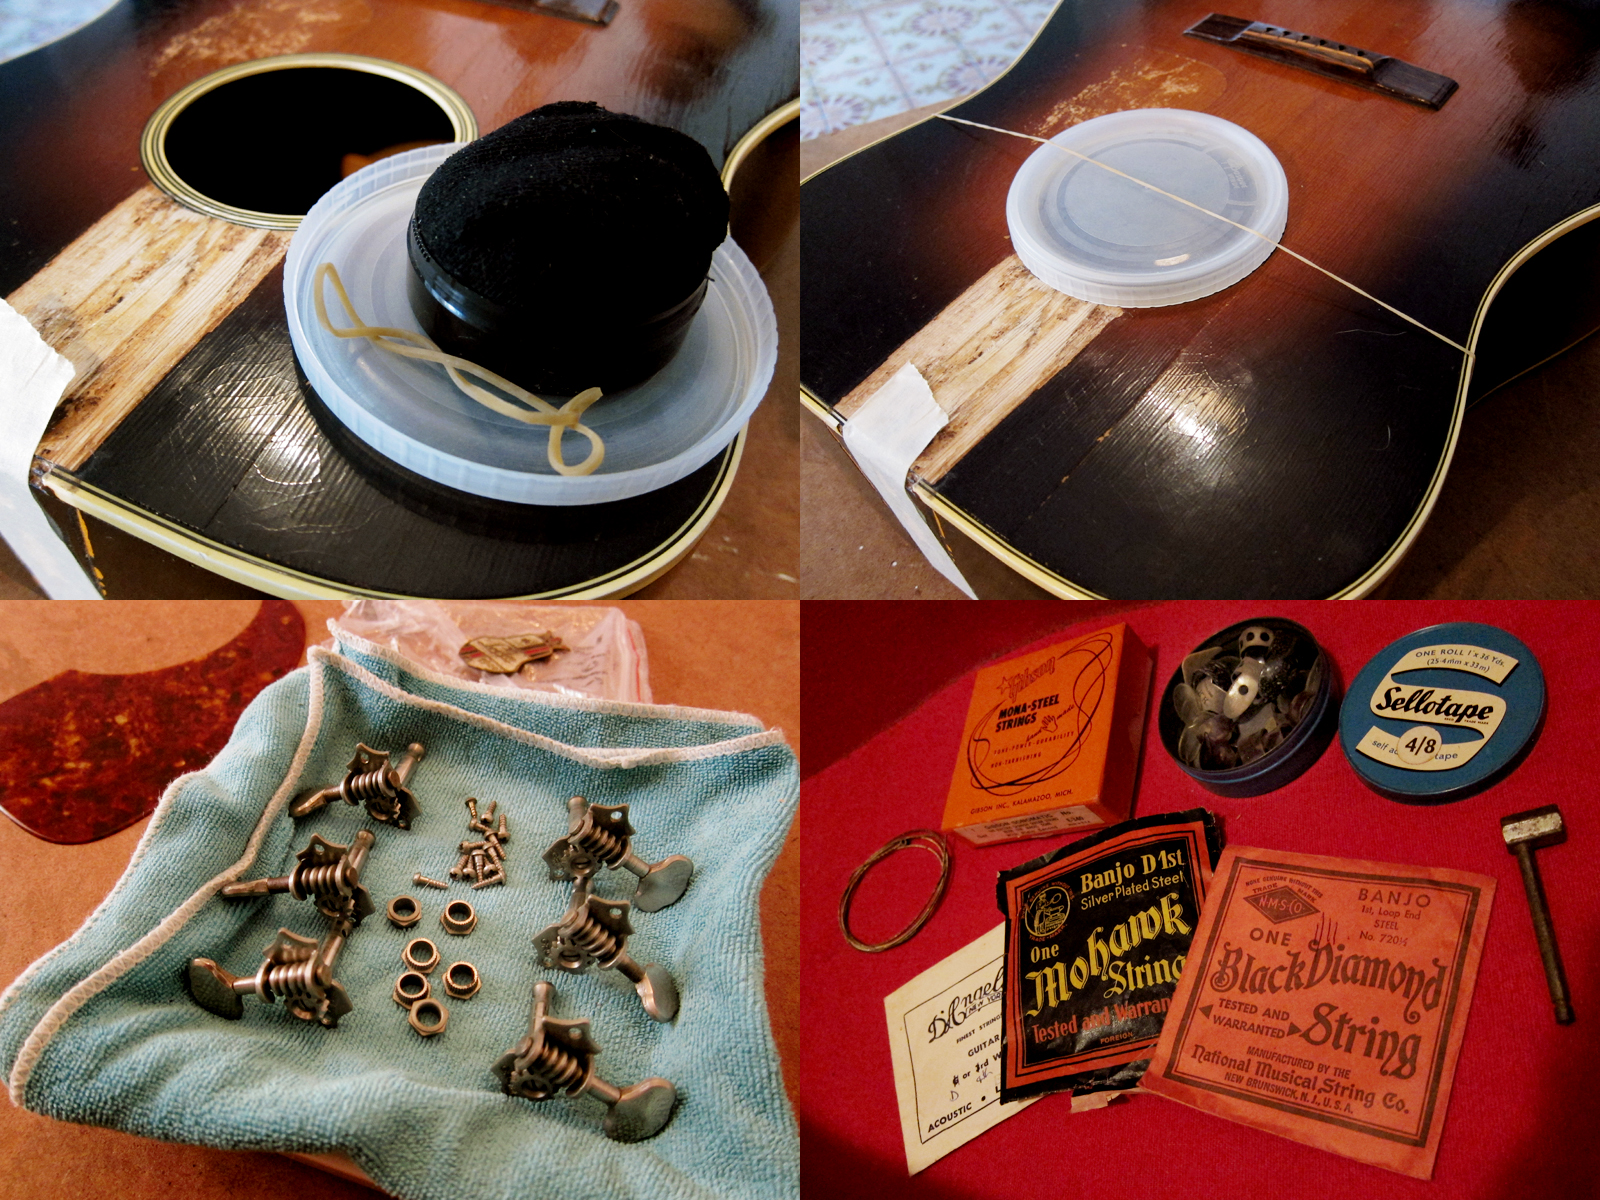
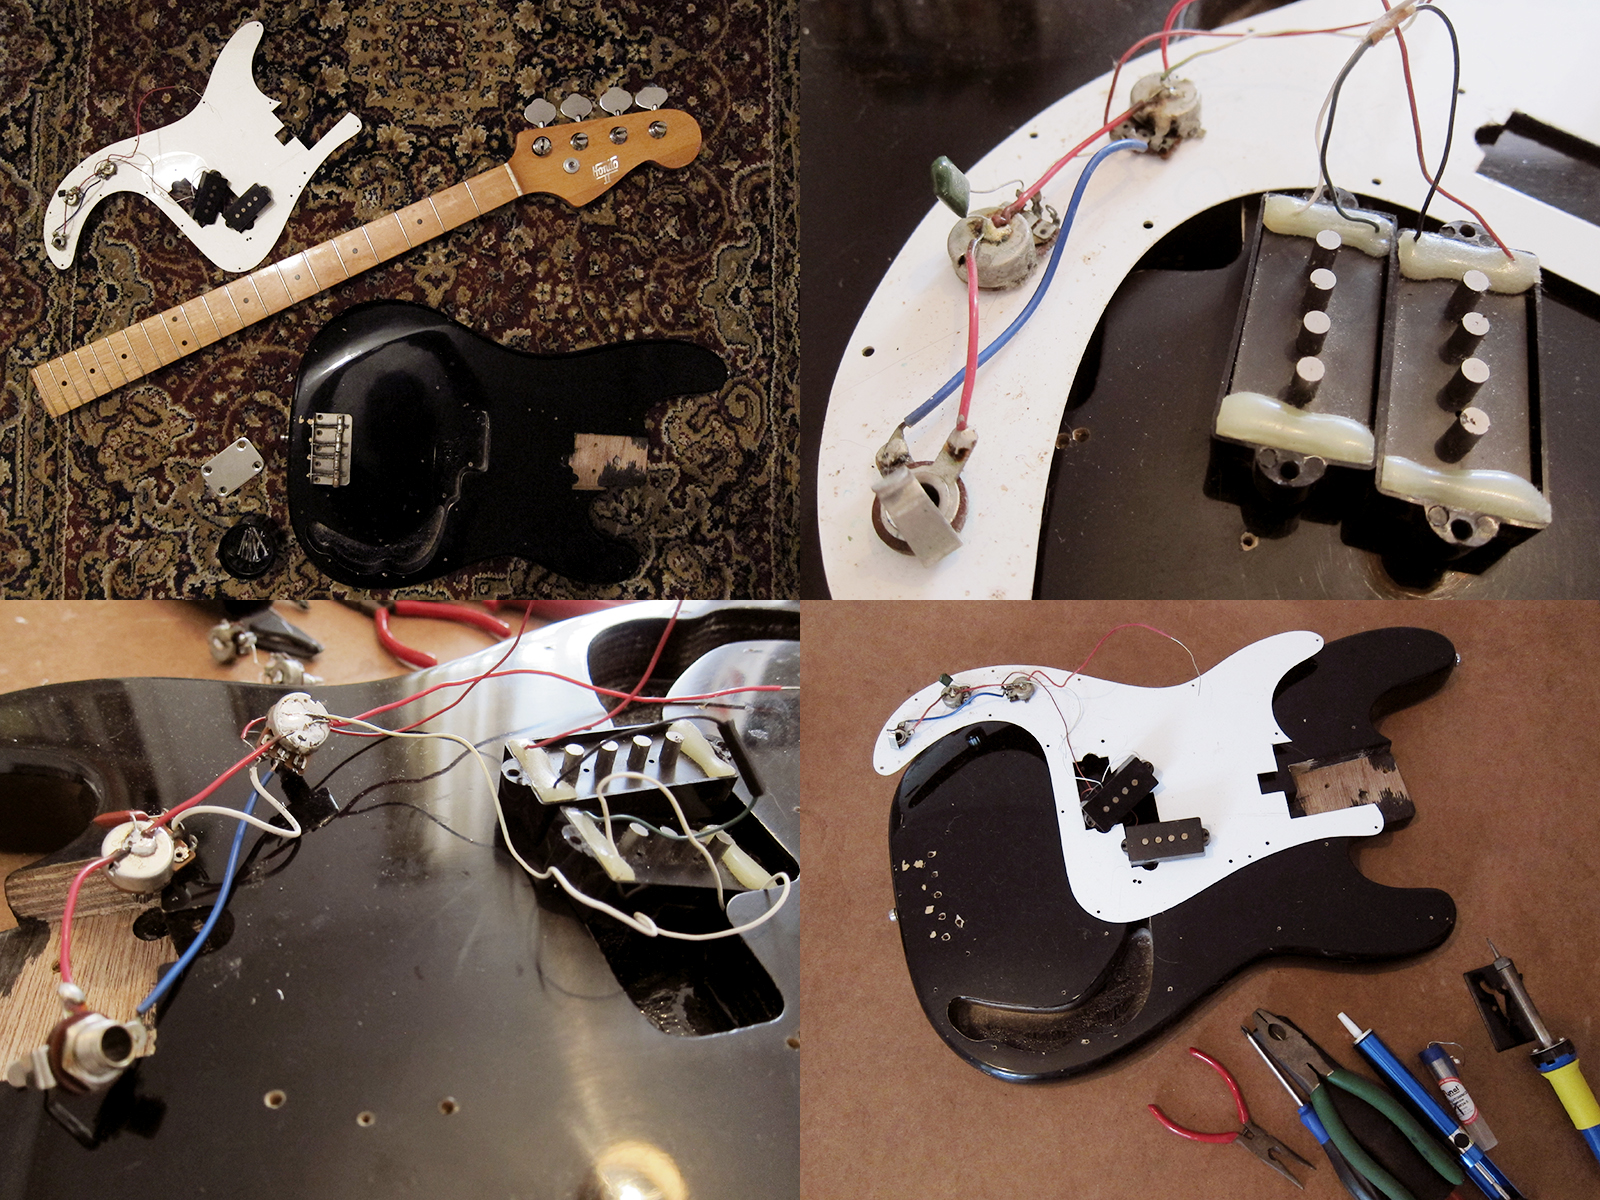
According to Roger the guitar has been stored in a back room in it’s case for the last three decades and I guess the humidity wasn’t ideal, hence the cracks. As soon as I got the guitar I started to humidify it with a wet sock in a plastic container inside the body and then sealed of the hole with a lid from a Mercadona lunch box. The Grover machine heads from 1965 got a good clean and is now oiled up and works fine.
In the last picture you can see what lied hidden in the accessory compartment in the old hardcase. Old guitar and banjo strings, an old sellotape box full of fingerpicks and best of all, an original Levin trussrod key. I’ve been looking all over for one of these. Thank you Roger.

Wilkinson WJ44

Morris W-40, Wilkinson WJ44

I just installed a new set of Wilkinson WJ44 in gold on my Morris W-40. I wasn’t happy with the fake 10€ tulip Grovers I had before so I decided to get some Wilkinson Deluxe tuners instead. They cost me about 33€ including shipping from Vansonguitars on eBay. I really love the tulip shape and will always chose that if possible but I really don’t like the green buttons that most companies use, even the big ones like Schaller, Kluson and Grover. Luckily Wilkinson has started to make their deluxe tuners in both vintage green and cream white so I could get my beloved gold deluxe tuners in off white instead of hospital green. Another good thing with these Wilkinson’s is that they have a 9mm bushing instead of 8mm which makes them easier to fit if you have modern 10mm holes for the tuners. Wilkinson are manufactured in Korea by Jin Ho and I’m very impressed with their quality considering how the cheap they are. I have both Wilkinson tuners and bridge on my Claescasters, I love their vintage bridge with compensated brass saddles.

Morris W-40, Wilkinson WJ44
Since the Morris W-40 has 10mm holes I had to try to make the 9mm bushings 1mm bigger. I decided to try the beer can trick which turned out to work pretty well. Cut a can open and remove the top on the bottom and then just cut strips as wide as the bushing. 1mm might sound like nothing but the bushing needs to sit tight in the holes otherwise they will be pulled out or move from the string tension. I had to go for about 1.5 strip to fill the gap and there was a lot of fiddling and pain in my thumbs to get it in place but I eventually succeeded.

Morris W-40, Wilkinson WJ44I was hoping that the screw spacing matched the old Morris tuners but they didn’t so I had to drill new holes. They are going to be hidden under the original tuners if I restore it but for now, I prefer gold and tulip buttons to the original Japanese 70’s chrome tuners.

Goya T-18

Levin Goya T-18 1966
My beloved Goya T-18, made in Sweden by Levin in 1966

When my Goya T-18 arrived from the US back in September I didn’t really know where to start. It had an amazing tone, actually every time I pick it up I think it’s my best sounding guitar, but it needed work. The action was way too high, there was three deep really annoying dents on the back of the neck and the pickguard was loose. Last weekend I actually got to work on all three problems and I managed to get my Goya up and running and now I struggle to put it down.

Levin Goya T-18 Made in Sweden 1966

Levin LT-18 / Goya T-18
Goliath size: Body width: 400 mm, body length: 505 mm, body depth: 95/120 mm
Fingerboard width: 43 mm, scale length: 630 mm
Spruce top, flame maple back and sides, 4-ply bound top, single-bound back
Mahogany bolt-on neck with adjustable truss rod
Single-bound ebony fingerboard with bass side pearloid block inlay
Nickel plated individual Van Gent tuners with metal buttons
Ebony bridge, natural finish and ten year warranty

Marketed by U.K. distributors as Super Goliath Model 1855

Goya T-18 1966 / Levin LT-18
First I had to try to fix the three deep dents in the back of the neck. Since they went through the original finish down to the wood I actually added some water first to let the mahogany swell a bit and that way make them less deep. After a couple of days I added the first layer of Nitrocellulose lacquer with a toothpick, just one drop at the time. I had to repeat the process quite a few times to get it even, the lacquer sinks when it dries. Next step was to get rid of the edges with a razor, like mentioned in my previous post, and then sand it even. I used 400, 800, 1500, 2000 and 2500 grit and then added a layer of  Carnauba wax and a lot of elbow grease and then buffed it up with a fine microfiber cloth. I guess because of the thickness of the original finish my repair blended in really well and it’s even hard to notice.

Goya T-18 1966 / Levin LT-18
The pickguard was loose so I decided to remove it completely and then glue it back again. I cleaned off the old glue with a razor blade and made sure that both the top of the guitar and the back of the pickguard was smooth and even before I glued it back with my trusty old fish glue. I added some pressure with a clamp, I had a little block of wood on the inside and half a wine cork on the outside for not ruining the finish.

Goya T-18 1966 / Levin LT-18
The main thing that was needed on this Goya T-18 was a neck reset to get the action down. I was pretty worried about this and that’s why I have put it off for so long. I have never done anything like this before and I wasn’t even sure what I could use to loosen the two bolts on the inside, these Levin / Goya guitars have used a combination of glue and the Levin bolt-on neck system since the early Sixties. It turned out that a normal Philips screwdriver no 2 fitted perfectly, they are square in the base of the tip. Once the bolts were off I tried to remove the neck completely but without any luck, well the heel came loose straight away but not the fretboard. I tried with heat, steam and all sorts of magic but it didn’t budge and since I didn’t want to do anything too drastic and ruin the guitar I left it. Then I read on a Swedish guitar forum that you could leave the neck on and just lift the heel, get a bit of sandpaper in under, add some pressure and then pull. That way you would get some material of the heel off without removing the neck completely. The guy in the forum mentioned that he had done 40 pulls on both the left and the right side so I did 30 on each to be on the safe side. I fastened the bolts and strung the guitar up again and it worked, it actually worked really well. I played it for a couple of days and then decided to sand off a bit more, so I loosened the neck again and did another 15 pulls on each side and now it’s perfect. Crazy Swedes, coming up with such a quick and easy way of resetting a neck on an acoustic guitar. Thank you Levin for thinking of me 47 years down the line.

Levin / Goya catalogue 1965Levin / Goya catalogue 1965
The Goya T-18 was top of the line back in 1965 and cost $219.50 new, I wish they still cost that.

Hondo II P-bass

Hondo II P-bass
It took 3 months but now it’s finally ready, Verushka’s Hondo II P-bass

We had such a bad luck with the pickups we ordered for Verushka’s Hondo II P-bass. First we ordered a set of Artec P-bass pickups my favourite Hong Kong store EY Parts, but they never arrived, we waited for more than two month and finally got refunded instead. Then we decided to order from Custom World in Holland but that took ages too. Now we got everything we needed, full sized 250K Alpha pots, Orange drop cap, cloth covered wire, new jack and the Artec pickups. I put it together the other night and got it to work fine. I’m still really impressed with these Hondo II basses, the electronics and hardware are pretty cheap but that’s easy to change, and it’s so worth it for these amazing necks.

Hondo II P-bassIt was pretty straight forward to change the electronics. I checked the Seymour Duncan’s wiring diagram for P-basses and followed that instead of the old wiring.

Hondo II P-Bass
Hondo II P-Bass
I really liked the look of the Hondo II I got for Dani but this is ten times better for Verushka, all black just like her

How to… Repair lacquer damage

I really like worn guitars, well it’s hard to avoid when most of my guitars are 30-40 years old, the oldest guitar I got is my little Levin from 1942. However, there is one thing that I can’t stand, marks and dents on the back of the neck. Some little imperfection that you feel every time you move you hand up and down the neck. I’m not sure if it’s related to my slight OCD but it annoys me so much that I tend not to play any of my guitars that doesn’t have perfect smooth necks. The worst used to be my Greco Les Paul, it had a dent in the neck and I complained so much when I bought that I actually got it cheaper. When I received my Goya T-18 and my Morris W-40 and realised that they both had really bad marks on the back of the neck I just wanted to cry. Then I thought about it and came to the conclusion that I can’t be the only one that has issues with this, so I checked some Youtube videos to learn how to fix it and then ordered everything I needed. It’s actually really easy to fix yourself, well as soon as you find good lacquer and sandpaper with a grit fine enough, that turned out to be impossible around here. I managed to find a eBay seller that sold Nitrocellulose lacquer fairly cheap and was willing to ship to Spain. The sandpaper I had to order from China, I couldn’t find anything finer than 800 in Barcelona. After a months waiting and some feeble practice runs on less loved guitars I was finally ready to try to fix all dents, marks and imperfections on the back of my guitar necks. It went really well, or as well as it could with just 2500 grit, ideally I would have liked to have something much finer for really getting the shine back, especially on flat surfaces like bodies, the necks looked pretty good anyway.

Repairing lacquer damage on guitar
Before I started on any necks I decided to practice on the fairly roadworn body of my old Claescaster. The sandpaper I ordered from eBay came in 1500, 2000, 2500 grit and actually turned out to be made in Japan. I cut wine corks in half and glued sandpaper strips to them to get a straight sanding surface, remember to mark the grit on them otherwise it gets a bit confusing. Next step, apply the lacquer. It dries pretty fast, about 10 min, which is good because you normally need to apply lacquer more than once to really fill the dents. When it’s dry just cut off the access with a razor blade until the surface feels smooth. It’s good to tape around the blade, not only to avoid cutting yourself, but also to not scratch the surrounding surfaces.

Repairing lacquer damage on guitar
Remember to dip the sandpaper in water before you start sanding, you can really feel the difference especially with the finer grits. I used 400, 800, 1500, 2000 and 2500 grit on my little wine cork sanding blocks. I would have loved to have something even finer. I tried everything I could think of that could have a bit of sanding effect but was finer than 2500 grit. Pencil eraser, sponges, different cloths, in the end I rubbed really hard with metal polish which seemed to work a bit. As a last step I applied a bit of Carnauba wax and a lot of elbow grease and then buffed it up with a fine microfiber cloth.

Repairing lacquer damage on guitar
This is the back of the neck of my Morris W-40. The seller didn’t even bother to mention that it had deep cuts in the neck. This took quite a few fills with lacquer to even out the dents but in the end it worked pretty well. You can still see a slight colour change but you can’t feel the dents, which was the main thing for me. The last photo is not of the final polished result, it’s in the middle of sanding, I forgot to take a picture when I was done. I’m very happy with the result on all of the guitar necks I tried to fix. It was also a lot easier to get the sanding smooth and unnoticeable on the back of a neck compared to a guitar body.

Fish glue

Fish glue
My newly glued Levin LT-16

My dad’s old Levin LT-16 has quite a few crack, well it had, because now most of them are fixed. I tried to figure out what type of glue would be best for repairing wood cracks and all the articles I read said the same thing, warm hide glue. The only problem is that I didn’t feel too intrigued by the idea of having to have melted horse hoves and other animals parts on the stove so I was desperately seeking for an alternative. Then my new found guitar building friend Roger in Sweden told me about fish glue. It has the same awesome properties as warm hide glue but can be used cold. It took some time to locate someone selling fish glue but eventually I found die-moebelwerkstatt, a German eBay seller specialised products for furniture restoration. I got myself some Canadian fish glue made from a recipe from 1870 and it’s amazing. I practised on my Francisca Montserrat and some other old guitars that had cracks in them before I dared to touch my Levin. It has gone pretty well so far, no major difficulties, but I wished that the glue pulled a bit more. I read that the special thing with warm hide glue, and apparently cold fish glue too, is that it is pulling the wood together when it dries, hence why it is so good for cracks and similar repairs. It might be my glue that is a bit old, or just the recipe from 1870 not being the best, but I wished it pulled a bit more. It still works really well, way better than I expected. I feel a lot safer now, not only when it comes to buying old guitars that might have a crack or two, but to dare to use mine because if I happen to crack them I can always repair them with my fancy new fish glue.

How to… fit a LR Baggs M1

Morris W-40 1973 My new Martin D-45 copy, a Morris W-40 Made in Japan by Terada in 1973

There was a bit of work that needed to be done when I first got my Morris W-40. First of all I polished the frets, cleaned her up and oiled the fretboard. Then I needed to take care of the action which was too low, imagine that on an acoustic guitar. There was a slight forward-bow on the neck which made a bit of rattle when I played solos in the middle of the neck, at least when I hit the strings hard. I adjusted the trussrod and gave her a slight bow the other way, meaning that cowboy chords still sound beautiful and the action is still very low for being an acoustic around the 12th fret. I changed the machine heads to a pair of Grover tulip copies in gold, maybe not the best ones but it looked so much nicer than the original plain ones in chrome. Then I fitted a strap button in gold, I can’t stand having to tie the strap to the head of the guitar. I’m still waiting for the Nitrocellulose lacquer I ordered so I can fill in the three dents on the back of the neck, which is going to be a new adventure since I have never done anything like it before. Last step was to fit my new L.R. Baggs M1 soundhole pickup. I’m getting pretty used to fit endpin jacks on acoustic guitars now so it was pretty straight forward even though it was a bit more hard work on this one. I’m not sure if it was because the wood is older, or the type of wood used in this, it’s Brazilian Rosewood and maple in the 3-piece back, Now it plays and sounds amazing, I’m really pleased with it.

Fitting LR Baggs M1
I prefer to fit the endpin jacks by hand, with a small round file and then even out the hole with sandpaper when it’s big enough

Morris W-40 1973
Morris W-40 1973

Morris W-40 Made in Japan by Terada in 1973, just look at that Brazilian Rosewood and maple 3-piece back

Yamaha FX-310

Yamaha FX-310
An Indonesian made Yamaha FX-310 from the late 1990’s

My Art Director at work, the new proud owner of the White Falcon copy, asked me if I could bring his old Yamaha FX-310 back from the dead. There was a fair share of cleaning involved and then I tightened the screws and oiled the machine heads, polished the frets and oiled the fretboard and then I tried to correct the neck angle. I’m not sure if it was because the guitar has been without strings for so long and was missing the string tension but the action was so low that that everything just buzzed. I tried to correct the angle of the neck with the trussrod but it made no difference, it was as loose as it could be. I had to make the saddle higher but since it had the piezo pickup built in to the bottom of the saddle I couldn’t just change it for a new one. In the end I cut a matchstick in half and put under it, I guess bone or some other material would have been better for the tonal qualities but since they saddle was made of plastic anyway I don’t think it would have made any difference. It actually plays pretty well now and sounds really good for have been made in Indonesia. I’m not sure if all Yamaha’s sounds and plays this well but I was pretty impressed. When I started to play guitar 20 years ago a lot of my friends had Yamaha’s and other inexpensive Far East made acoustic guitars but I was fortunate enough to learn to play on my dad’s old Levin LT-16 so I never really tried any of these Yamaha’s back in the early 1990’s.

How to… refret a guitar

How to… refret a guitar
The shiny new Jescar FW47104 frets I put on my Tokai Love Rock LS-55 Les Paul Standard “Made in Japan” 1991

Here is a little update on my previous post on How to… refret a guitar. It turns out that maybe it wasn’t as easy as I first thought to level, crown and polish the frets on a guitar. I have had some small issues with both the Tokai that I refretted and my old Claescaster that I levelled the frets on. I didn’t pay enough attention to the height of the frets and I hardly used the fret rocker the first time around. This resulted in some buzzing when some frets were pressed down. I have now levelled, crowned and polished both guitars again and checked every single fret with the fret rocker to make sure they were all the same height. It would probably have helped if I had glued in the frets on the Tokai when I refretted it, which I didn’t in case I needed to take them out again for some reason. I think the frets not being glued in combination with the difference in the neck with and without the tension of the strings was enough to cause problems with on the Tokai. Now I when I levelled it again I pushed down the guitar to simulate the tension of the strings and that worked pretty well. The Claescaster was a lot easier, that was just a case of paying a bit more attention when I levelled the frets and actually use the fret rocker properly. When I first attempted to level, crown and polish frets it was evening so it got pretty dark and my main light source was the ceiling lamp above me. I have since learned that it’s a lot easier to get this done properly if you have light coming from the opposite side of you. This time I was working in front of the windows and had an even flow of natural light coming in which made it a lot easier to see if the frets were even and later during the polishing stage, if they were smooth enough. Both necks still feels a bit weird but I think that after a couple of hours of heavy playing, not playing heavy music just playing a lot, they will settle and even out a bit. Normally guitars feels weird even after just adjusting the bridge saddles, imagine after changing all the frets.

How to refret a guitar
I checked every single fret with the fret rocker and then marked any parts that was higher with a black marker. I levelled the frets and took extra care with the problem areas. I used a small Bahco file this time instead of the long fret leveller that I used last time. I checked with the fret rocker, levelled a bit more and then checked again until it was perfectly even.

How to refret a guitar
When everything was levelled I just had to crown the frets again and then polish them. I’ve realised that these little aluminium fret board protectors that I have used in the past doesn’t really work. If you have levelled and crowned the frets you have to run a sandpaper over the whole fretboard, feeling every single fret with your fingers to round them off, that’s the only way to get them smooth and nice. For that you really need to do it properly and tape the whole fretboard to protect it.

Hondo II P-bass

Hondo II P-Bass
Hondo II P-bass copy, it’s a bit roadworn but the neck is in a really good state and it feels great to play.

Hondo II P-Bass
The machine heads could do with being replaced too, it seems like Hondo II have great necks but cheap hardware and electronics.

As I mentioned before I got a Hondo II P-bass for my colleague Verushka, she plays in an awesome punk group called Sect. The bass arrived last week and I took it home and had a look at it. It was sold as untested so I presumed that nothing worked, and I was right. The wood seems really solid and good, just like the Hondo II I got for Dani a few months back but the electronics seemed to be pretty bad. I took it a part and cleaned it, polished all the metal and then started to go through the electronics. It turned out that the pickups doesn’t work. Or rather they work, but the output is so low that you can hardly hear them. We ordered a new set of Artec P-bass pickups, new pots and jack from my favourite Hong Kong store EY Parts so as soon as they arrive I can get the bass sorted.

Hondo II P-Bass
I cleaned it, polished the frets and all the hardware with wire wool and metal polish. I have to say that this cheap little bottle of Harley Benton Hardware Polish has proven to be extremely worth the 1.90€ I paid for it. I put in a little shim when I assembled it, just like I did with Dani’s and it made wonders to the action. Now it’s really low and easy to play.

Hondo II P-Bass
I took all the electronics apart, cleaned the jack, cut the ends of all the wires and replaced the mini pots with some newer mini pots I had at home, I did everything I could to make sure that all the connections would be as good as possible but it didn’t help. Well I got rid of the extremely loud humming noise that was there before but the pickups are still way too weak for being usable. Let’s see what it sounds like when the new full size pots, jack and Artec pickups arrive.