The Claescaster, put together in May 2013 out of a Mighty Mite Swamp ash body, Tonerider Vintage Plus pickups, Wilkinson hardware and a cheap but fairly fat China neck.
Last night I decided to change the pots and install a treble bleed on my new Claescaster, I never liked the feel of the CTS pots I had on. I’m still not sure if I like the new changes or not, in my head it sounded better before but I stupidly forgot to record it so I can’t compare the before and after. I think it had a clearer sound with more highs, now I feel that the neck pickup is more muffled. I’m not sure if this is down to cheaper pots, the treble bleed or the wiring. I changed the wiring too from a more standard wiring to Seymour Duncan’s suggestion for a ’66 wiring which matched what I had seen for the treble bleed. Maybe it has more to do with the changes in wiring than the actual treble bleed because before I had an old 50′s vintage wiring to help with the lack of treble at lower volumes and I was pretty happy with that. I’m so confused with all the different wiring options, I have no idea who’s doing what to whom, and where? I might just have to redo it again and copy the original wiring on my Greco TL-500 or my Fender TL52-75, they both sounds great.
The new Claescaster got a treble bleed and the ’66 wiring, bottom right photo shows the original wiring on my 1979 Greco TL-500
Update: December 27, 2014, Since I had the soldering iron out to fit the electronics in my new home built Claescaster I took the treble bleed out in this one and changed the wiring back to it’s original 50′s vintage wiring
The old Claescaster before and after the transformation, well I just changed the pickguard.
I recently did a little order from my favourite Hong Kong site, EY Guitars. I wanted to change the pots on the new Claescaster, I’m really not happy with the fancy CTS pots I got and decided to put on some Asian ones instead. I also ordered a new black pickguard for the old Claescaster for 5€, I had grown tired of the cheap looking tortoise that has been on for 4 years. I also changed the knobs for flat topped gold ones so now the old Claescaster looks just like the new Claescaster, if it wasn’t for the Fender logo and the beautiful wood grain on the swamp ash body on the new one.
Now I have two Claescaster’s that looks pretty much the same. Boring perhaps but I really love the look of the 1970’s Fender Telecasters with their 3-tone sunburst, black pickguards and maple necks.
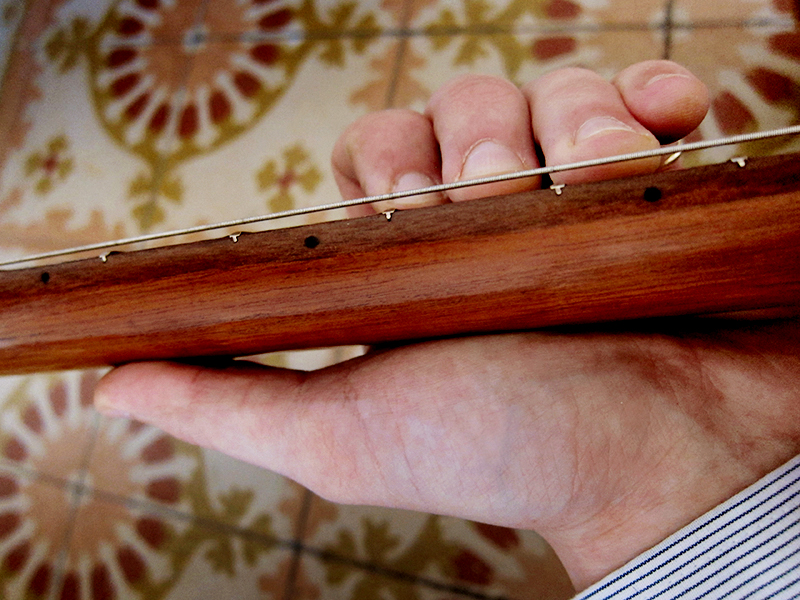
I get really confused when I play on guitars without side dots. You are playing your cowboy chords and everything is fine and then suddenly you want to play a bit of solo up on the 12th fret and you realise that there are no markers above the 5th fret and you have to guess where to put your hand. Well on a 14th fret acoustic guitar you know roughly where the 12th fret is, 2 above where the body and neck joins but say that you need to quickly find the 11th, or 9th fret. For me position markers, or side dots, are essential. Flamenco guitars seems to never have any side dots at all and a lot of Spanish or Classic guitars seems to have forgotten them too. I guess if you are used to it, if you have played your whole life without them maybe it’s fine but I come from the world of electric guitars with clear indications where you are on the neck. My Levin guitars only have side dots up until the 7th fret, it’s just my Goya T-18 that has markers up to the 12th fret, so I decided to change that. I had to order some new Jescar frets from my favourite eBay luthier supplier in the States, Philaluthiertools, so I got some 2mm side dot position markers in black as well. I was a bit scared to drill in to thin strip of binding on my 40-50 years old Levin guitars but after practising on my Francisca Montserrat I felt ready and just did it. It went pretty well, no real drama. It was interesting to see what the fretboards was really made off when you saw the sawdust. Some of the Levin’s had normal rosewood freatboards but the Levin 174 has a ebony fretboard, how fancy pants is that? My dads old Levin LT-16 is supposed to have a rosewood fretboard but I think that sawdust looks very dark for being normal rosewood.
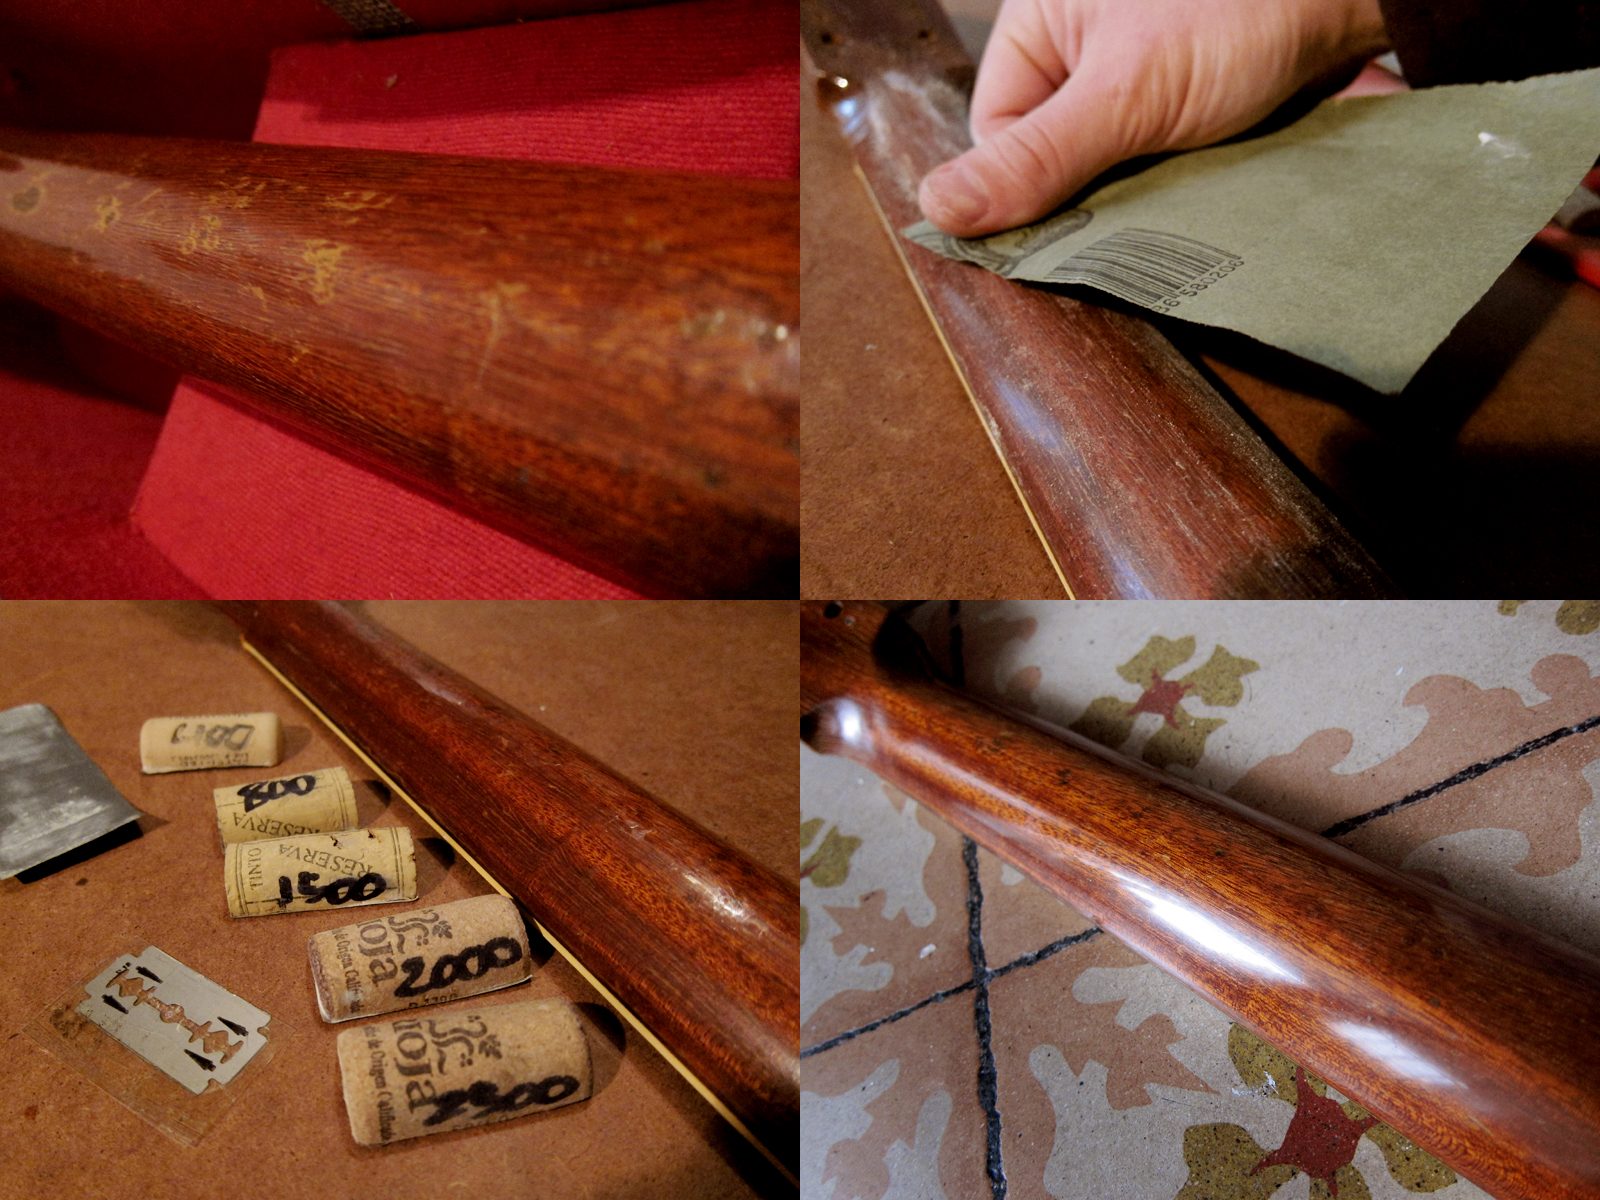
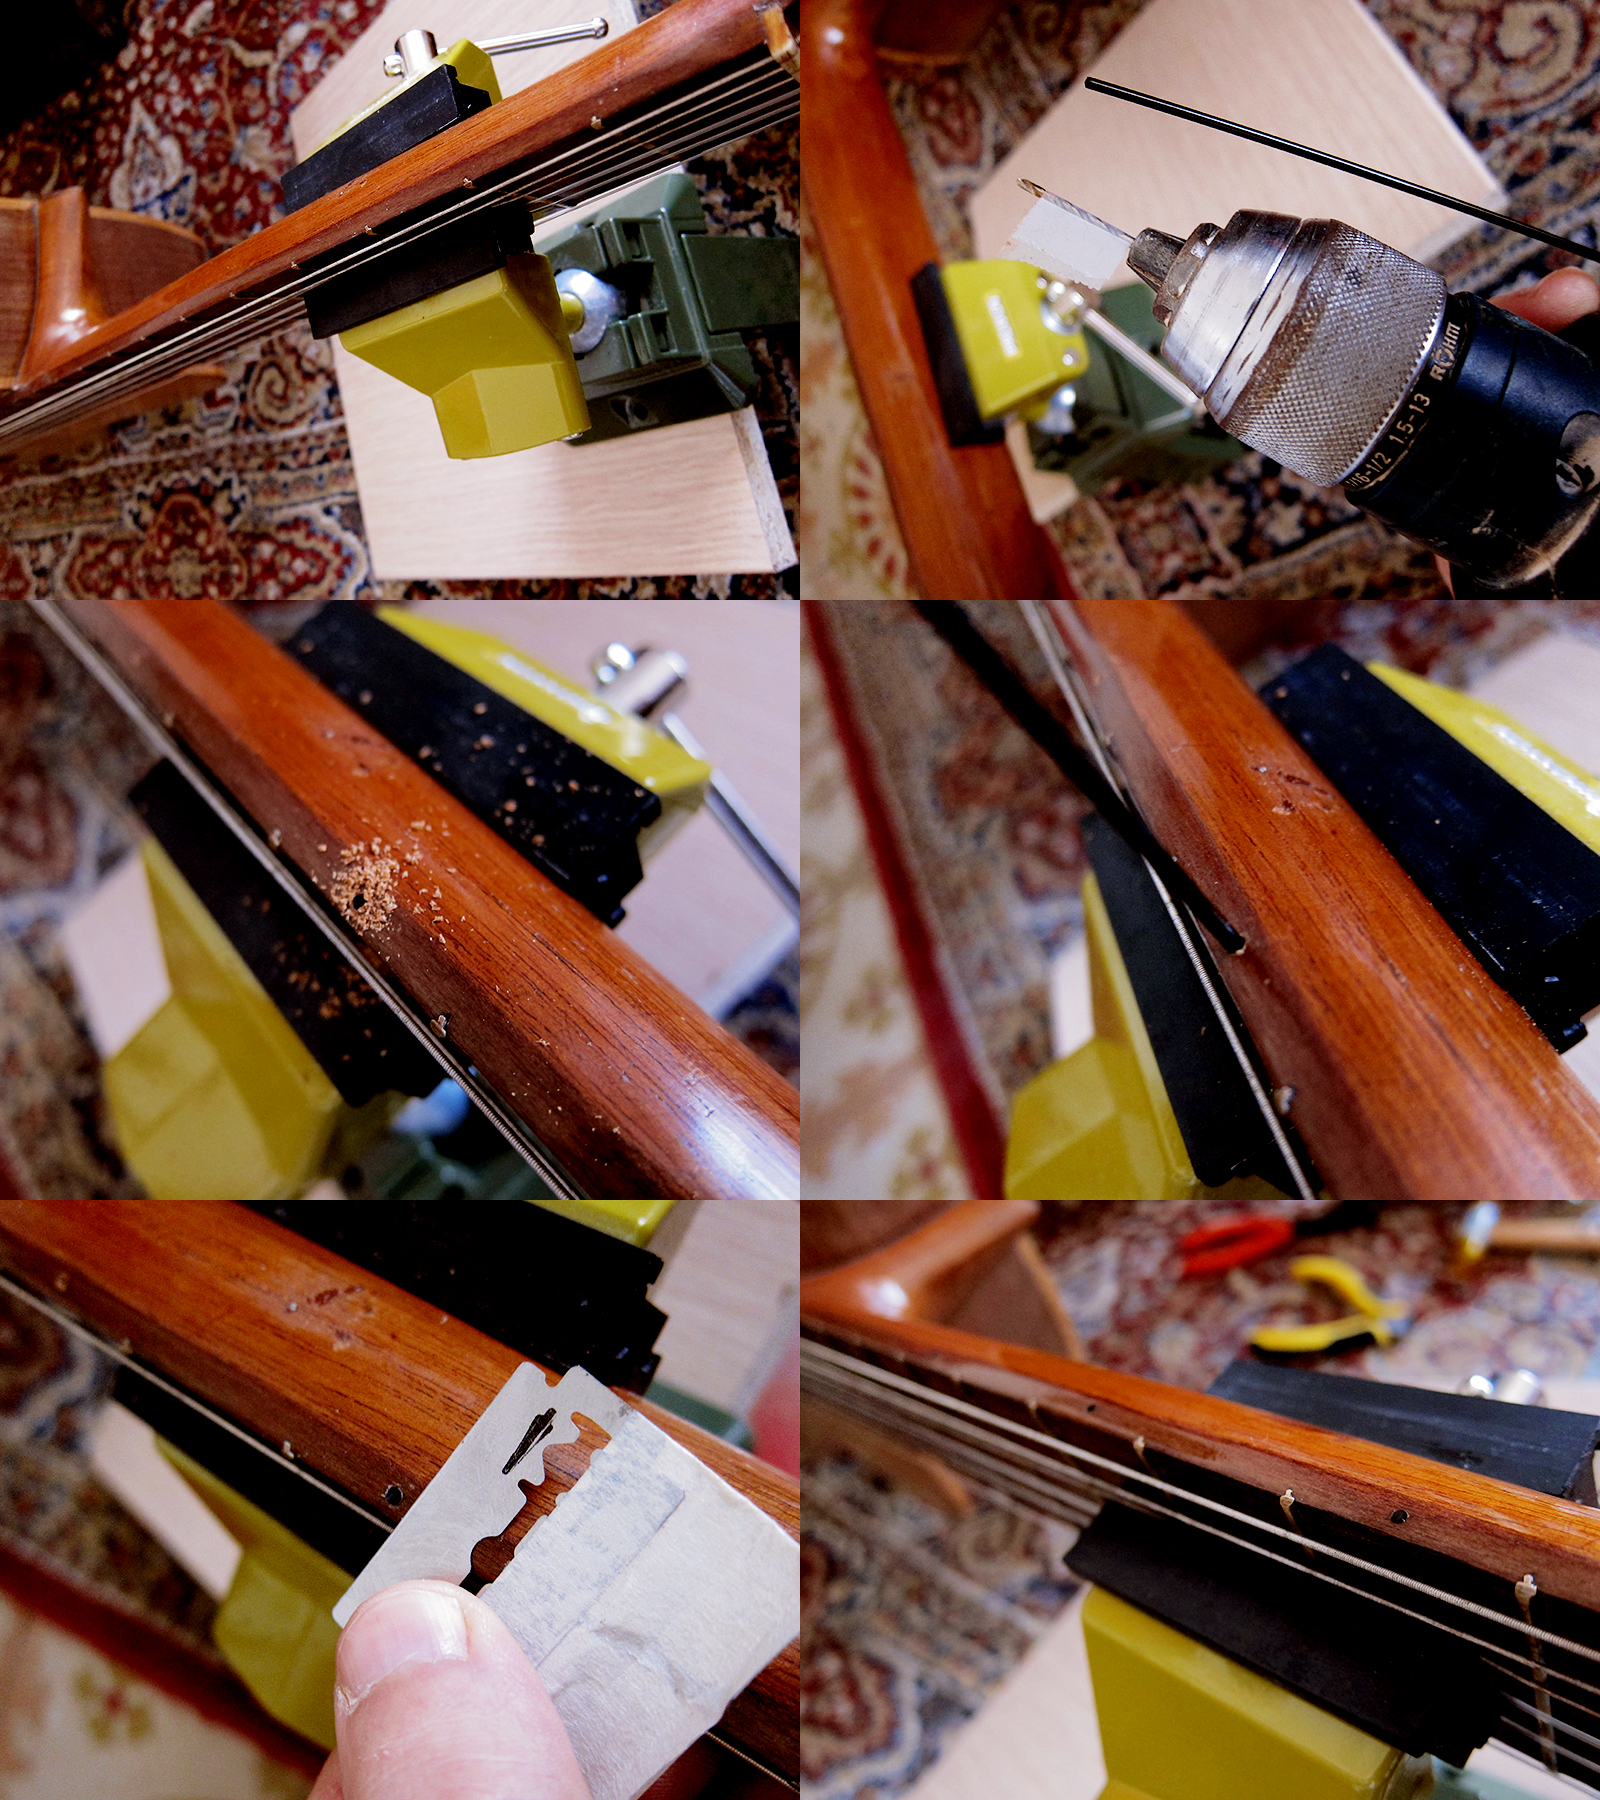
First I installed 3 side dots on my Francisca Montserrat just to warm up. There might be some Flamenco purists saying that I’ve ruined this guitar now but I think it was a fairly discrete modification that will make it hundred times easier for me to play it. I just drilled a 2mm hole, same as the plastic side dot, about 3-4mm deep. I didn’t use any ruler, I felt that my eyes would be the best judge to make a visual estimatation and get them to line up. I made a little mark with a black pen and then when I was happy with that I made a little pilot hole with a nail so the drill wouldn’t slip. I put some super glue in the end of the side dot stick, stuck it in and then cut it off with a pair of pliers. I got it smooth with a razor blade and then sanded it down with 400, 800, 1500, 2000 and 2500 grit paper, the same technique I use for repairing lacquer damage.
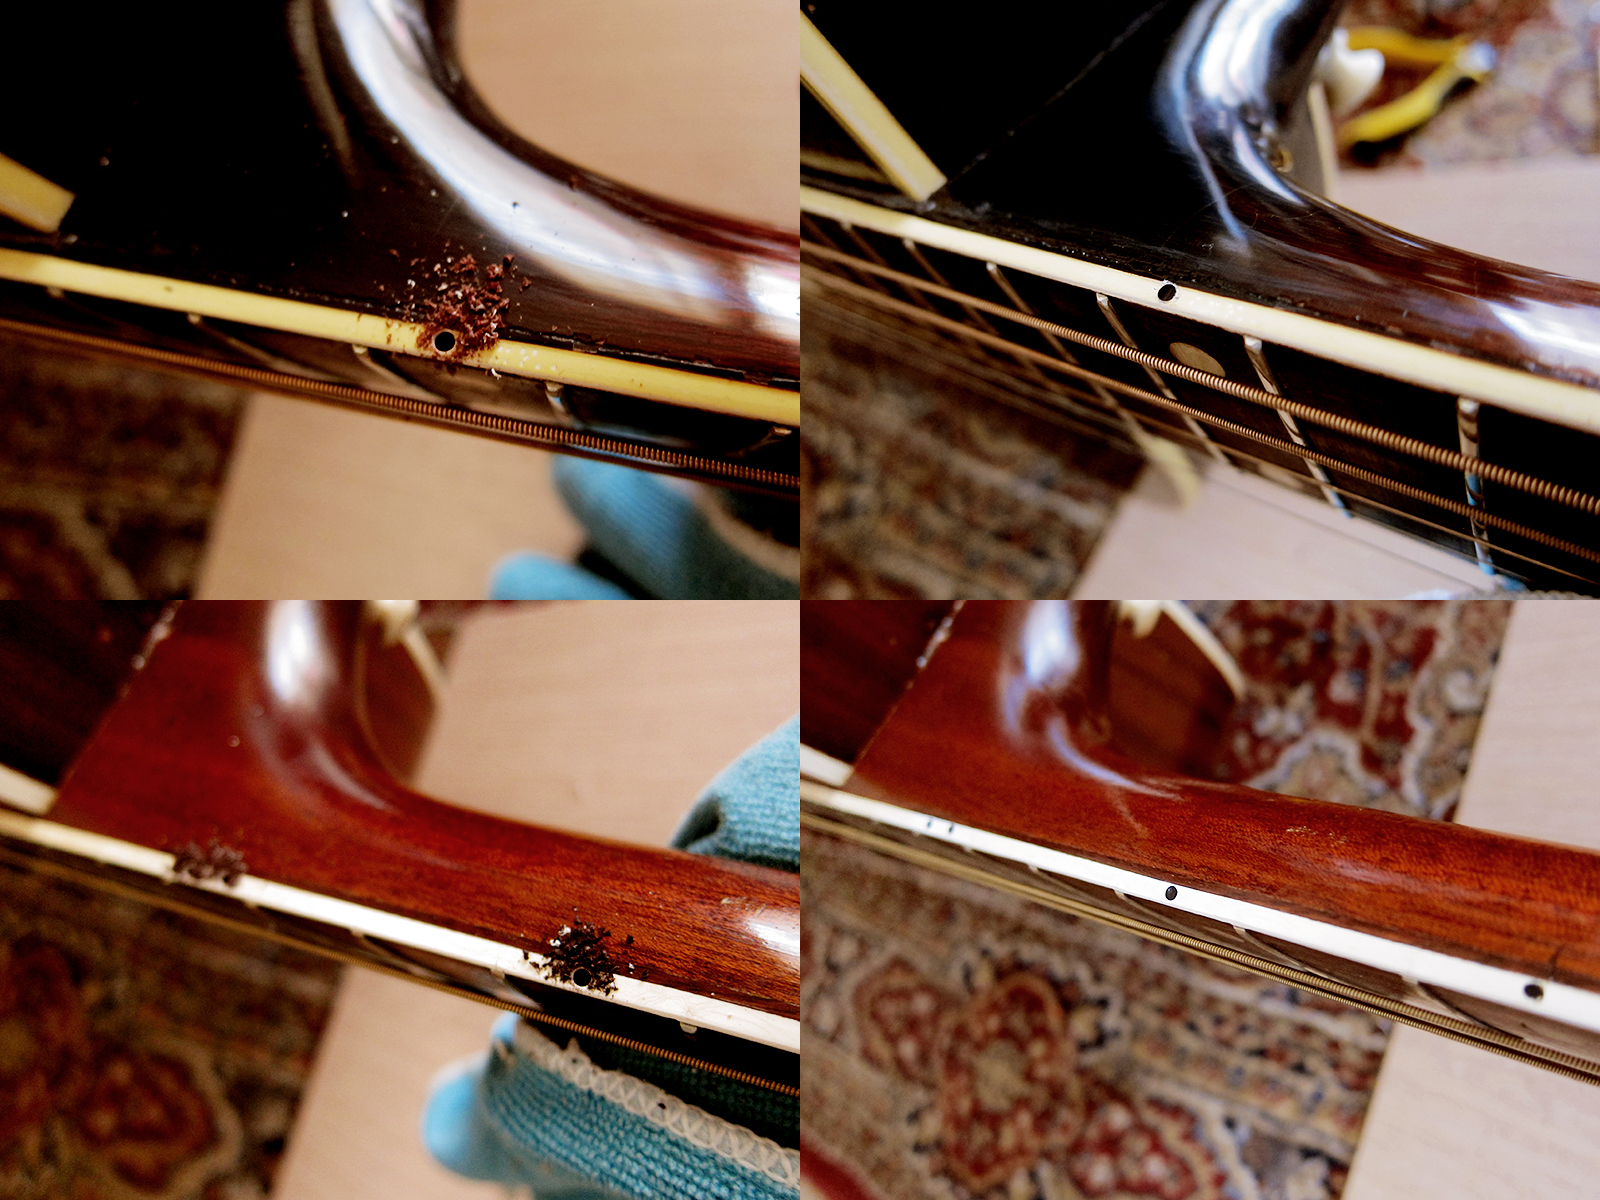
All my Levin’s got new side dots installed, here is a 1959 Levin LM-26 on top and a 1966 Levin LT-16 below. I have to say that the dots I put in on the 9th and 12th fret on my dads LT-16 looks better than the original one on the 7th fret that was installed 48 years ago at the Levin factory in Gothenburg.
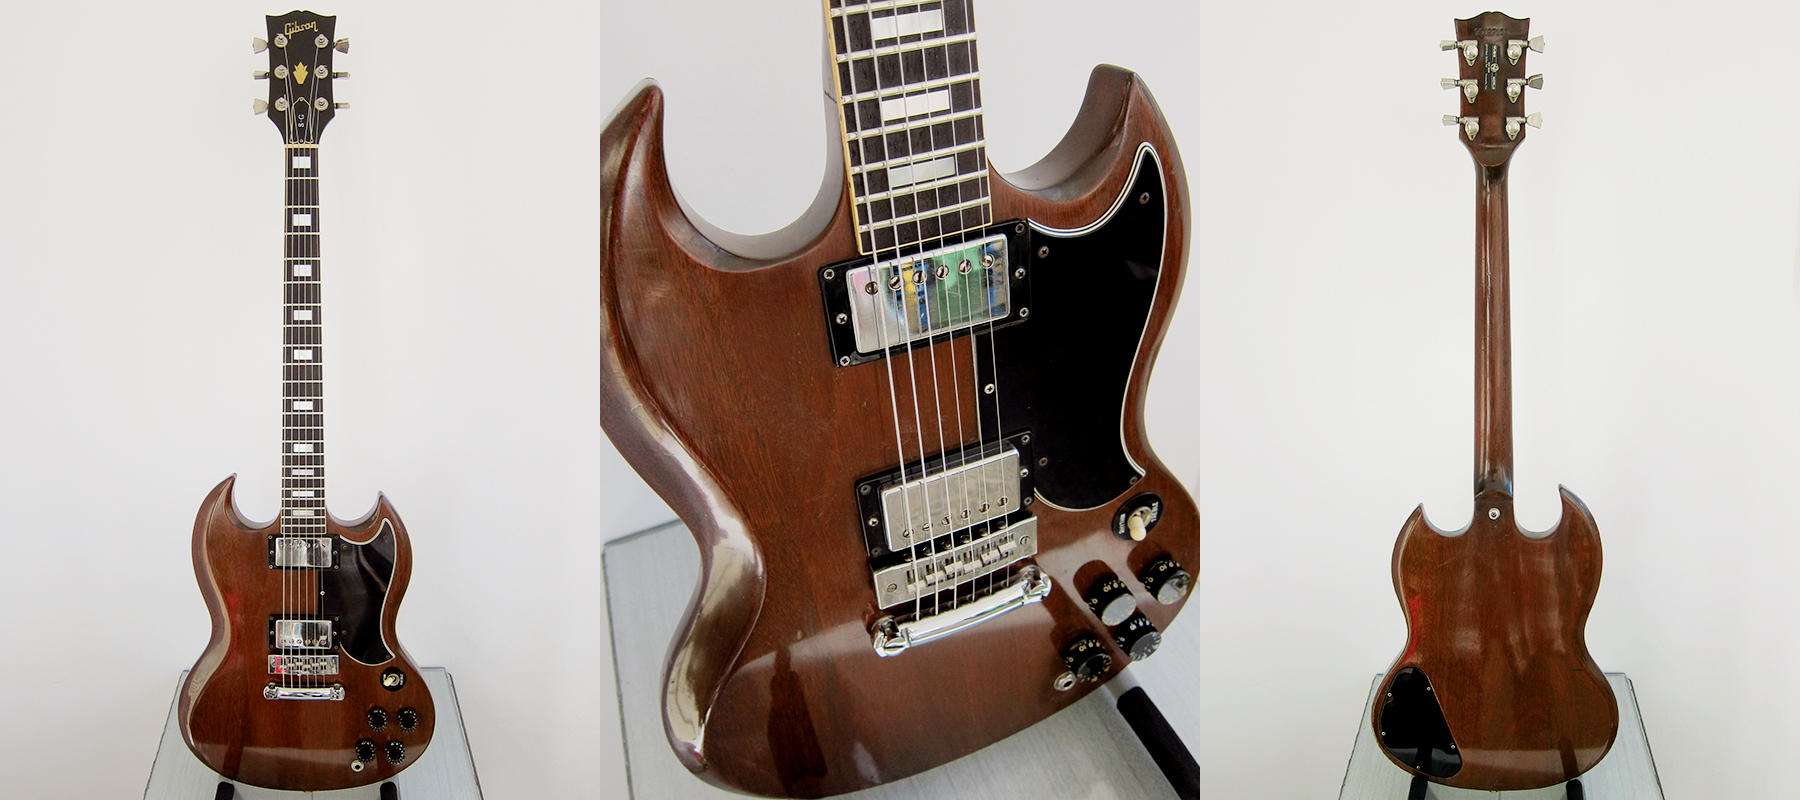
Gibson Walnut SG Standard made in Kalamazoo, USA in 1977
I recently had the pleasure of having an awesome 1977 Gibson Walnut SG Standard at home to play with. Well the idea was to look over the electronics and make sure it was fit to gig with for Patrycja, a friend of Verushka that I sorted the Hondo II bass for. According to The Guitar Dater Project it was made at the Kalamazoo Plant, USA on December 15th 1977, production number 103. It was great that I got a chance to play around with a Gibson Walnut SG Standard from the Seventies, that’s exactly what I was tempted to get myself, see my previous post about Gibson SG. Luckily I tried one before I bought one and I realised straight away that I still prefer Telecasters, SGs have too much neck for me. It was interesting to try a 1970’s Gibson made in USA just to compare it to all the made in Japan copies in my collection. I have to say that the feel and quality of the Japanese guitars are right up there with the American originals.
Everything seems to be original, except one pot, so I thought it was unnecessary to change the original jack just because of a bit of crackle so I cleaned it instead. I cleaned all the contact surfaces with wire wool and contact spray, it seems to be enough. I tightened the pots and all the screws on machine heads, strap buttons, pickguard, pickup rings, bridge and polished up the wood a bit.
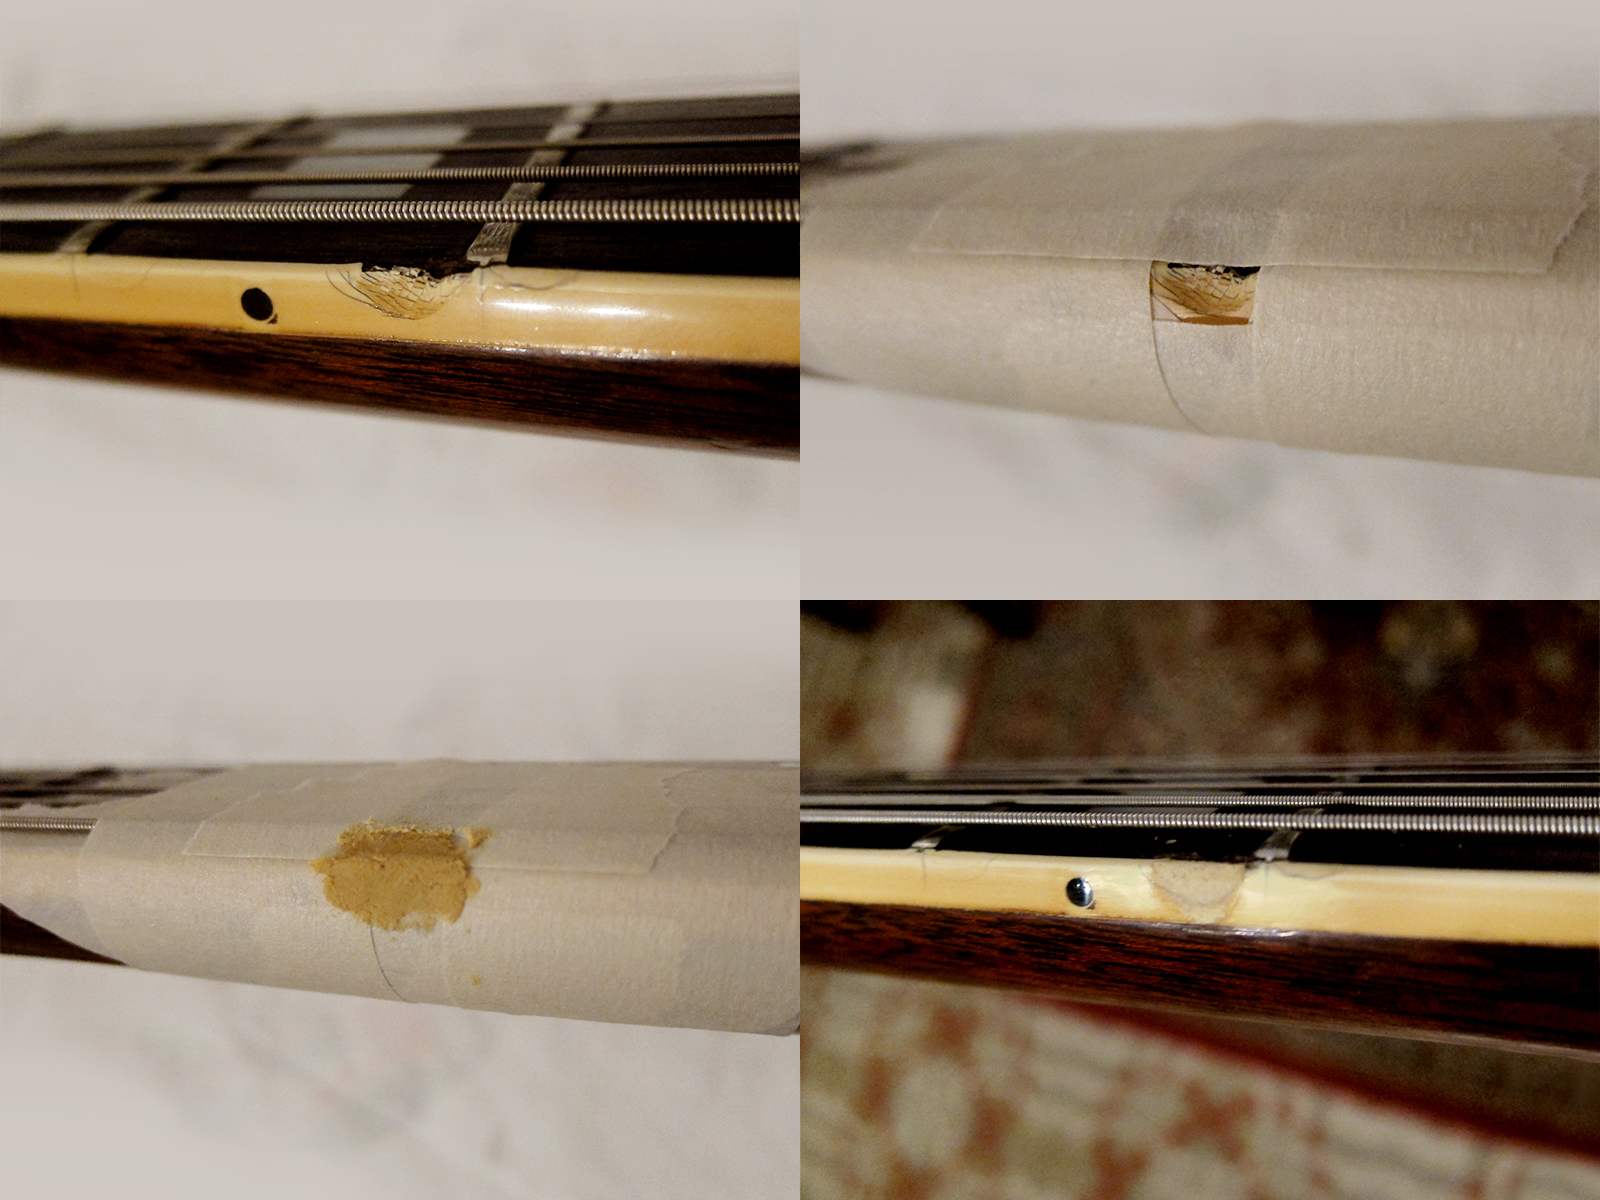
There was a fairly nasty cut in the edge binding on the 5th fret. You could feel it when you played so I masked it off and then filled it with wood filler, that happened to match in colour, then sanded it smooth and dropped a bit of nitro lacquer over it. Unfortunately I forgot to take a picture when it was all done, the last picture is before the lacquer and the final sanding with 2500 grit.
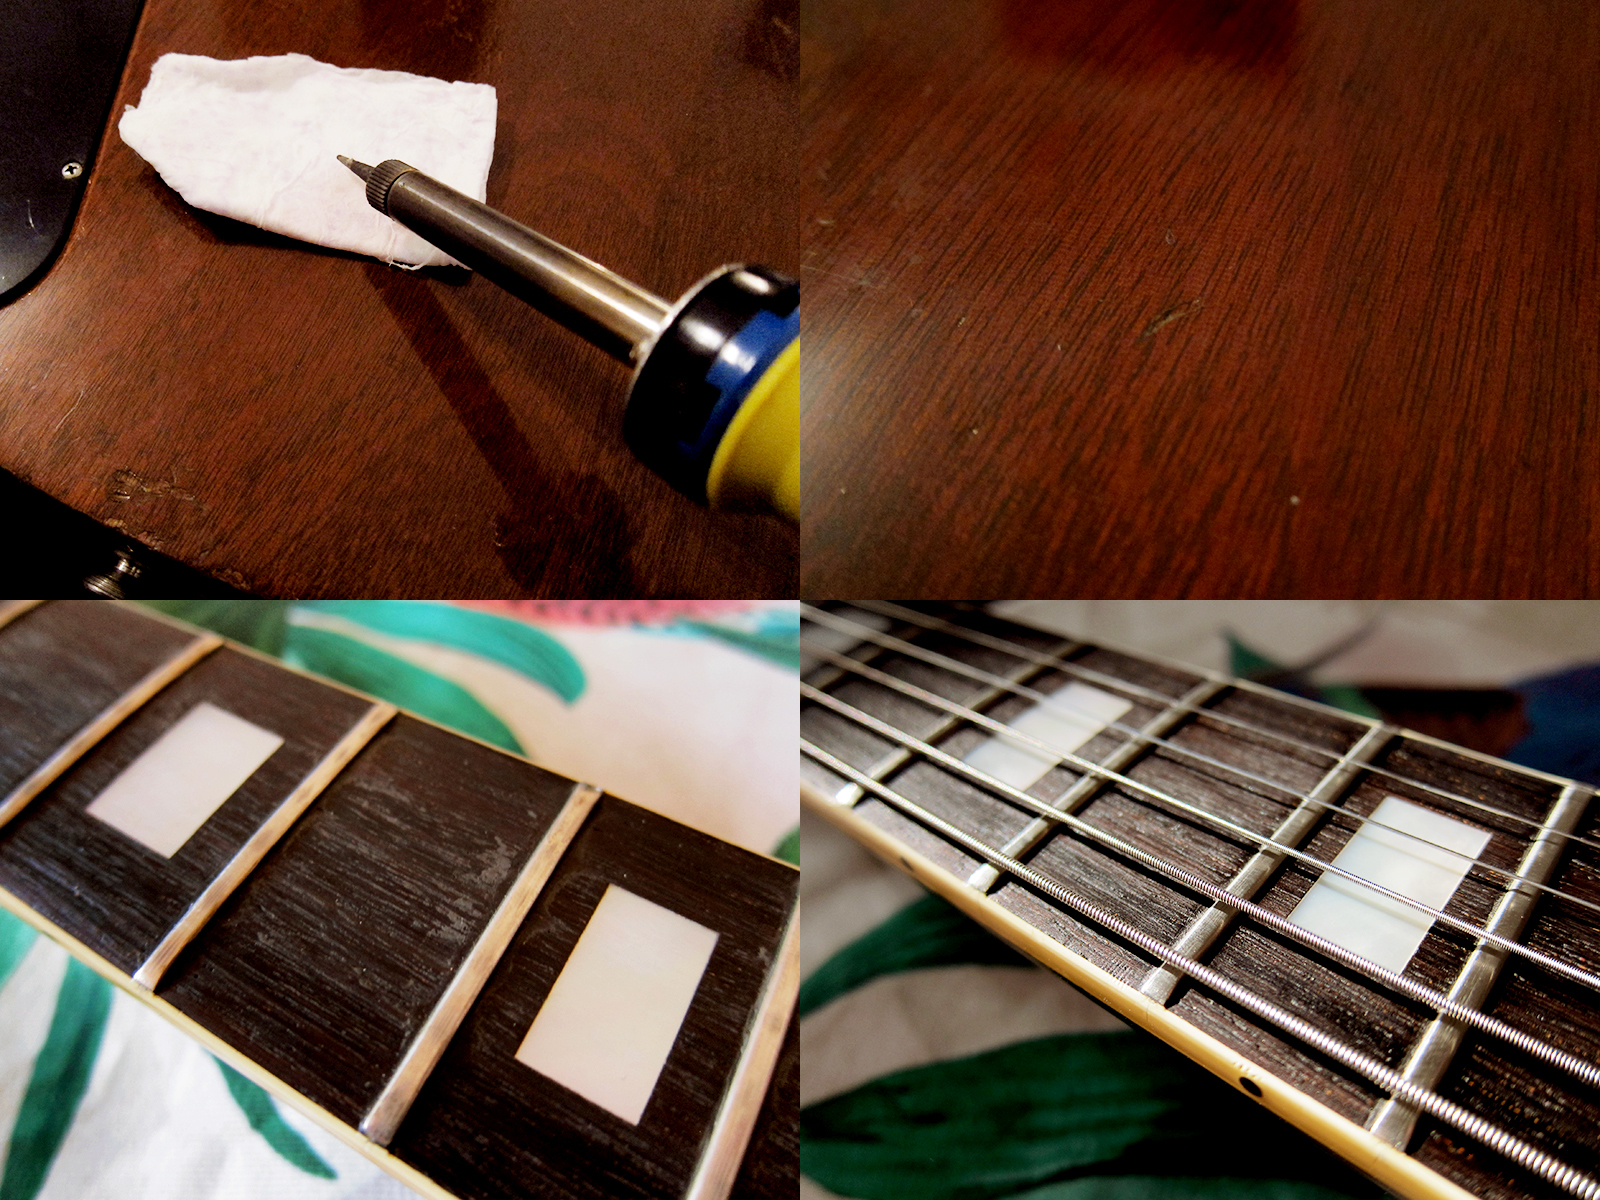
Patrycja wanted to keep the dents and scratches to the body and I agreed, it’s nice when a guitar shows it’s real age. However, nobody likes dents in the back of the neck so I did what I could to soften them a bit. I recently learned a great way of removing dents and scratches, or at least making them stand out less. Use a soldering iron and some wet paper folded up, the steam from the iron will make the wood swell and that way make the dent less deep. Sometimes this works extremely well, especially on surface scratches, and sometimes it makes no difference at all so it’s a bit hit and miss but it’s quick and easy and therefore at least worth a try. Make sure you move the soldering iron and just hold it down for a sec to not damage the surface. The last step was to polish the frets and fretboard, put on some lemon oil and then new strings. The action and intonation was already great so I didn’t have to adjust that.
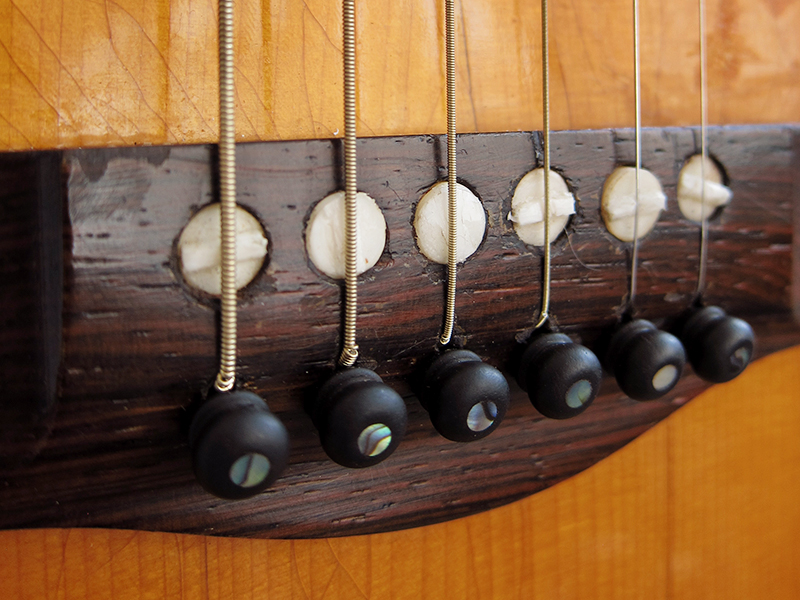
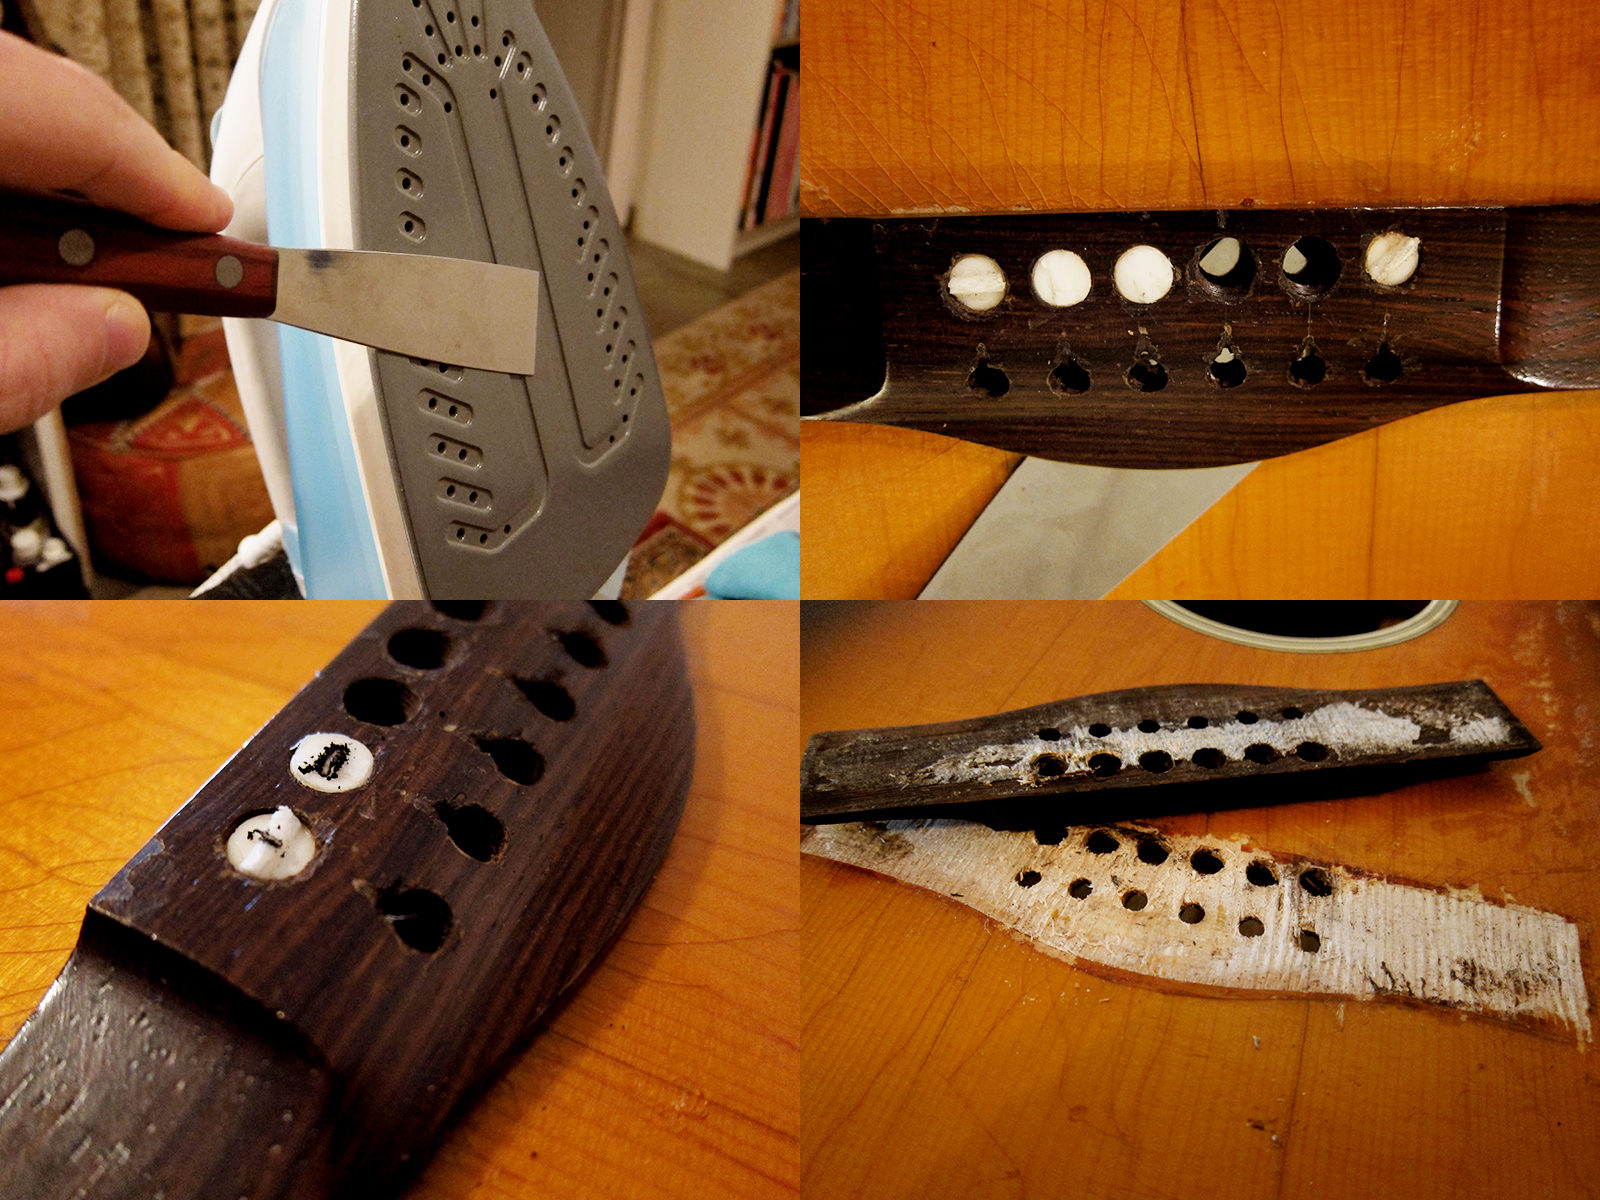
The old plastic saddles before I removed the bridge on my Goya Model 163 from 1968.
I recently had to remove my first bridge on an acoustic guitar, after removing my first neck it just felt like a natural next step. It turned out to be both harder and easier than I first thought it would be. I needed to do this for two reasons, first because the bridge started to come loose, it felt like the glue had dried up and started to fall apart. Second, I wasn’t too excited about the extremely low individual height adjustable plastic saddles, as Levin calls them, that the previous owner had left me. They were too low to adjust and made some strings sound muted and dull. I watched a Youtube clip before I started with Julyan Wallis, who happened to be working on a Levin guitar as well, and learned a few good tricks. He was heating up the spatula on an normal clothes iron and that way managed to loosen the old glue under the bridge. It worked extremely well.
I heated up the spatula on a normal clothes iron and touched it with my fingers to make sure it didn’t get too hot, I was scared to scorch the lacquer. As soon as you loosened the corners and worked your way around the whole bridge you can keep the tip of the spatula quite hot if you are quick to get it in under the bridge and not resting it on the lacquer. This could have been such a smooth and and easy job if I would have realised earlier that that saddle screws went all the way through and was actually screwed in to the top as well, something that kept the bridge secure even when all the glue was loosened. I tried over and over and even managed to damaged the lacquer in two places in my desperate attempts to get the bridge off. Since I couldn’t get a grip of the saddle screws, two was filed down smooth and the others were too low to hold on to with any pliers. I had to heat up a screwdriver on a candle, I should probably have used the clothes iron, and then melt the tip in to the saddle and that way get a grip and unscrew them. Once all the saddle screws were out the bridge came off straight away. It could have been a cleaner removal if I had realised that the saddles were attached to the top but still, I’m pretty pleased with the result for being my first time.
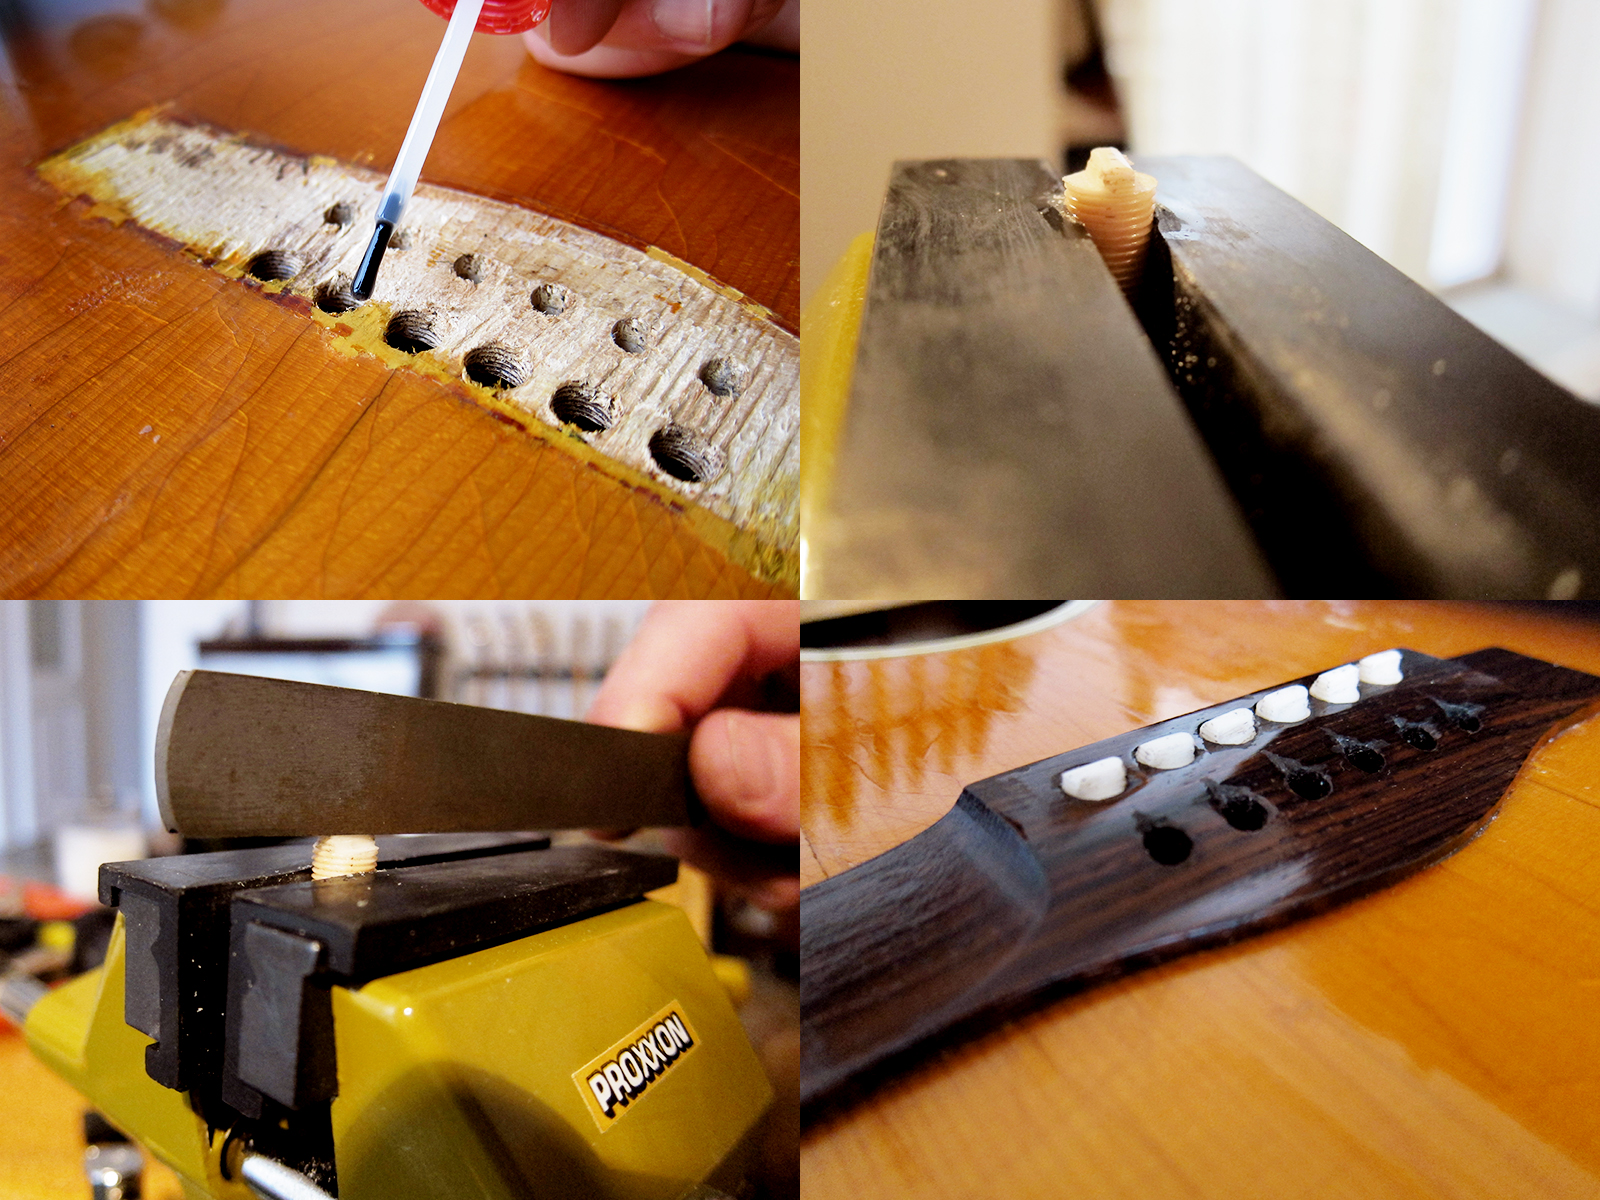
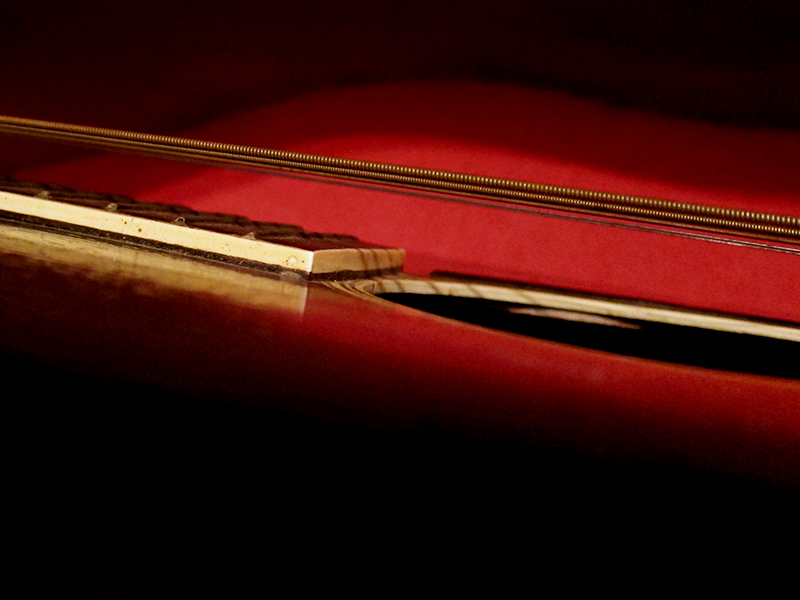
I painted the wood where the finish had come off and then added a bit of nitro lacquer to seal it. Since I had to burn the tip of the saddles to get them out I thought the best I could do in order to save as much material as possible was the flip them over and reshape the bottom instead. I used a normal hand file to shape the saddles, I made the tip both higher and wider to get a better grip with the pliers when I adjust them. Once the shape was good I rounded them off with my fret crowning file. I glued the bridge back in place with fish glue and a couple of clamps and let it set for 24 hours. It worked pretty well, the tone is better and I can now easily adjust the string height like Levin intended 46 years ago.
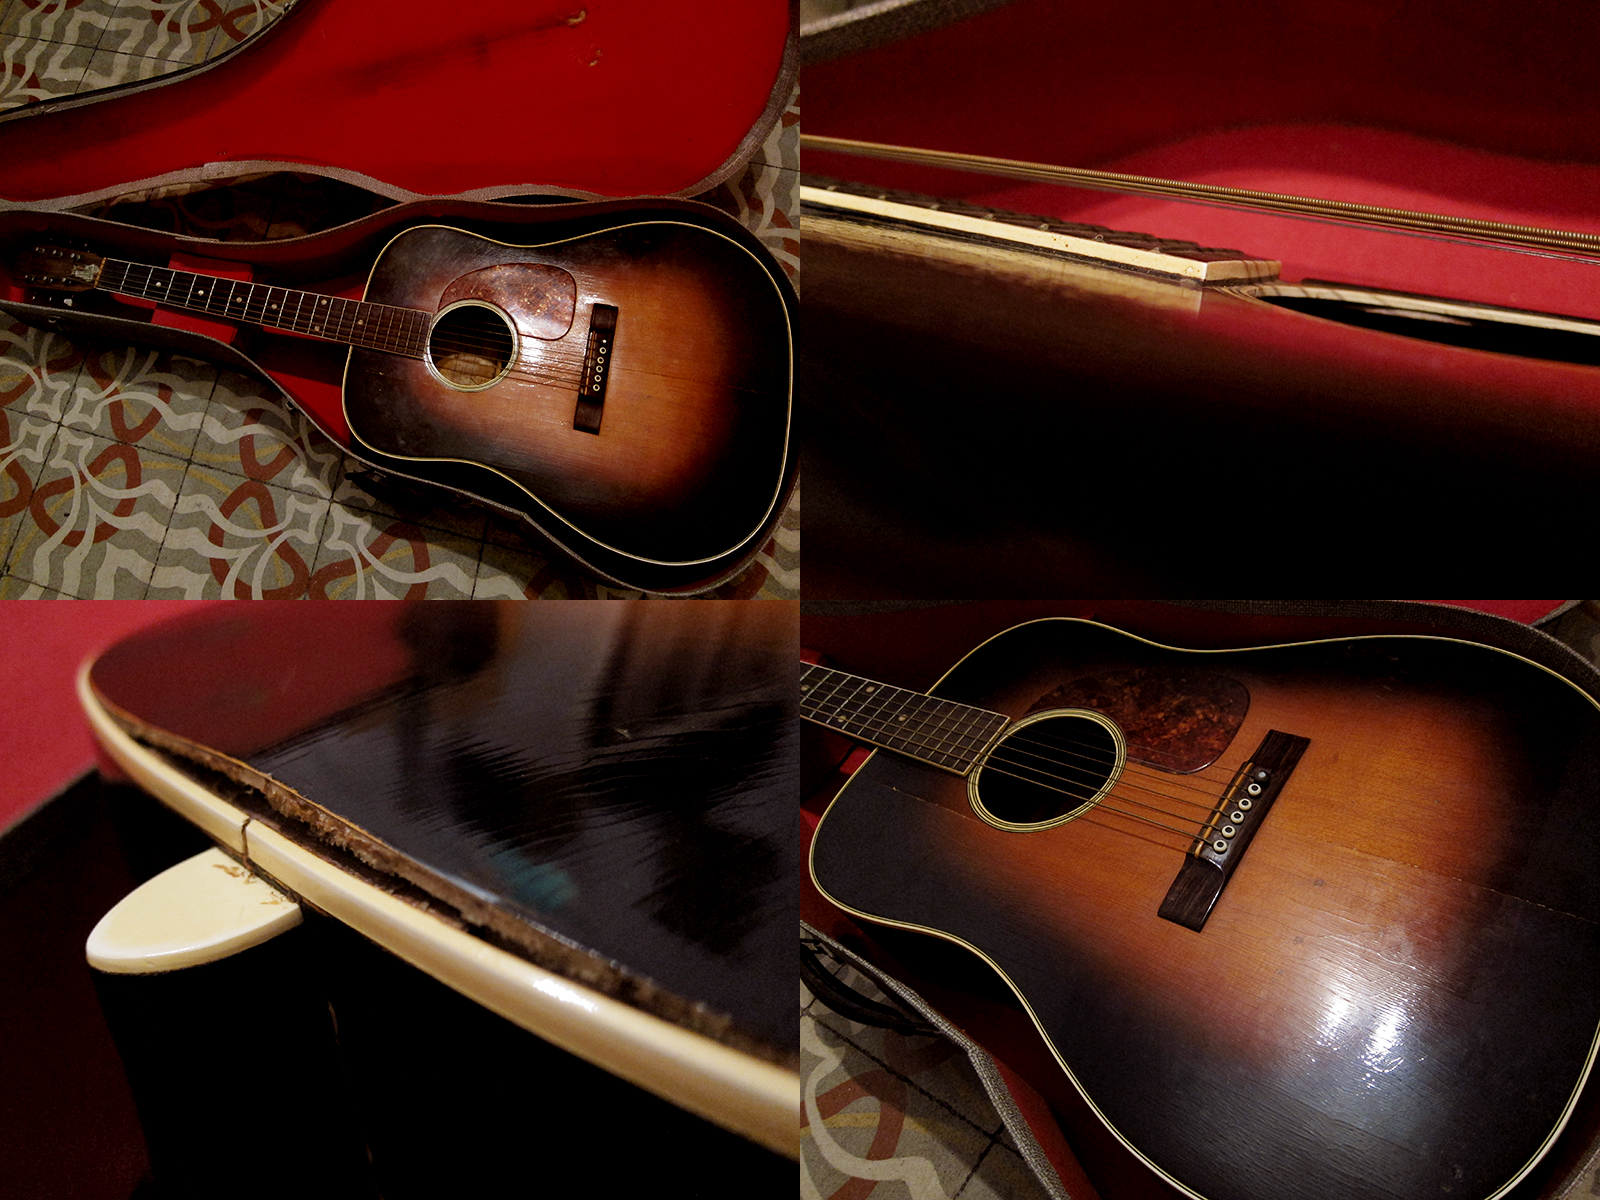
A fairly unplayable 1959 Levin LM-26 before I reset the neck
I’ve been very lucky and managed to get my hands on a couple of really nice Levin and Goya guitars over the last year. I would probably have thought twice about getting any random 50 years old acoustic since the action is normally a bit of an issue but with Levin it’s quite easy to reset the neck. They have been using a bolt-on neck system since the 1950’s which makes the job pretty manageable. Remove the two bolts that attach the heel with the neck block, you can see them if you look inside. A normal Philips no 2 screwdriver fits if you don’t have a square Allen key. The heel is normally not glued in so you will feel it loose as soon as you remove the bolts. If not, apply a bit of pressure upwards to loosen the heel. Now you will be able to fit a sanding strip under the heel and can start to sand it down and that way change the neck angle and lower the action. Apply a bit of pressure on the neck and just pull, it might take 40-60 pulls on each side so so be patient. Check the neck angle with a straight edge once in a while so you don’t take it too far. As long as the straight edge doesn’t go over the bridge it should be fine. I have done the sanding strip trick on two guitars so far, my Goya T-18 and a Goya 163. On my Levin LM-26 I felt it was better to remove the whole neck so that made the sanding process even easier.
Update: January 27, 2014 I needed to sand down the heel a bit further on my Goya Model 163 and realised that the fretboard started to come loose. It looked and felt just like the bridge, like the glue had dried up and started to crack and fall apart. I tried a new trick that I learned on Youtube, to heat up the spatula instead of heating the neck, like a did on my Levin LM-26. My God, this was so easy and quick, I think it took me 7 min to remove the neck. When I had sanded down the heel a bit further I glued the neck back with some fish glue and a couple of clamps.
Update: January 26, 2014 My Levin LM-26 from 1959 is now finished
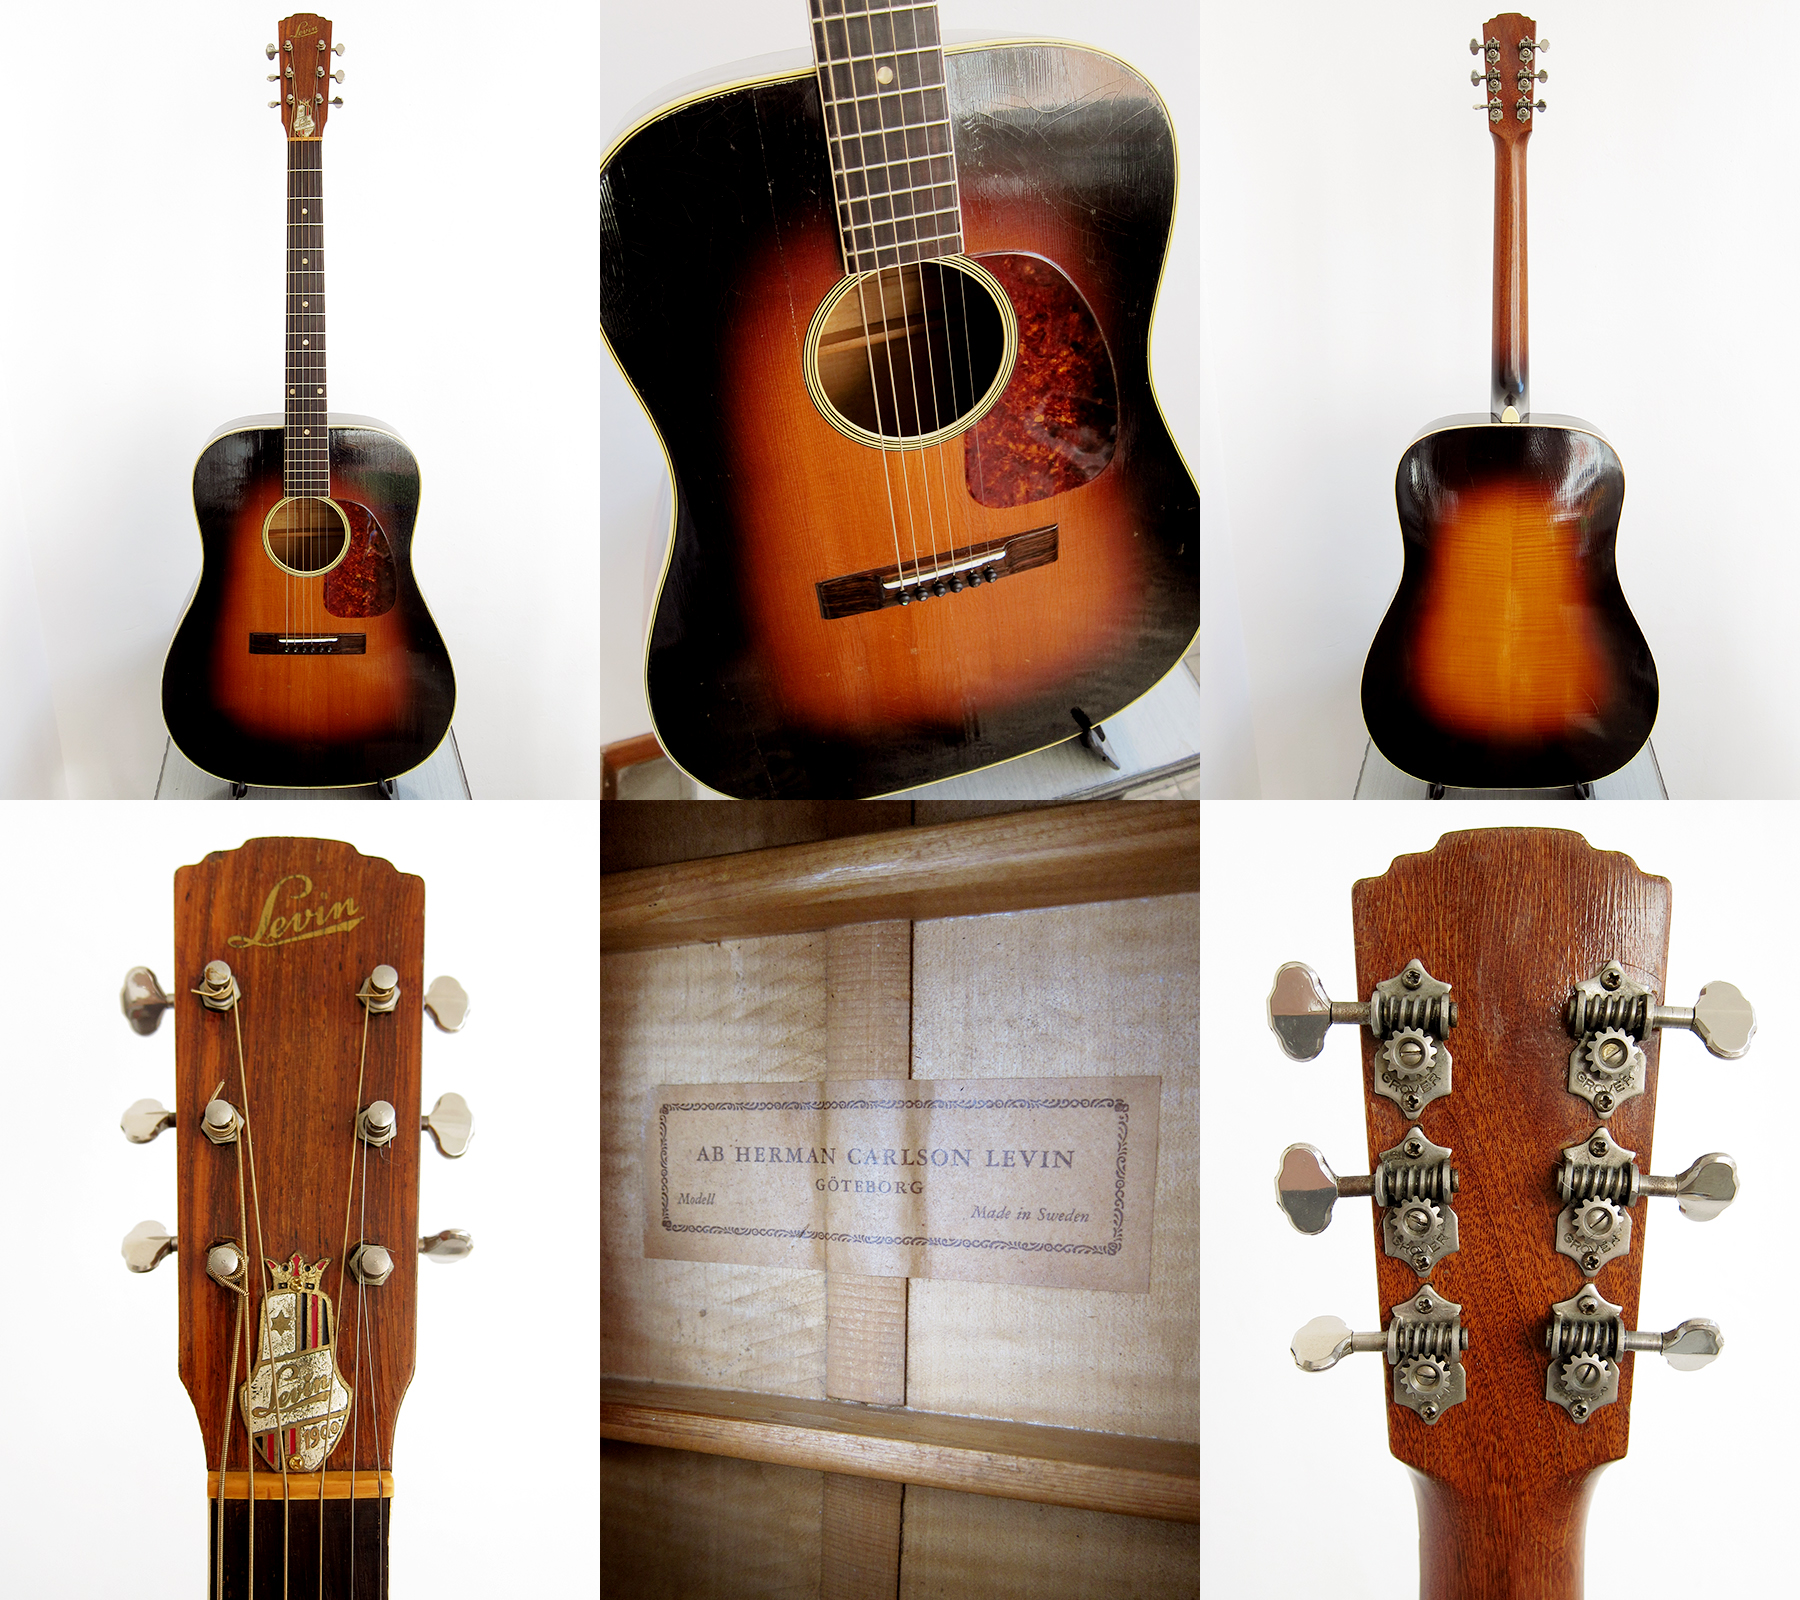
Bell ad from 1962 for the wonderful extra large sized Levin Goliath Model 1795
As I mentioned in my previous post about Levin I managed to win a Levin LM-26 on eBay back in December. It turned out to be in a worse state than I expected which I guess is both good and bad. Bad because it’s unplayable so I still don’t know how it sounds, good because I’m forced to learn a lot of new things, like how to remove the neck on an acoustic guitar. The Levin LM-26 was sold as The Levin Goliath Model 1795 in the UK and I think they sold pretty well, even Pete Townshend had one. They have spruce top with flame maple back and sides, all solid as always with Levin. If you want to know how old your Levin or Goya is then check Vintage Guitars Sweden. Levin serial numbers / Goya serial numbers
Pete Townshend is playing a Levin Goliath LM-26 in 1963 with Detours, later The Who
Levin LM-26/ Goya M-26 Goliath size: Body width: 400 mm, body length: 505 mm, body depth: 95/120 mm
Fingerboard width: 43 mm, scale length: 630 mm
Spruce top, flame maple back and sides, 4-ply bound top, single-bound back
Mahogany bolt-on neck with adjustable truss rod
Metal truss rod cover with a star and “1900”, nickel plated tuners
Single-bound rosewood fingerboard with centered pearl dot inlay, rosewood bridge
Sunburst finish and ten year warranty
Marketed by U.K. distributors as Goliath Model 1795.
Levin LM-26 from 1959, well the body is actually stamped with a number from 1958, the year this model was introduced. I’m not sure if they used an old body when they put they guitar together at the Levin factory in Gothenburg in 1959 or if someone changed the neck when the guitar came to the UK. The previous owner for the past 51 years, Roger, bought the guitar second hand in 1963 for £40 from Bill Greenhalgh Ltd, 125-127 Fore Street in Exeter. Roger changed the original machine heads to Grovers in 1965, it’s otherwise all original. The action was so high that I could almost fit my hand under the strings so I had to remove the neck and reset it. There are a few things that needs to be glued as well, the back is lose and there are 2-3 cracks in the top.
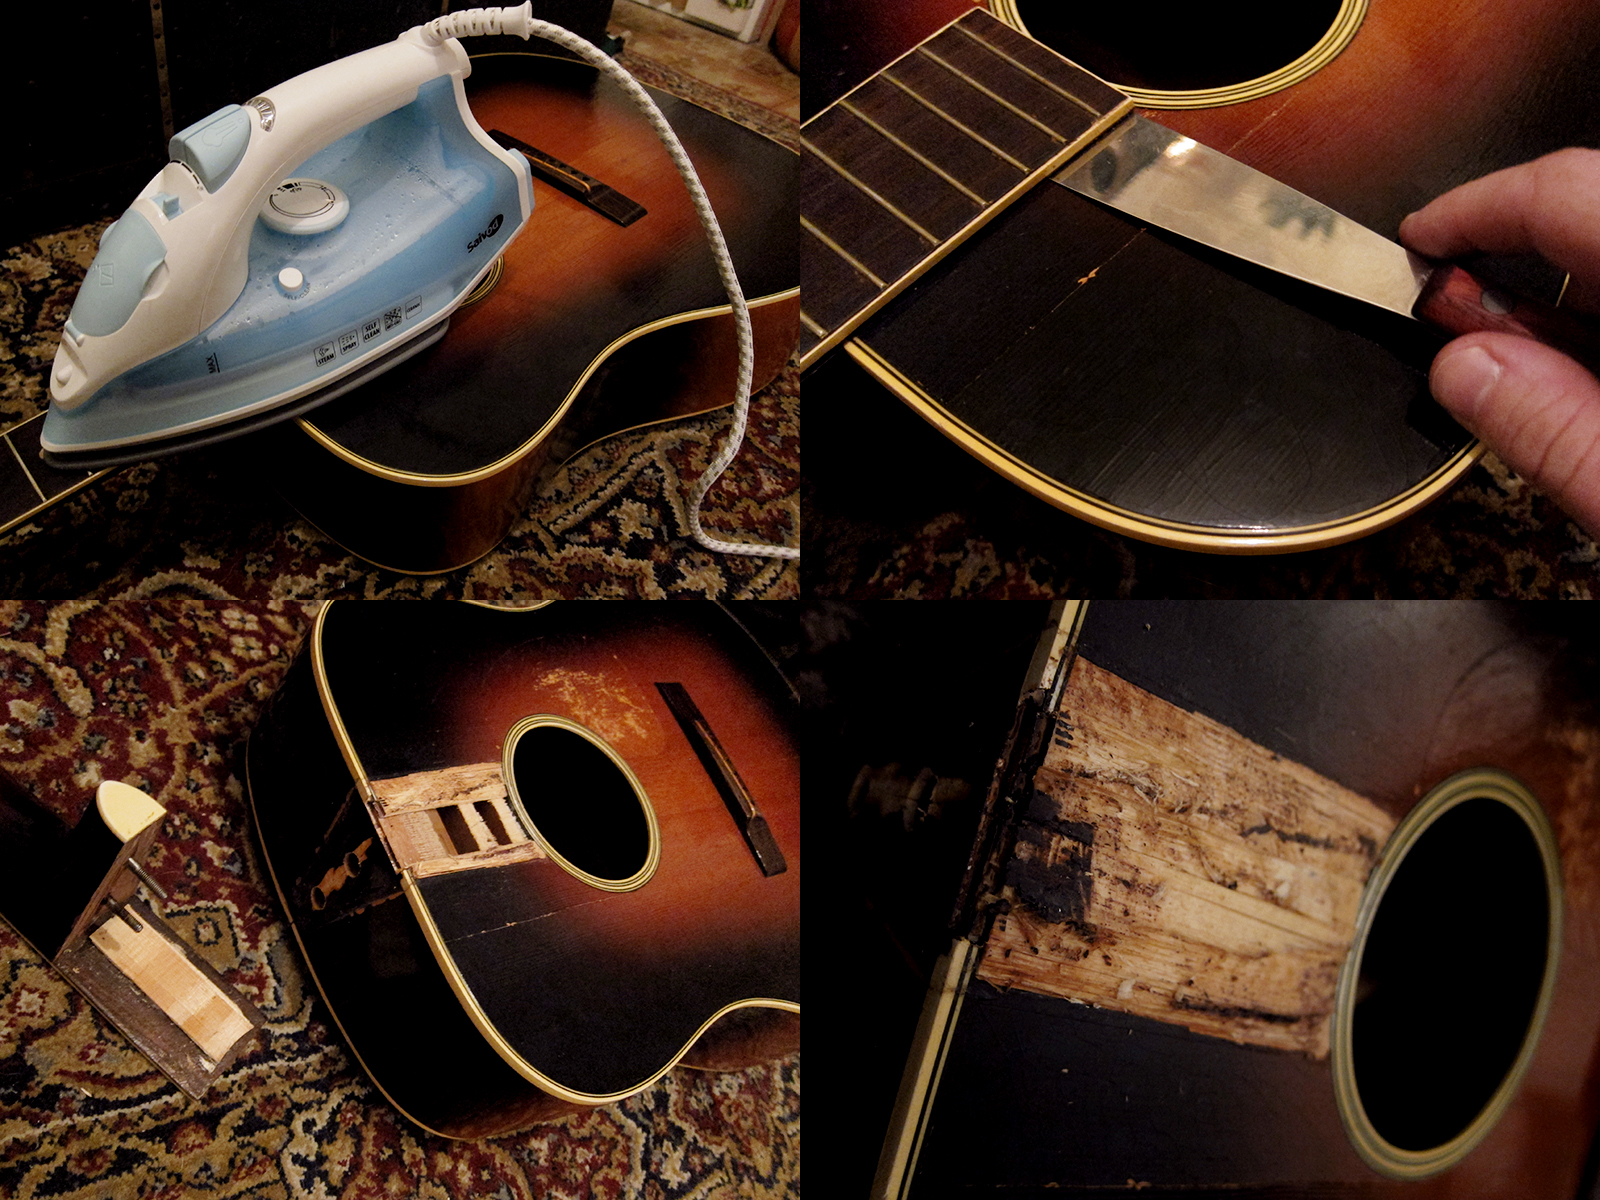
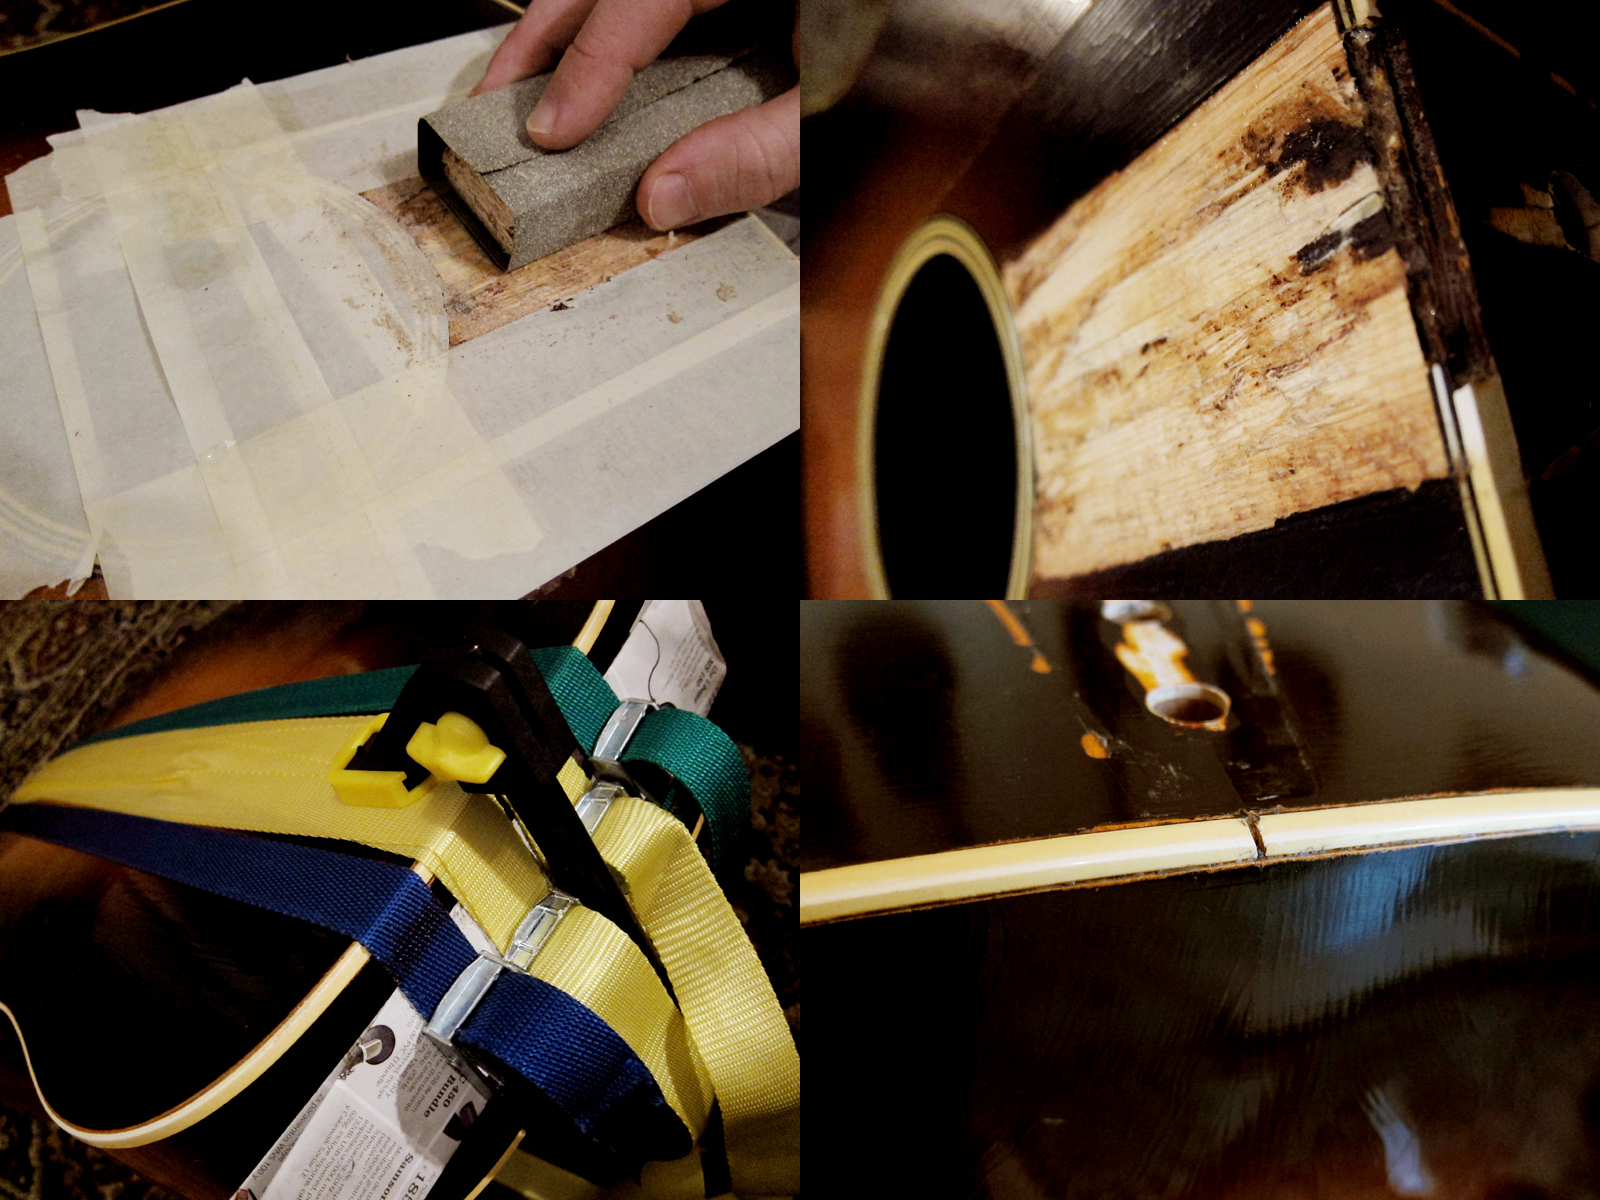
I have never removed a neck before so I was pretty nervous about this part. It’s supposed to be one of the trickier things to sort on an acoustic guitar but luckily this neck was fixed with the Levin bolt-on neck system which made it a lot easier. I removed the two bolts inside and the heel came lose straight away, now I only had to loosen the fretboard overhang. I removed the pickguard with a razor blade, cutting under the edge, just to make sure I wouldn’t melt or damage it while removing the neck. Then I used a normal clothes iron to heat up the fretboard, I don’t have any fancy pants Stew Mac tools or special gadgets. I heated up the fretboard for 1-2 min and felt with my hand every 30 sec to make sure it didn’t get too hot, I thought if I could still touch it maybe I wouldn’t burn or damage the lacquer on the top. It took ages to get it off, I think I probably spent 1-2 hours per night for 3 nights in a row on this. The glue loosened more and more and in the end I could get a flat screwdriver in and bend it loose. Unfortunately a chunk of spruce decided to stick to the neck instead of the body but to be honest I expected worse damage than that on my first attempt to remove a neck. I used my clothes steamer and steamed the spruce loose from the mahogany neck, it peeled right off, and just glued it back in the neck pocket again.
I masked off the top and sanded the pocket even so now the neck will fit fine once I’m ready to put it back on. I had to get the gap on the back closed. I’m not a master gluer and since you pretty much just get one shot, or rather it’s really annoying to remove and re-glue things if they aren’t perfect, I was a bit concerned about this too. I used plenty of fish glue and then 4 strong straps that could not only press in the back but also press down the the sides to close the gap as much as possible. I’m pretty pleased with the result, the gap is gone and it seems pretty solid.
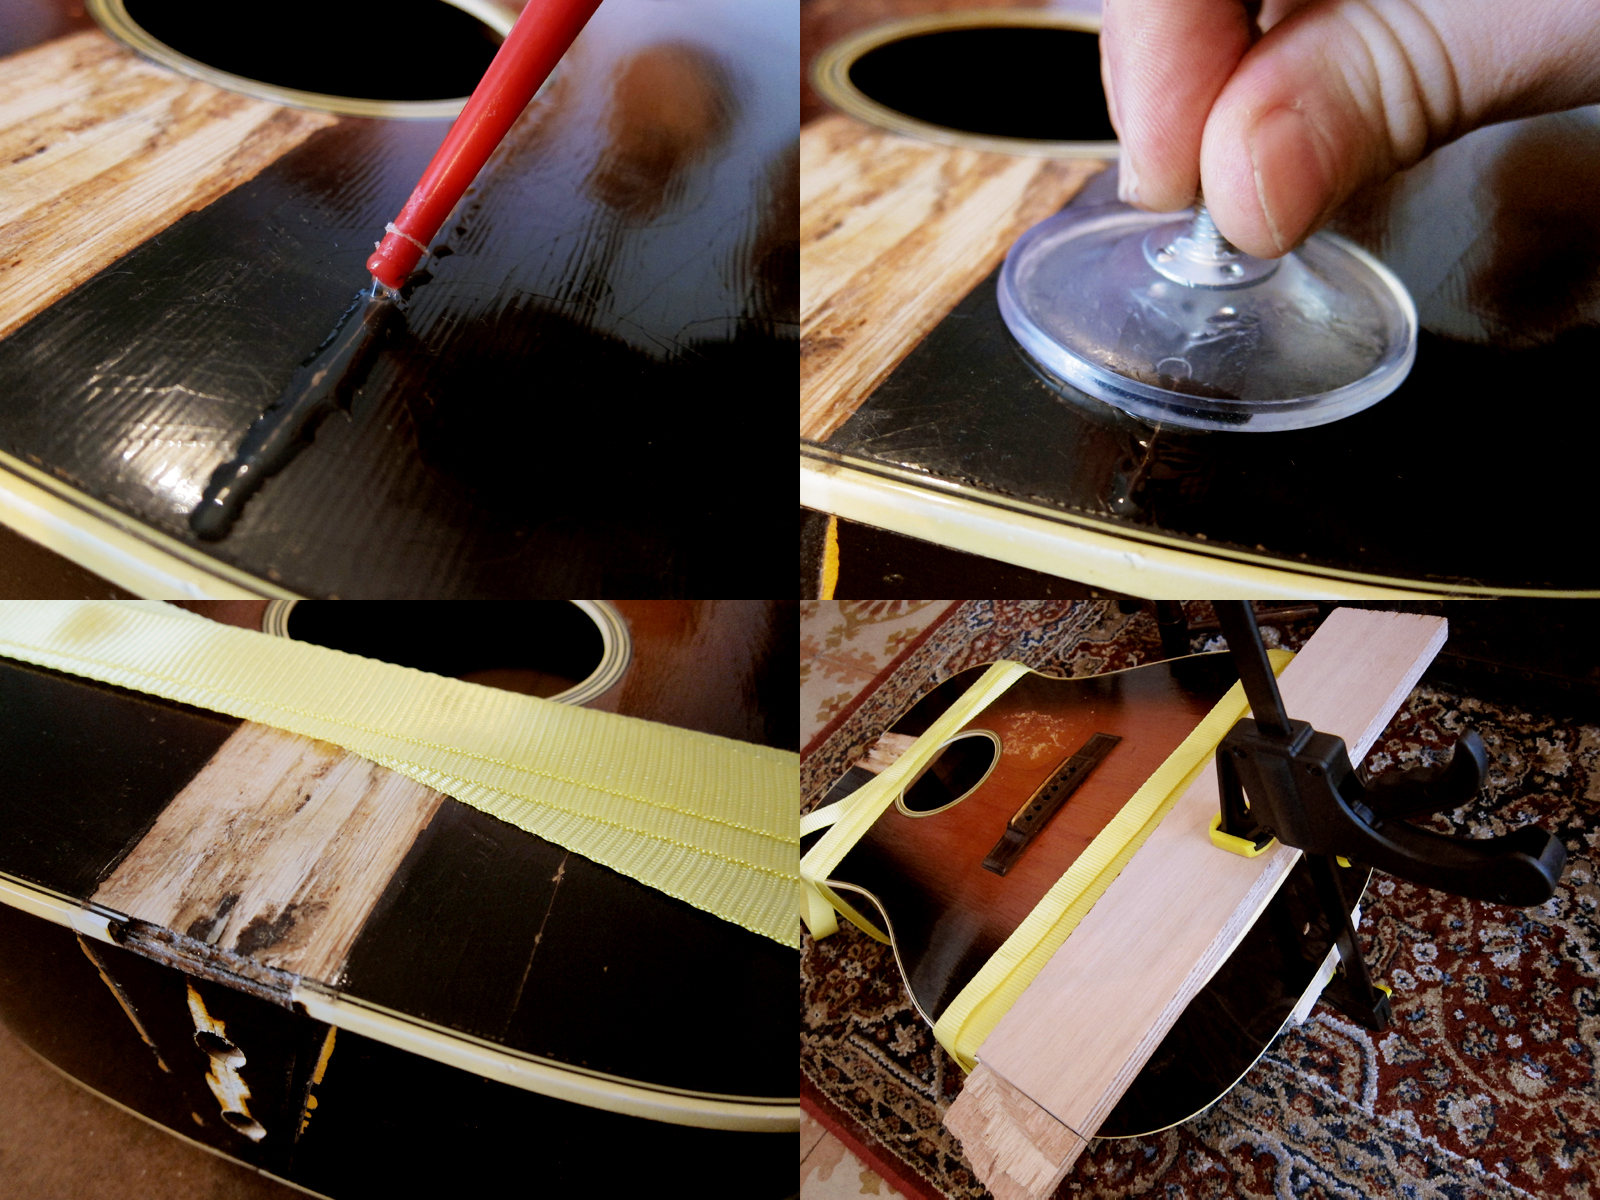
Next thing was to try to close the cracks on the top. One was all the way through and two was smaller hairline cracks. I filled everything with fish glue and used a suction cup to try to push in the glue in the cracks, I saw this on Youtube and it made sense to me so I tried it. Then I just strapped everything up and put a piece of wood the keep the main crack flat while it dries.
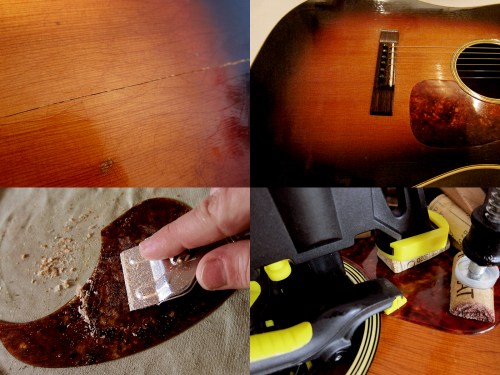
Once I had glued the cracks in the top, the first image shows before I started, I painted and lacquered the crack. I used normal matt black acrylic paint for the dark parts and just darkened the rest with furniture oil before I applied the nitrocellulose lacquer. Once the lacquer was dry I sanded the surface smooth with 400, 800, 1500, 2000 and 2500 grit. It worked really well, it’s actually hard to even see the big crack that went all the way from the edge to the bridge. I removed the old glue from the pickguard and then glued it back again.
The neck was in really poor state, deep groves and marks all over it. I filled it with nitrocellulose lacquer, as mentioned in my previous post about how to repair lacquer damage. I had to take out the heavy artillery in order to get the neck smooth and used 180 grit. Then it was just a matter of sanding it back to it’s former shine using 400, 800, 1500, 2000 and 2500 grit. You can still see the marks but the neck is perfectly smooth and shiny again.
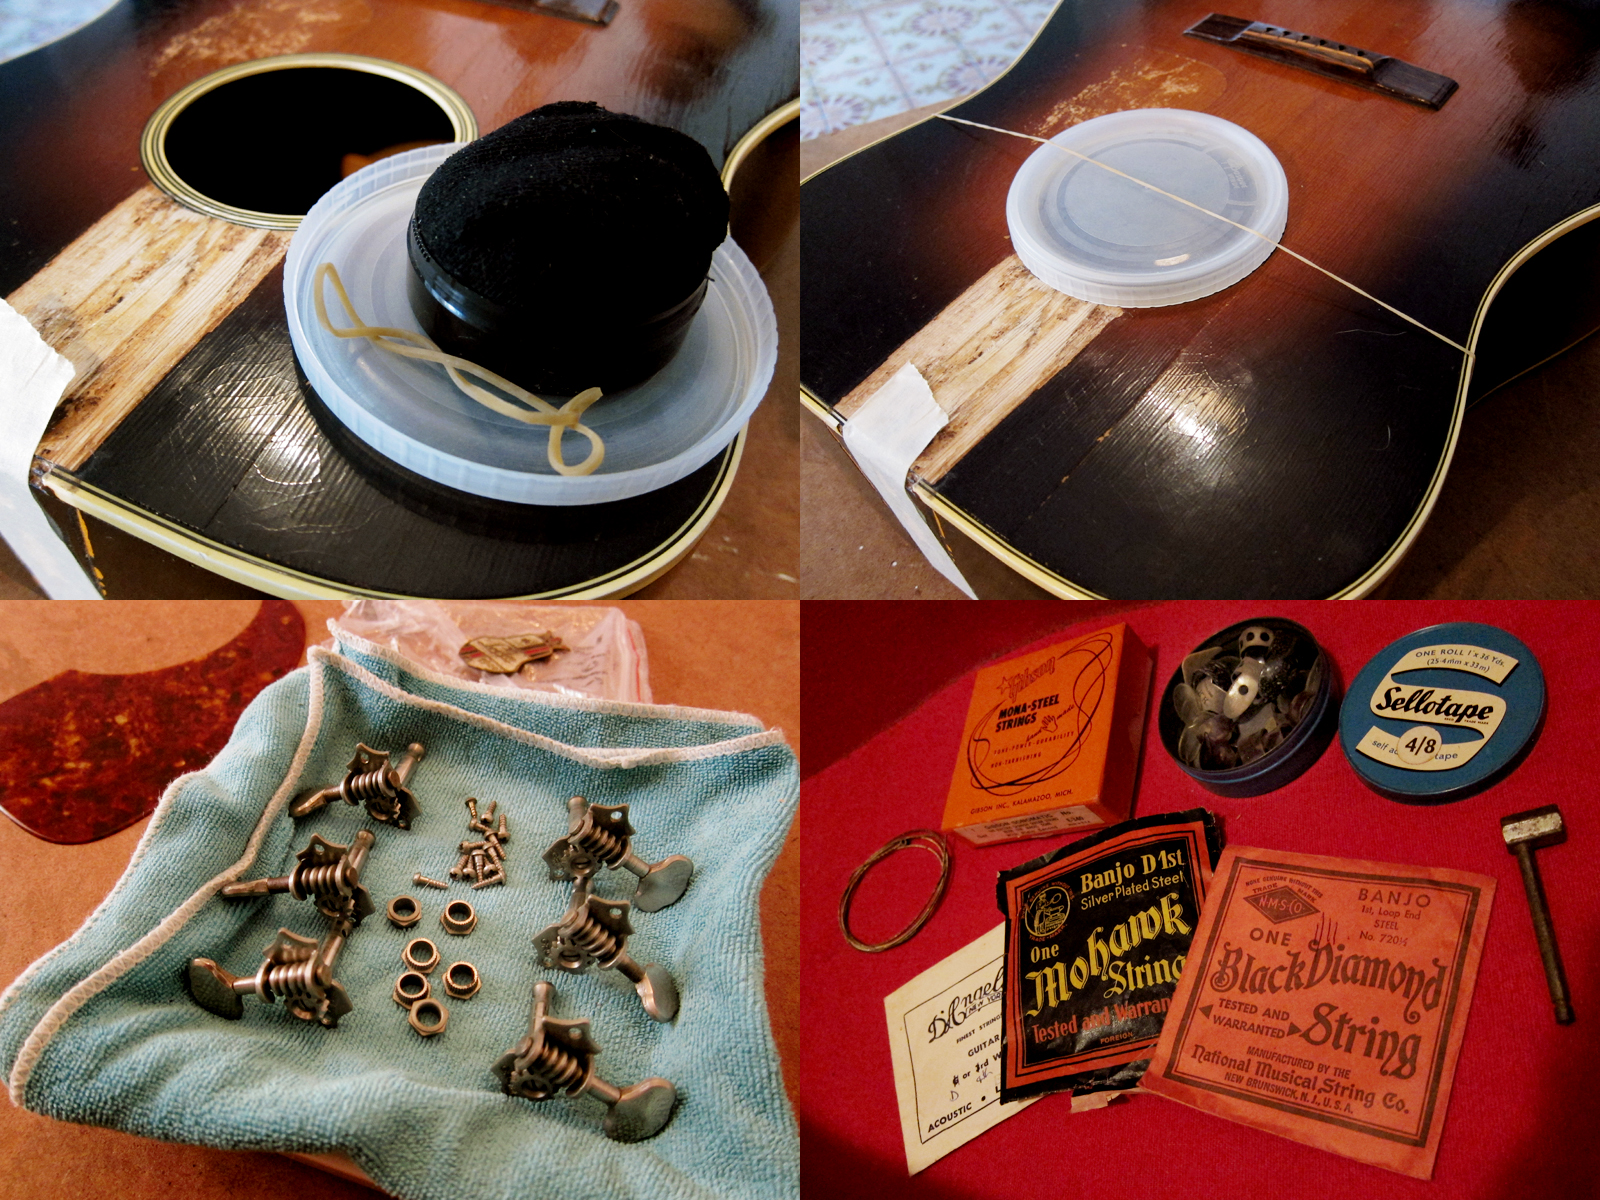
According to Roger the guitar has been stored in a back room in it’s case for the last three decades and I guess the humidity wasn’t ideal, hence the cracks. As soon as I got the guitar I started to humidify it with a wet sock in a plastic container inside the body and then sealed of the hole with a lid from a Mercadona lunch box. The Grover machine heads from 1965 got a good clean and is now oiled up and works fine. In the last picture you can see what lied hidden in the accessory compartment in the old hardcase. Old guitar and banjo strings, an old sellotape box full of fingerpicks and best of all, an original Levin trussrod key. I’ve been looking all over for one of these. Thank you Roger.
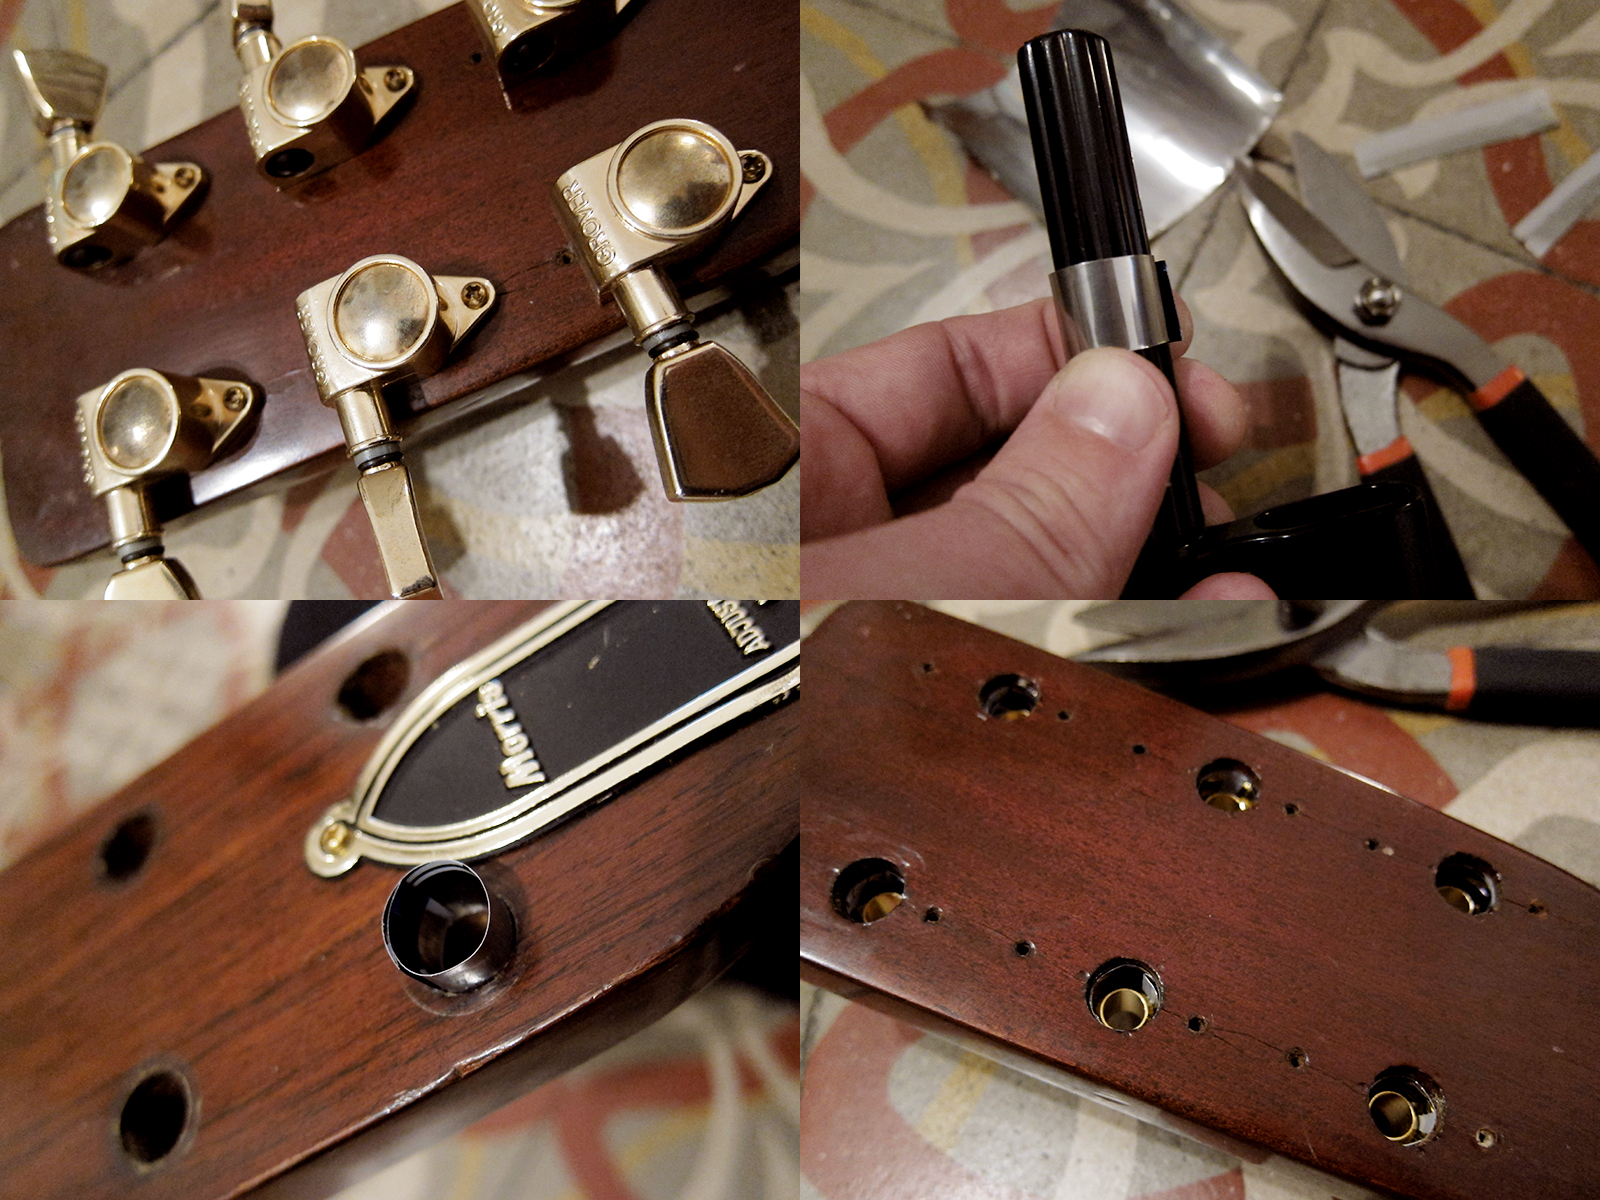
I just installed a new set of Wilkinson WJ44 in gold on my Morris W-40. I wasn’t happy with the fake 10€ tulip Grovers I had before so I decided to get some Wilkinson Deluxe tuners instead. They cost me about 33€ including shipping from Vansonguitars on eBay. I really love the tulip shape and will always chose that if possible but I really don’t like the green buttons that most companies use, even the big ones like Schaller, Kluson and Grover. Luckily Wilkinson has started to make their deluxe tuners in both vintage green and cream white so I could get my beloved gold deluxe tuners in off white instead of hospital green. Another good thing with these Wilkinson’s is that they have a 9mm bushing instead of 8mm which makes them easier to fit if you have modern 10mm holes for the tuners. Wilkinson are manufactured in Korea by Jin Ho and I’m very impressed with their quality considering how the cheap they are. I have both Wilkinson tuners and bridge on my Claescasters, I love their vintage bridge with compensated brass saddles.
Since the Morris W-40 has 10mm holes I had to try to make the 9mm bushings 1mm bigger. I decided to try the beer can trick which turned out to work pretty well. Cut a can open and remove the top on the bottom and then just cut strips as wide as the bushing. 1mm might sound like nothing but the bushing needs to sit tight in the holes otherwise they will be pulled out or move from the string tension. I had to go for about 1.5 strip to fill the gap and there was a lot of fiddling and pain in my thumbs to get it in place but I eventually succeeded.
I was hoping that the screw spacing matched the old Morris tuners but they didn’t so I had to drill new holes. They are going to be hidden under the original tuners if I restore it but for now, I prefer gold and tulip buttons to the original Japanese 70’s chrome tuners.
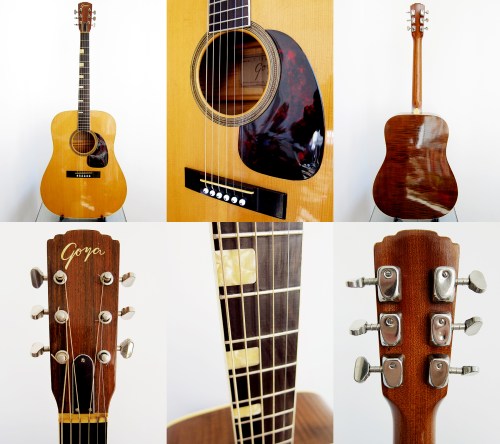
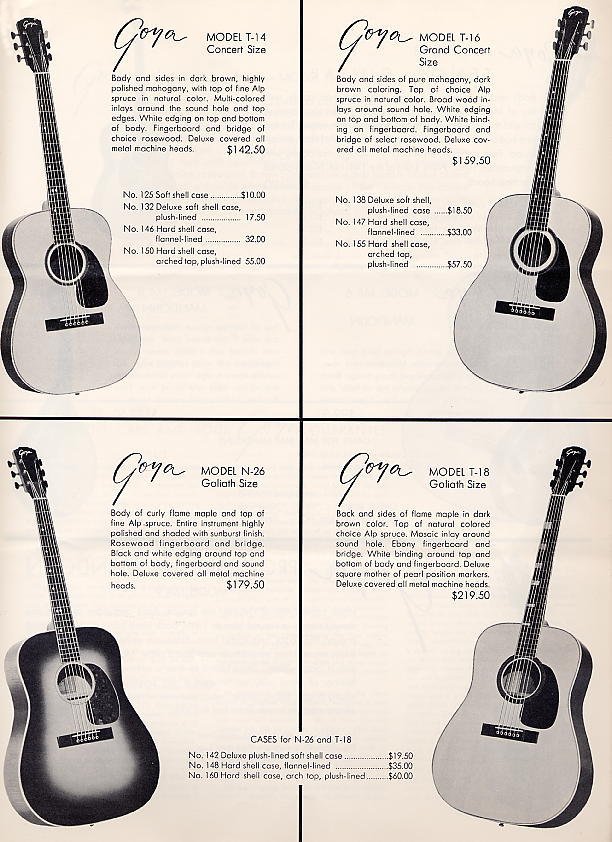
When my Goya T-18 arrived from the US back in September I didn’t really know where to start. It had an amazing tone, actually every time I pick it up I think it’s my best sounding guitar, but it needed work. The action was way too high, there was three deep really annoying dents on the back of the neck and the pickguard was loose. Last weekend I actually got to work on all three problems and I managed to get my Goya up and running and now I struggle to put it down.
Levin LT-18 / Goya T-18 Goliath size: Body width: 400 mm, body length: 505 mm, body depth: 95/120 mm
Fingerboard width: 43 mm, scale length: 630 mm
Spruce top, flame maple back and sides, 4-ply bound top, single-bound back
Mahogany bolt-on neck with adjustable truss rod
Single-bound ebony fingerboard with bass side pearloid block inlay
Nickel plated individual Van Gent tuners with metal buttons
Ebony bridge, natural finish and ten year warranty
Marketed by U.K. distributors as Super Goliath Model 1855
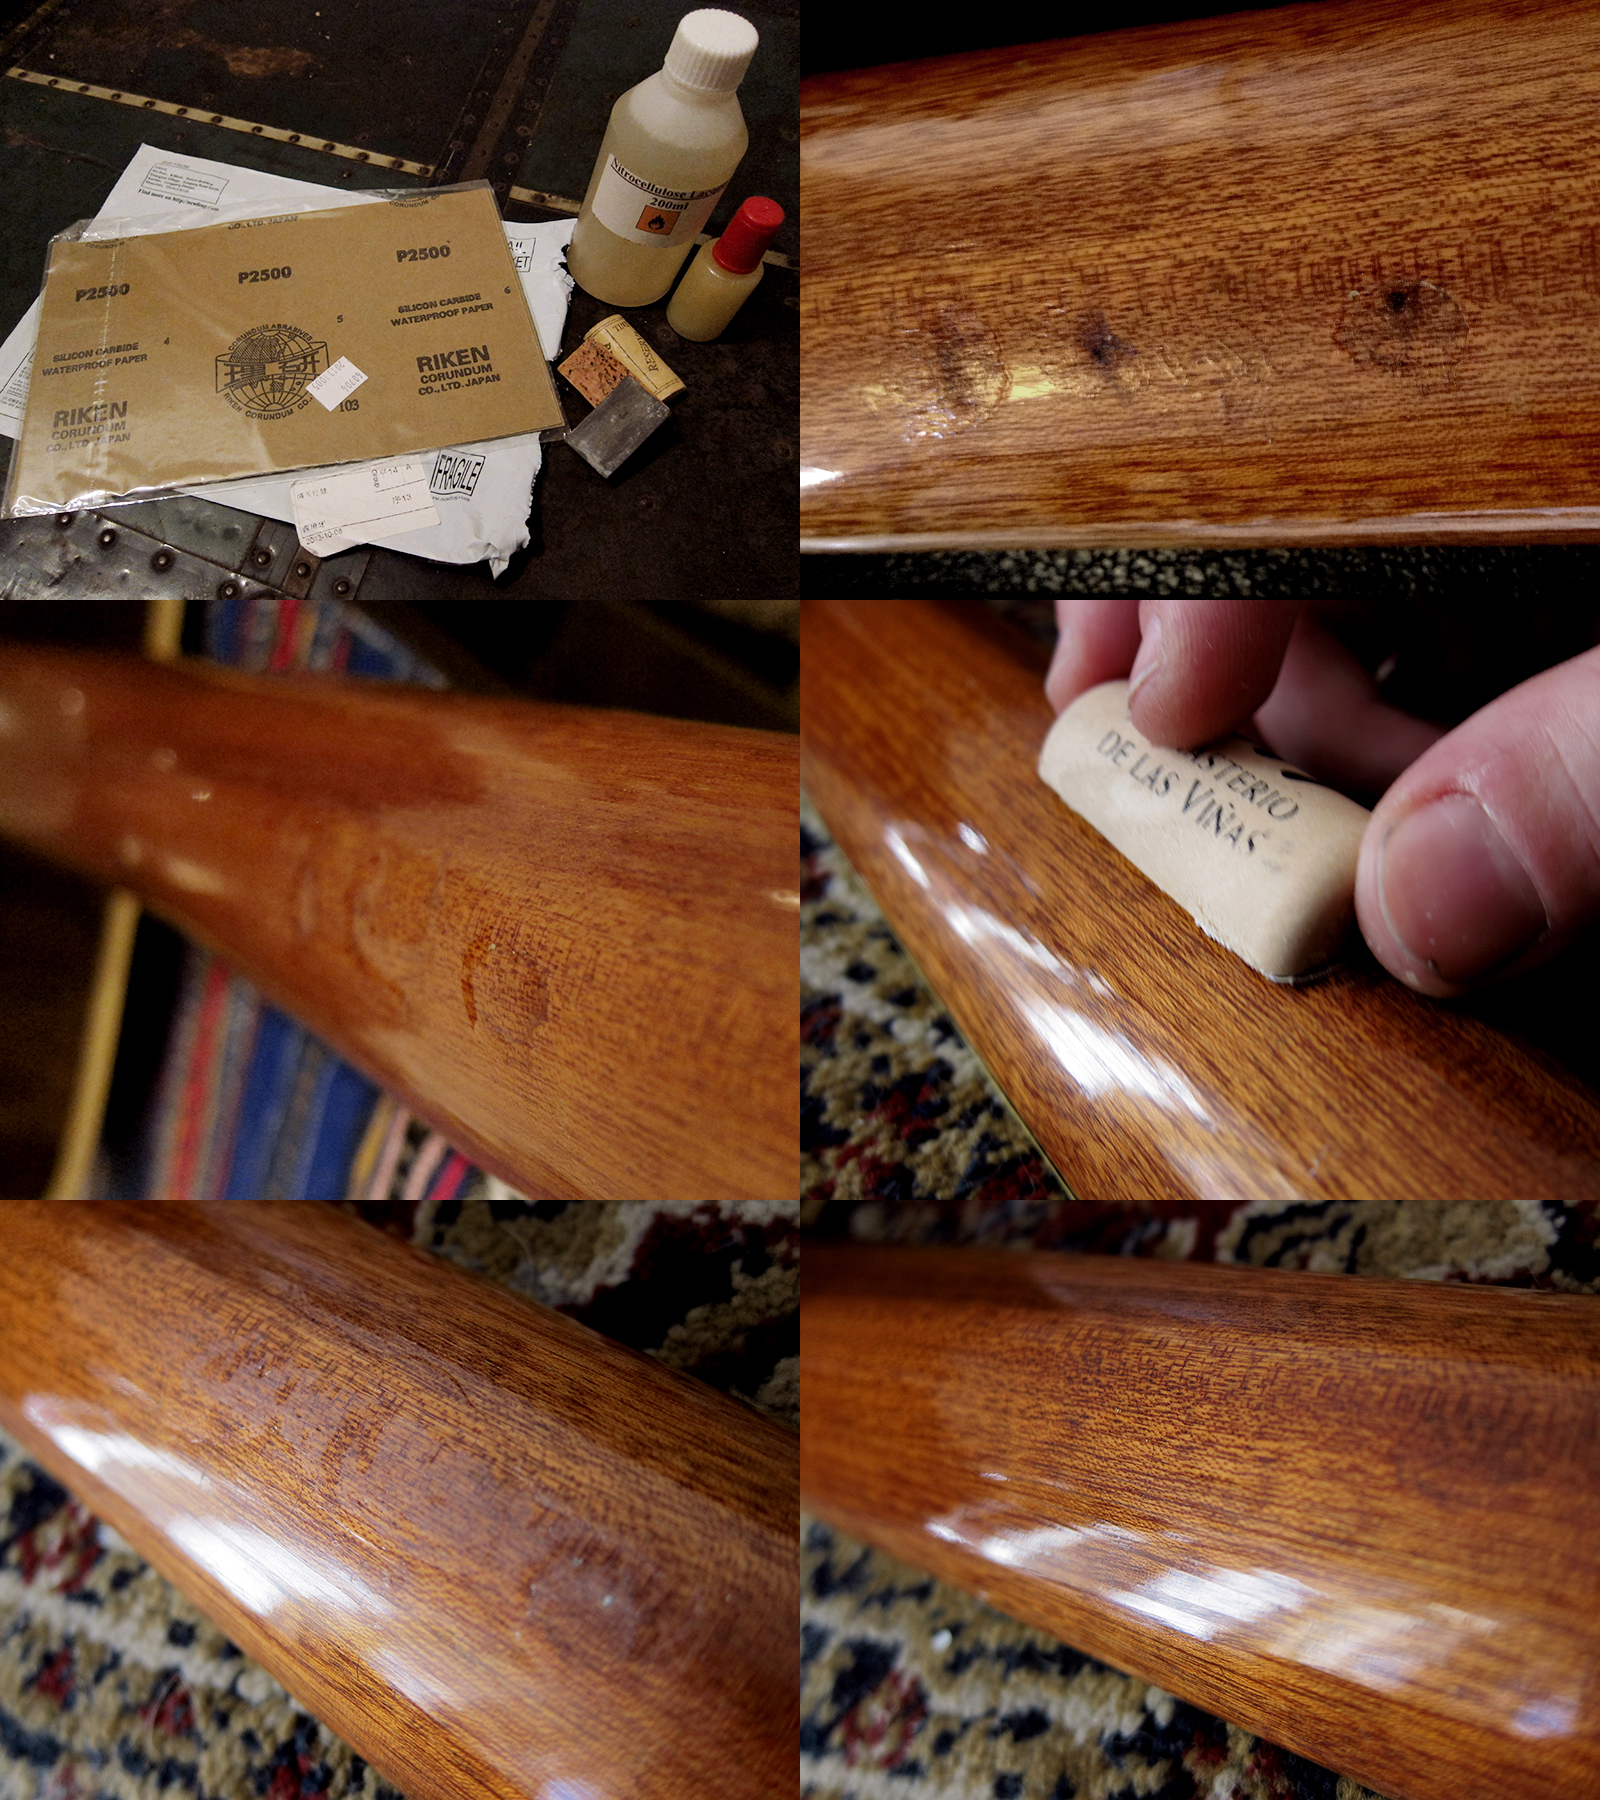
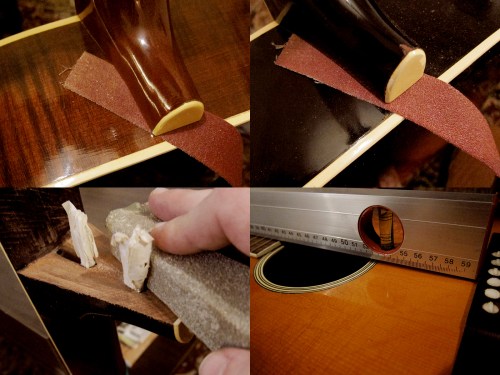
First I had to try to fix the three deep dents in the back of the neck. Since they went through the original finish down to the wood I actually added some water first to let the mahogany swell a bit and that way make them less deep. After a couple of days I added the first layer of Nitrocellulose lacquer with a toothpick, just one drop at the time. I had to repeat the process quite a few times to get it even, the lacquer sinks when it dries. Next step was to get rid of the edges with a razor, like mentioned in my previous post, and then sand it even. I used 400, 800, 1500, 2000 and 2500 grit and then added a layer of Carnauba wax and a lot of elbow grease and then buffed it up with a fine microfiber cloth. I guess because of the thickness of the original finish my repair blended in really well and it’s even hard to notice.
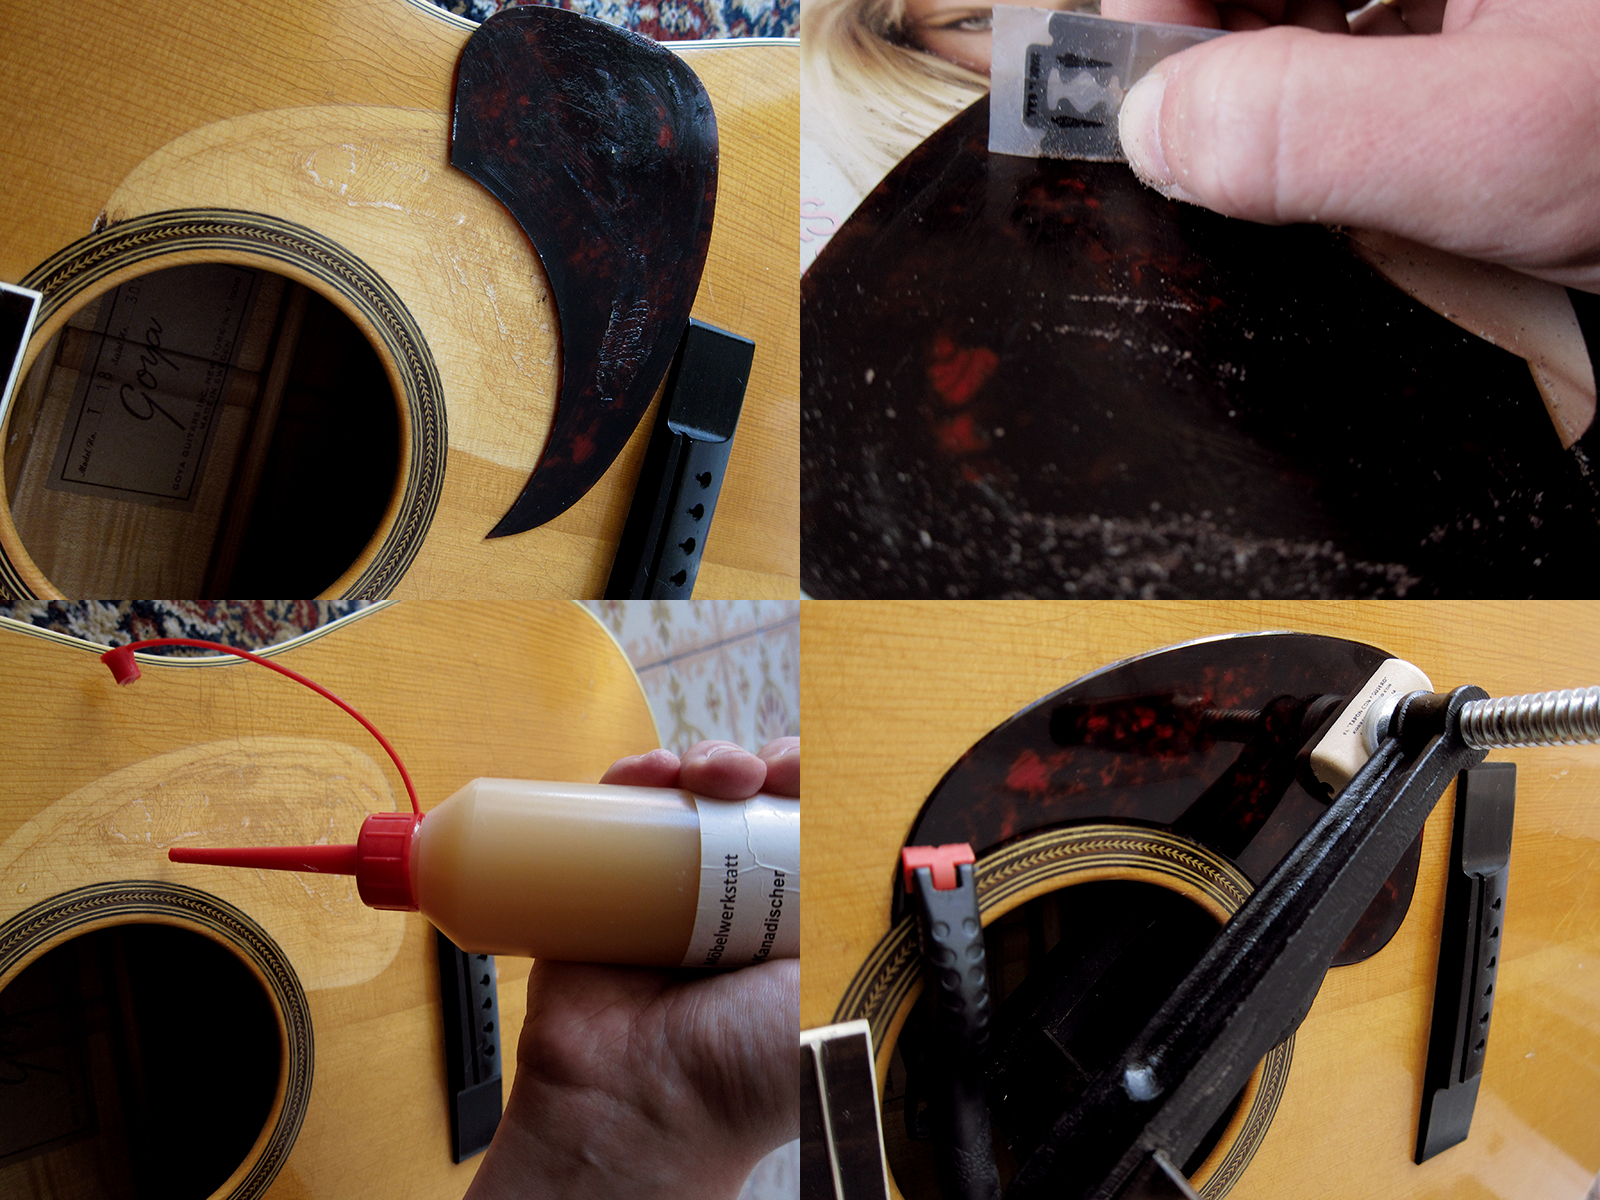
The pickguard was loose so I decided to remove it completely and then glue it back again. I cleaned off the old glue with a razor blade and made sure that both the top of the guitar and the back of the pickguard was smooth and even before I glued it back with my trusty old fish glue. I added some pressure with a clamp, I had a little block of wood on the inside and half a wine cork on the outside for not ruining the finish.
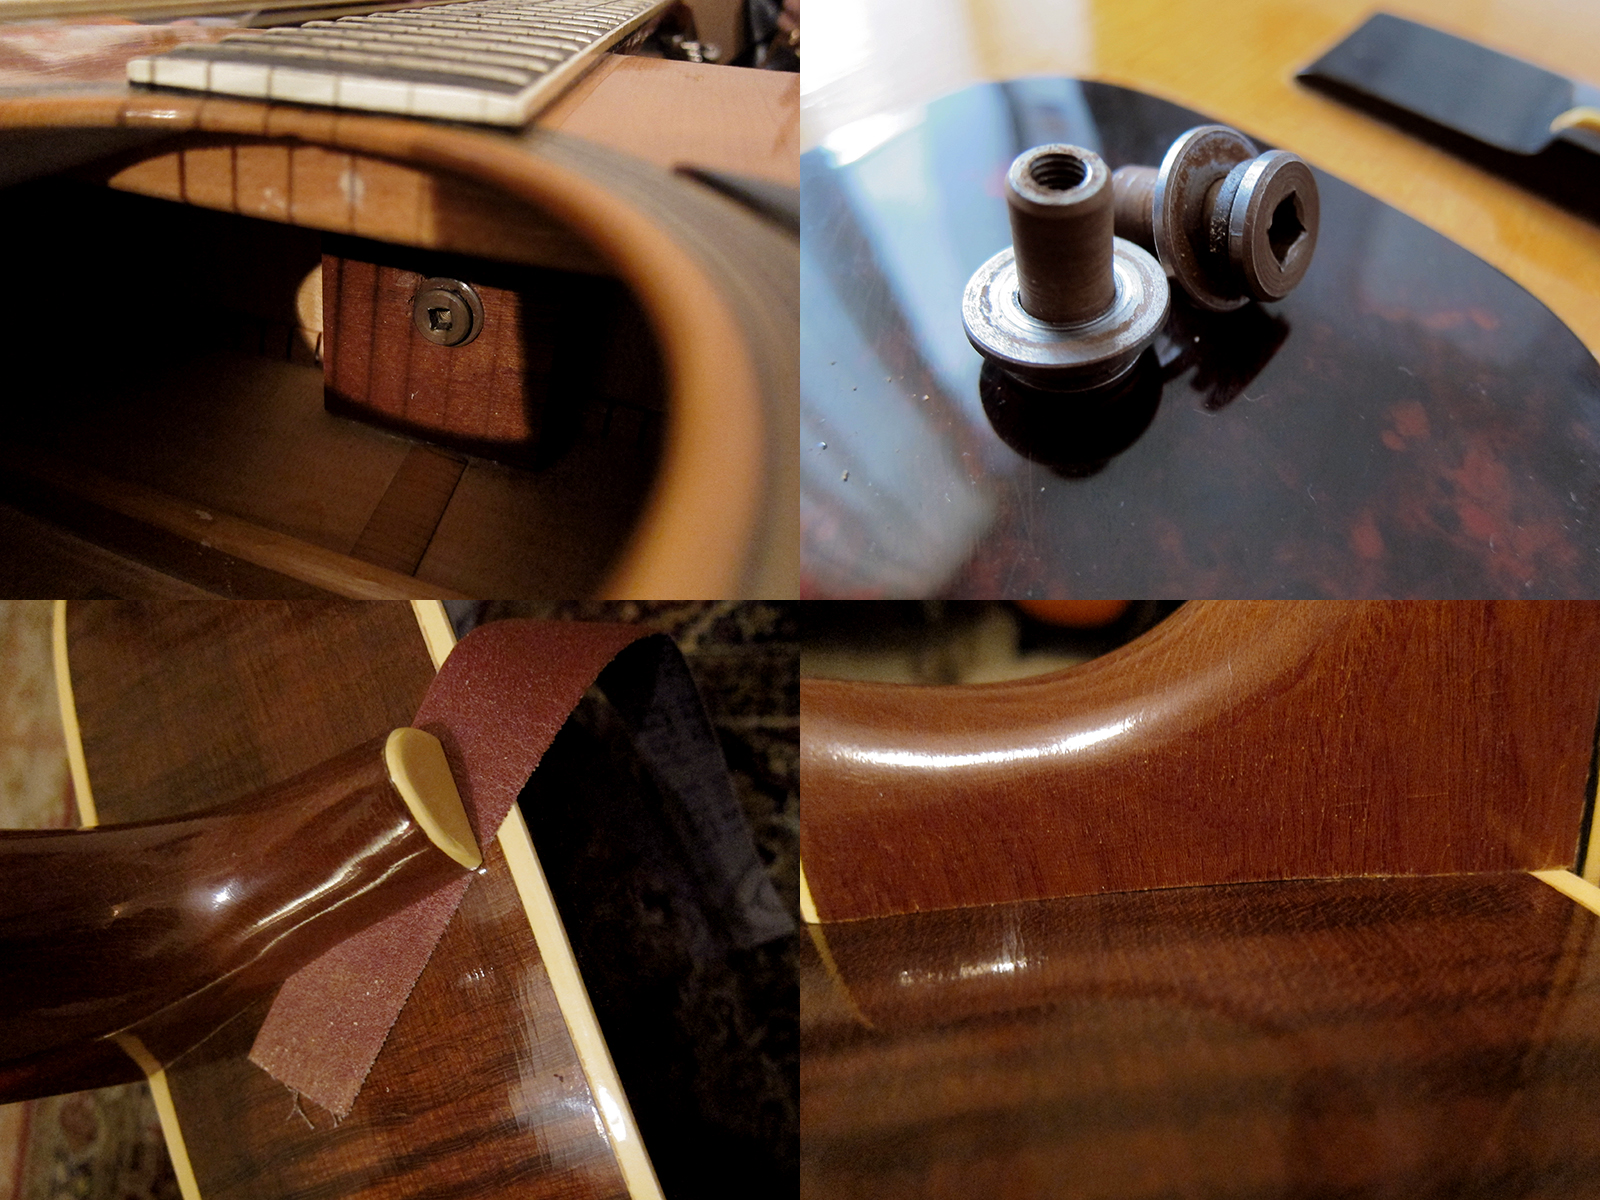
The main thing that was needed on this Goya T-18 was a neck reset to get the action down. I was pretty worried about this and that’s why I have put it off for so long. I have never done anything like this before and I wasn’t even sure what I could use to loosen the two bolts on the inside, these Levin / Goya guitars have used a combination of glue and the Levin bolt-on neck system since the early Sixties. It turned out that a normal Philips screwdriver no 2 fitted perfectly, they are square in the base of the tip. Once the bolts were off I tried to remove the neck completely but without any luck, well the heel came loose straight away but not the fretboard. I tried with heat, steam and all sorts of magic but it didn’t budge and since I didn’t want to do anything too drastic and ruin the guitar I left it. Then I read on a Swedish guitar forum that you could leave the neck on and just lift the heel, get a bit of sandpaper in under, add some pressure and then pull. That way you would get some material of the heel off without removing the neck completely. The guy in the forum mentioned that he had done 40 pulls on both the left and the right side so I did 30 on each to be on the safe side. I fastened the bolts and strung the guitar up again and it worked, it actually worked really well. I played it for a couple of days and then decided to sand off a bit more, so I loosened the neck again and did another 15 pulls on each side and now it’s perfect. Crazy Swedes, coming up with such a quick and easy way of resetting a neck on an acoustic guitar. Thank you Levin for thinking of me 47 years down the line.
The Goya T-18 was top of the line back in 1965 and cost $219.50 new, I wish they still cost that.
It took 3 months but now it’s finally ready, Verushka’s Hondo II P-bass
We had such a bad luck with the pickups we ordered for Verushka’s Hondo II P-bass. First we ordered a set of Artec P-bass pickups my favourite Hong Kong store EY Parts, but they never arrived, we waited for more than two month and finally got refunded instead. Then we decided to order from Custom World in Holland but that took ages too. Now we got everything we needed, full sized 250K Alpha pots, Orange drop cap, cloth covered wire, new jack and the Artec pickups. I put it together the other night and got it to work fine. I’m still really impressed with these Hondo II basses, the electronics and hardware are pretty cheap but that’s easy to change, and it’s so worth it for these amazing necks.
It was pretty straight forward to change the electronics. I checked the Seymour Duncan’s wiring diagram for P-basses and followed that instead of the old wiring.
I really liked the look of the Hondo II I got for Dani but this is ten times better for Verushka, all black just like her
 The Claescaster, put together in May 2013 out of a Mighty Mite Swamp ash body, Tonerider Vintage Plus pickups, Wilkinson hardware and a cheap but fairly fat China neck.
 The new Claescaster got a treble bleed and the ’66 wiring, bottom right photo shows the original wiring on my 1979 Greco TL-500


 Remove the two bolts that attach the heel with the neck block, you can see them if you look inside. A normal Philips no 2 screwdriver fits if you don’t have a square Allen key. The heel is normally not glued in so you will feel it loose as soon as you remove the bolts. If not, apply a bit of pressure upwards to loosen the heel. Now you will be able to fit a sanding strip under the heel and can start to sand it down and that way change the neck angle and lower the action. Apply a bit of pressure on the neck and just pull, it might take 40-60 pulls on each side so so be patient. Check the neck angle with a straight edge once in a while so you don’t take it too far. As long as the straight edge doesn’t go over the bridge it should be fine. I have done the sanding strip trick on two guitars so far, my
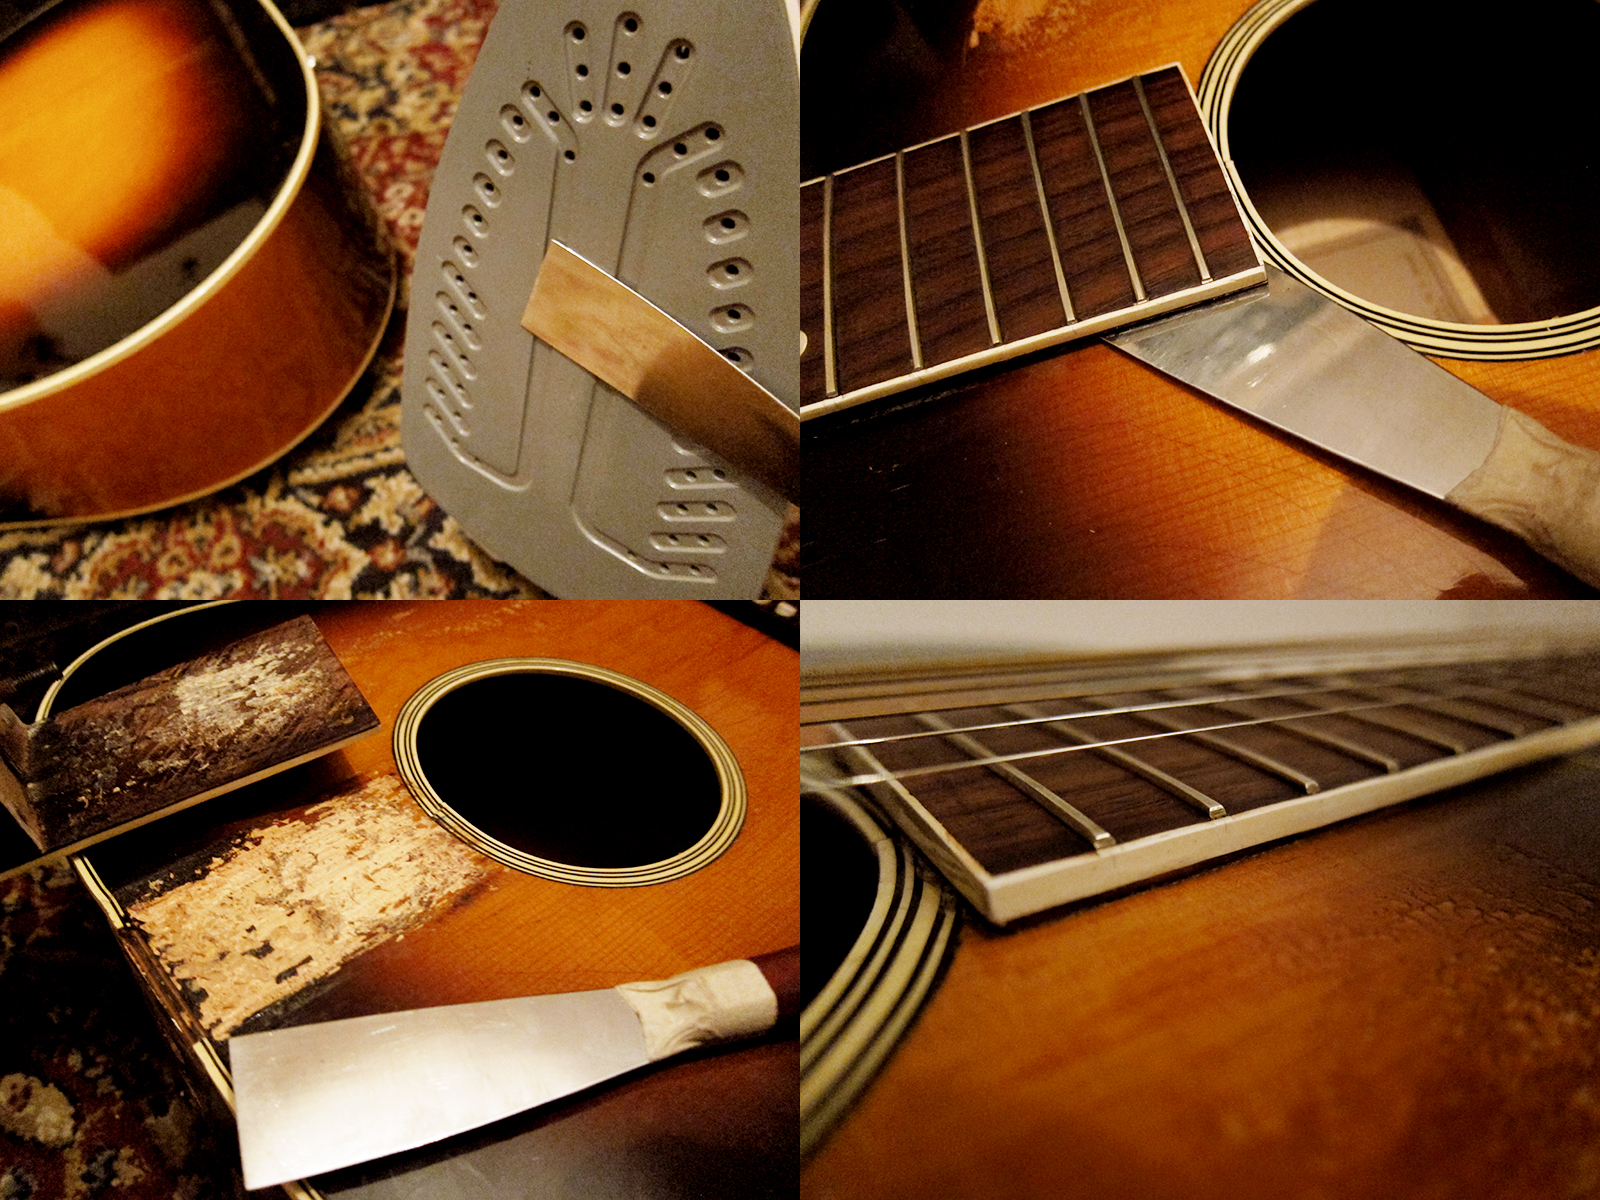


 Once I had glued the cracks in the top, the first image shows before I started, I painted and lacquered the crack. I used normal matt black acrylic paint for the dark parts and just darkened the rest with furniture oil before I applied the nitrocellulose lacquer. Once the lacquer was dry I sanded the surface smooth with 400, 800, 1500, 2000 and 2500 grit. It worked really well, it’s actually hard to even see the big crack that went all the way from the edge to the bridge. I removed the old glue from the pickguard and then glued it back again.