A couple of weeks ago I came across a really nice looking Harmony Monterey H1325. The only way to date these guitars is by the second stamp inside, if you can find it, giving the year and month. Unfortunately I can just see 784H1325 and the second stamp JAN in mine. I assume it’s from the late 1950’s judging by the head logo and the lack of trussrod since that was introduced in 1964. It’s a really nice playing and sounding guitar, not as loud as my Levin archtops, the 1951 Levin Royal or 1946 Levin Model 32, but still a very nice guitar. Harmony guitars were mass produced in Chicago during this time and even though they are made from solid woods they feel a bit low budget, in a good way, I guess that’s why they are so damn awesome and look so rock n’ roll.
Harmony H1325 – Monterey
Acoustic archtop – Brown shaded
Production years: 1952-1972 (other years possible, not verified)
Spruce top, birch body – Grand Auditorium 16 1/2 in. Unusual sunburst pattern in bands. Neck has a trussrod from 1964.
There was a lot of cleaning to do and two cracks that needed to be glued. One large on the upper bout and a smaller one on the top and then I glued down the heel a bit better which got the action down. Except for that it was in pretty good shape for being around 60-years old and all original.
The original case has these awesome looking shipping stickers on it, I presume from when the guitar left America for Germany by boat in the 1950’s carried by the first owner.
The top left looks very much like my Harmony Monterey, having said that, the model number inside mine is H1325 which match the bottom left. Taken from a 1959 Harmony catalogue
I also got myself two late 1960’s H162 from the US that I need to restore. First of all they need a neck reset but then I was actually thinking of removing the back and X-brace at least one of them. Taken from a 1959 Harmony catalogue.
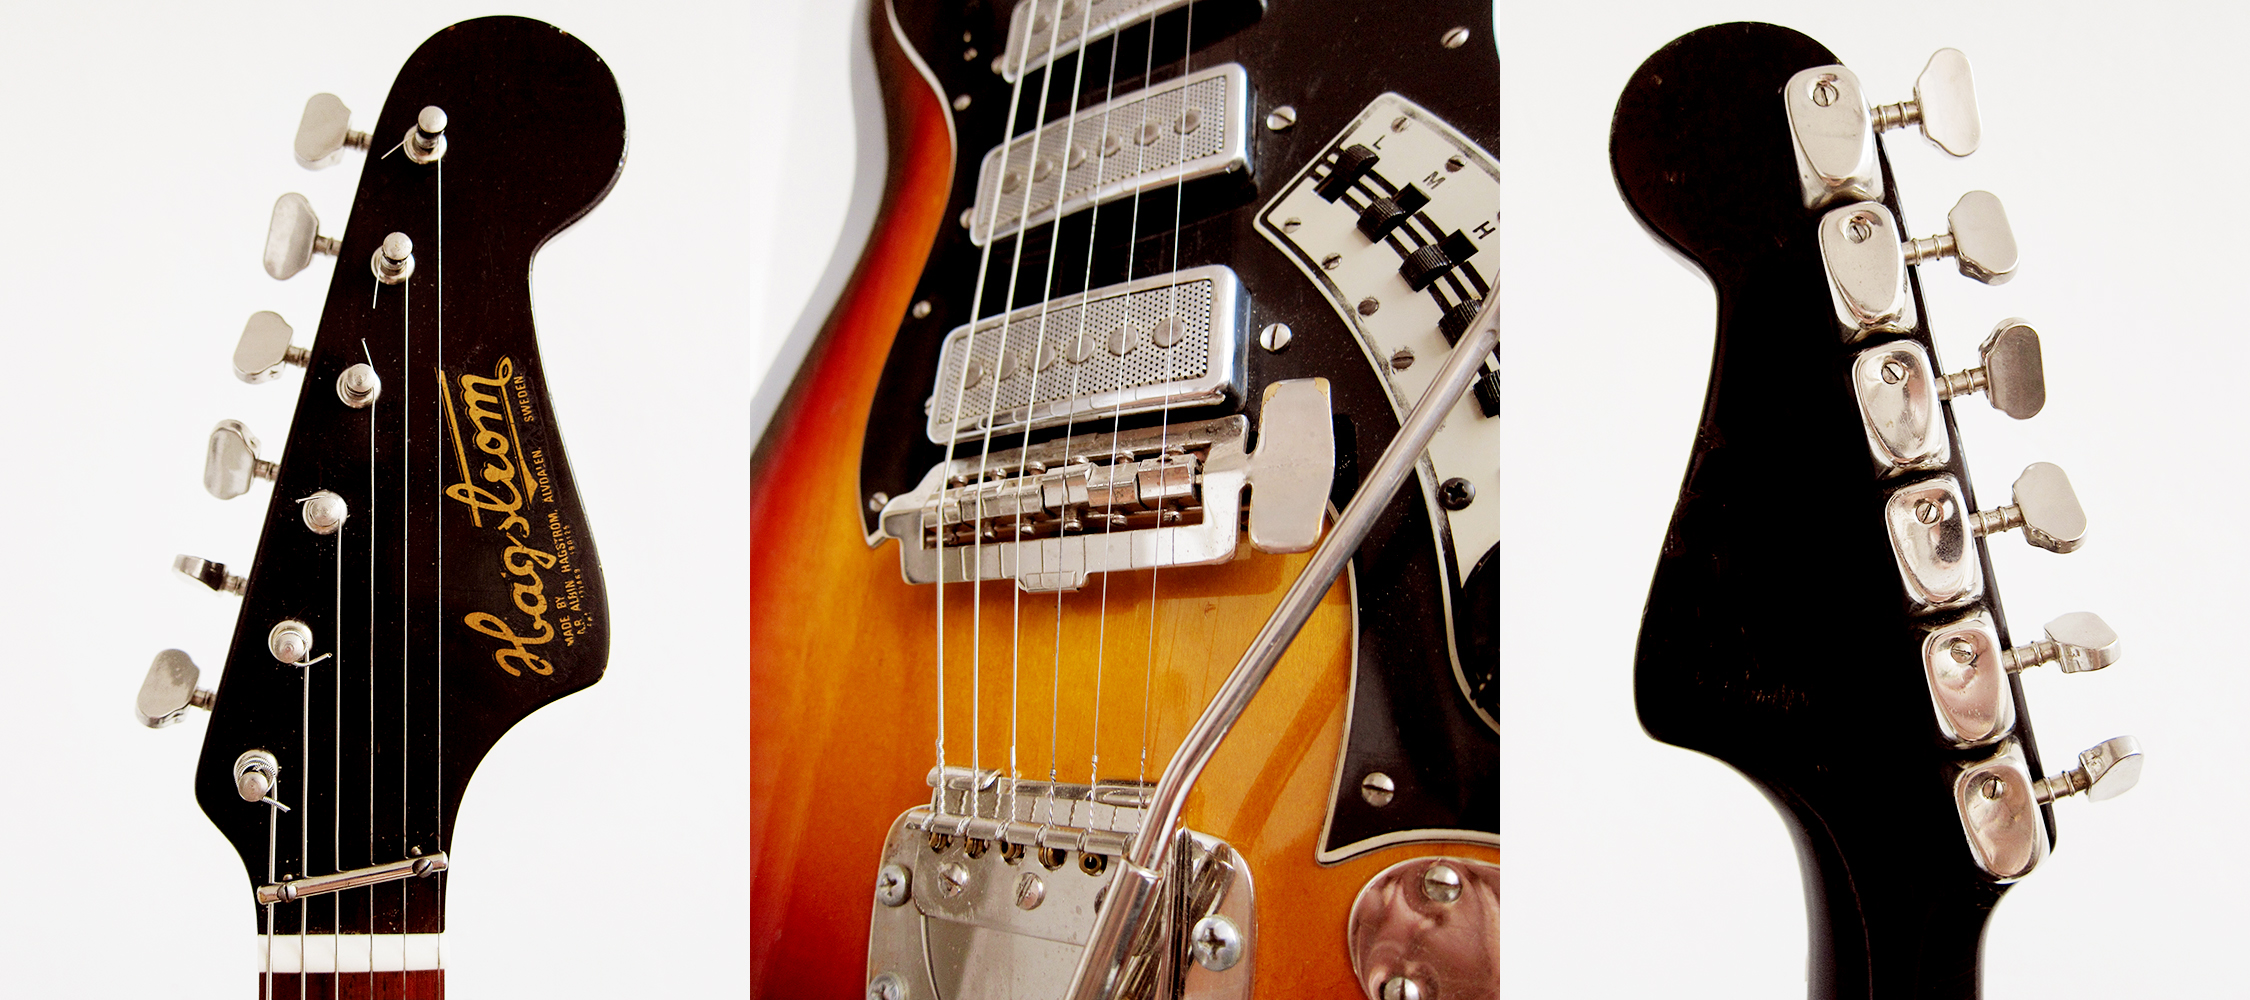
I found a Hagström HIII back in April that I felt really sorry for and had to rescue, or rather save it from being slaughtered and sold for parts by someone else. Unfortunately it wasn’t a bargain and I probably wouldn’t have bought it if I wasn’t drunk at time, I need to stop browsing eBay on Sunday evenings. It had all the parts but the fretboard and frets were in a terrible state and the electronics weren’t working properly, basically a nice guitar and worth the price if it was working. All the hardware cleaned up nicely, I love the Van Gent machine heads, a complete set tend to go for 100€ on their own, and it had the original tremolo, pickups and pickguard. I had to remove the old frets, even out the fretboard and then refret it to get it playable. After waiting for over a month I finally got the switch needed from Hong Kong here we are, a fully restored and working 1970 Hagström HIII. Even though I love the look and sound of this guitar I can’t seem to get used to the fast Hagström neck, the fastest neck in the world, and therefore it’s for sale.
Hagström HIII made in Älvdalen, Sweden between 1970-1972. It’s the 491st HIII made in a series of totally 708 guitars, this was the last run ever of this model since it was replaced by the more 1970’s looking Hagström HIIN
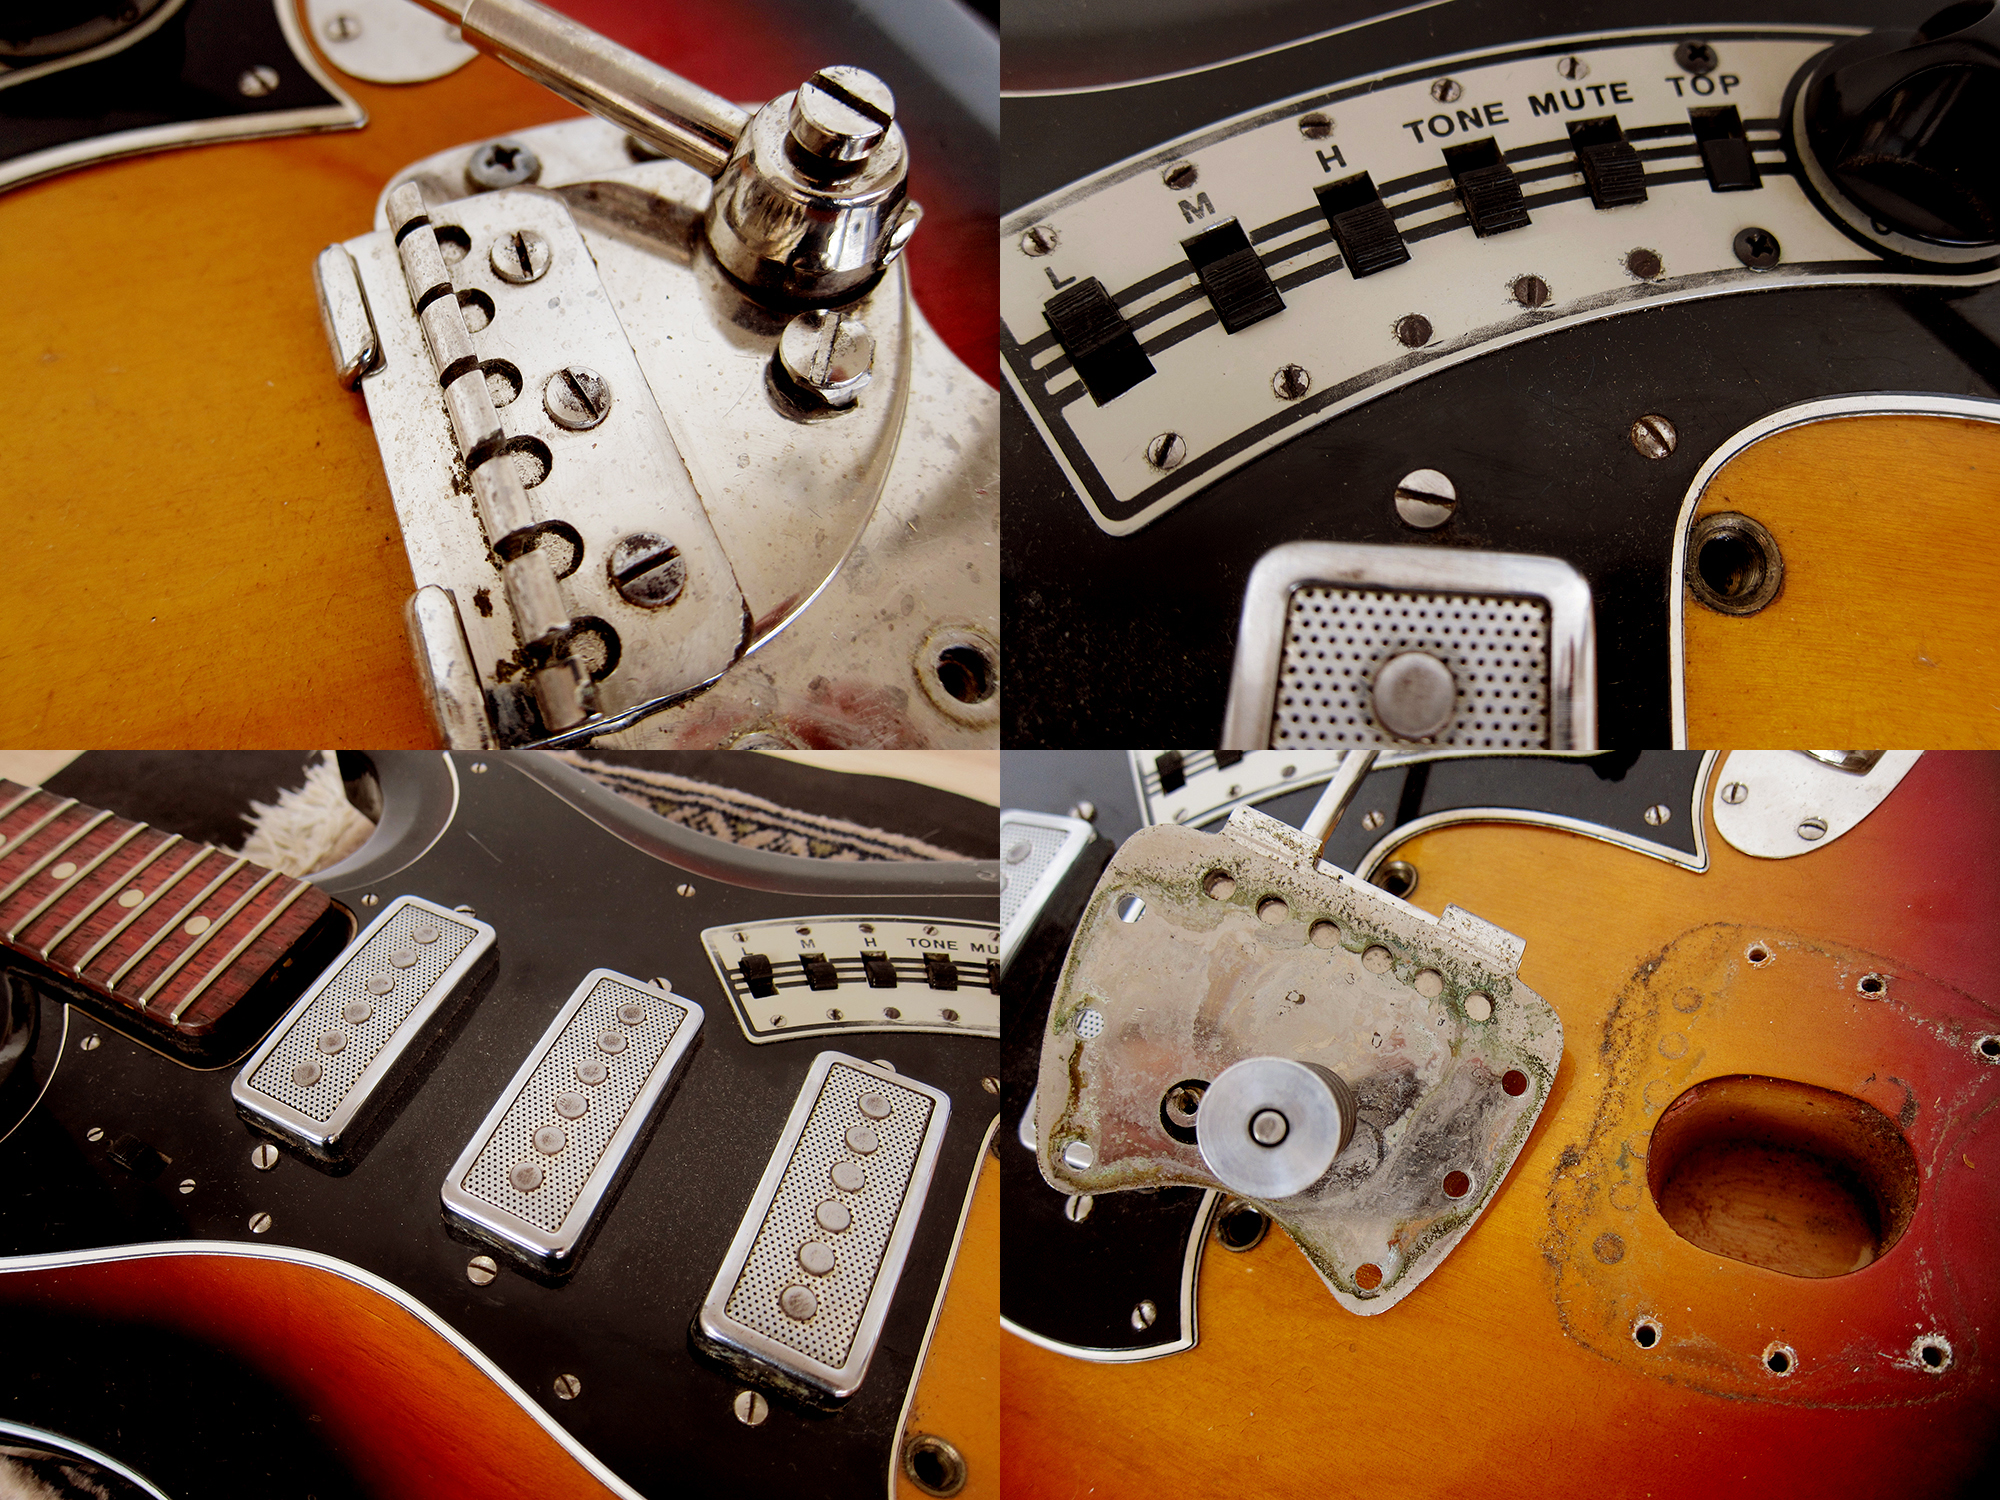
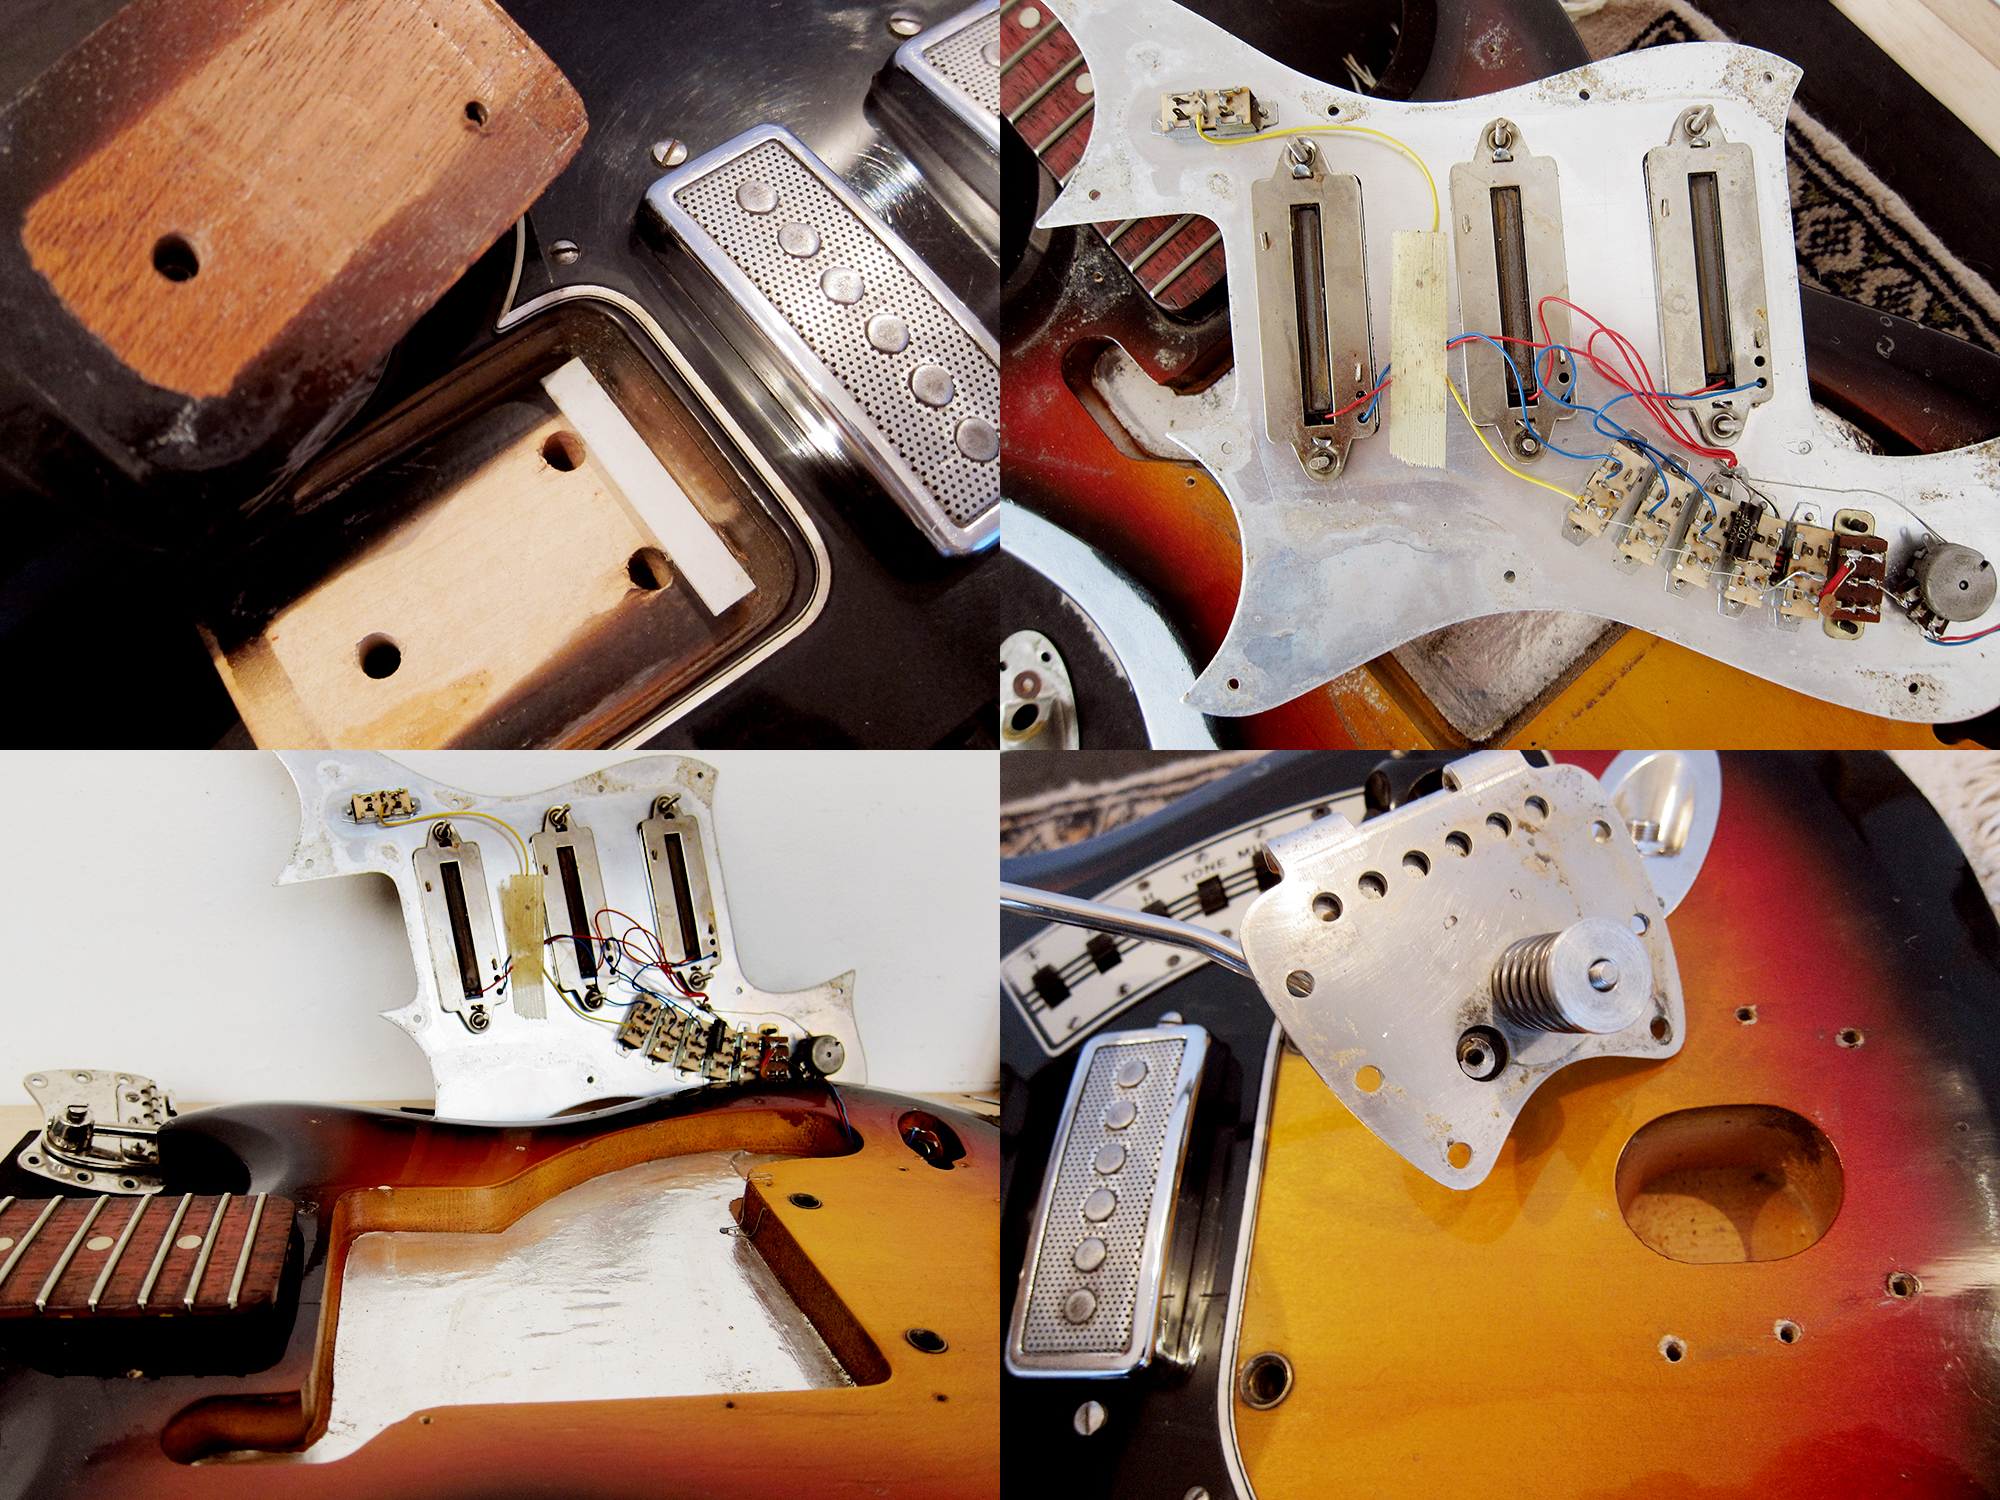
I started with taking the guitar apart and cleaning everything with a toothbrush and some soap and then polish up all the hardware.
The electronics was in fairly good state but needed to be grounded properly. Also the on/off wasn’t plugged in and the bridge pickup’s switch wasn’t working properly so I had to wait a month for a new one from Hong Kong. Now everything is soldered up properly and is working fine.
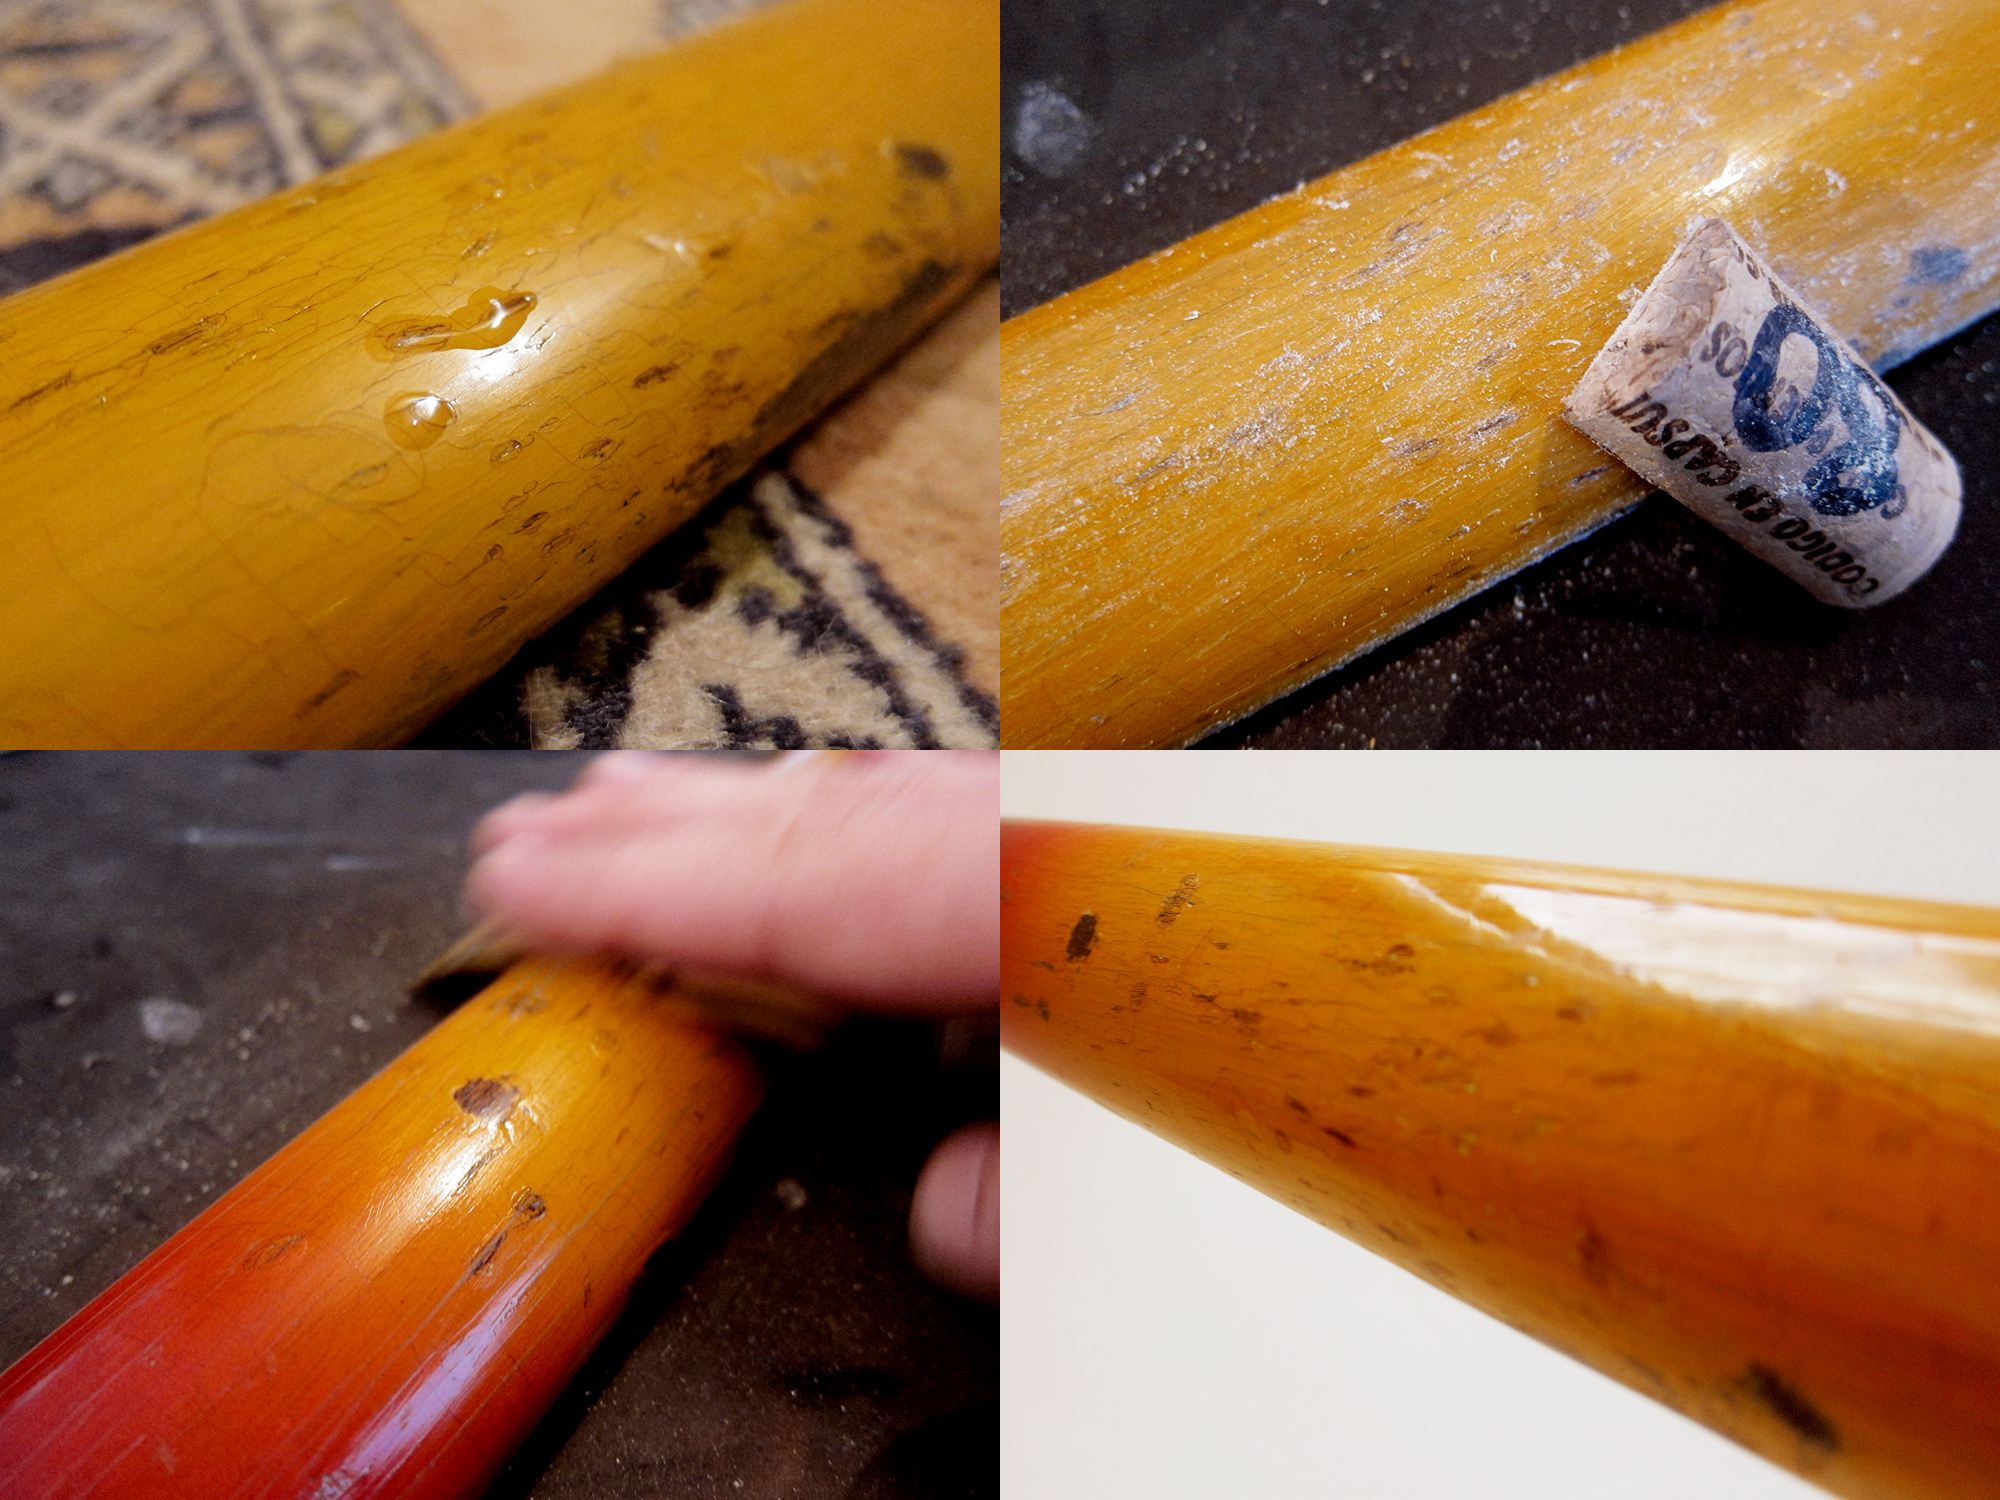
The back of the neck was a mess, dents and groves everywhere so I filled them with Nitro and sanded everything smooth before I buffed it up with metal polish so now you can’t feel it.
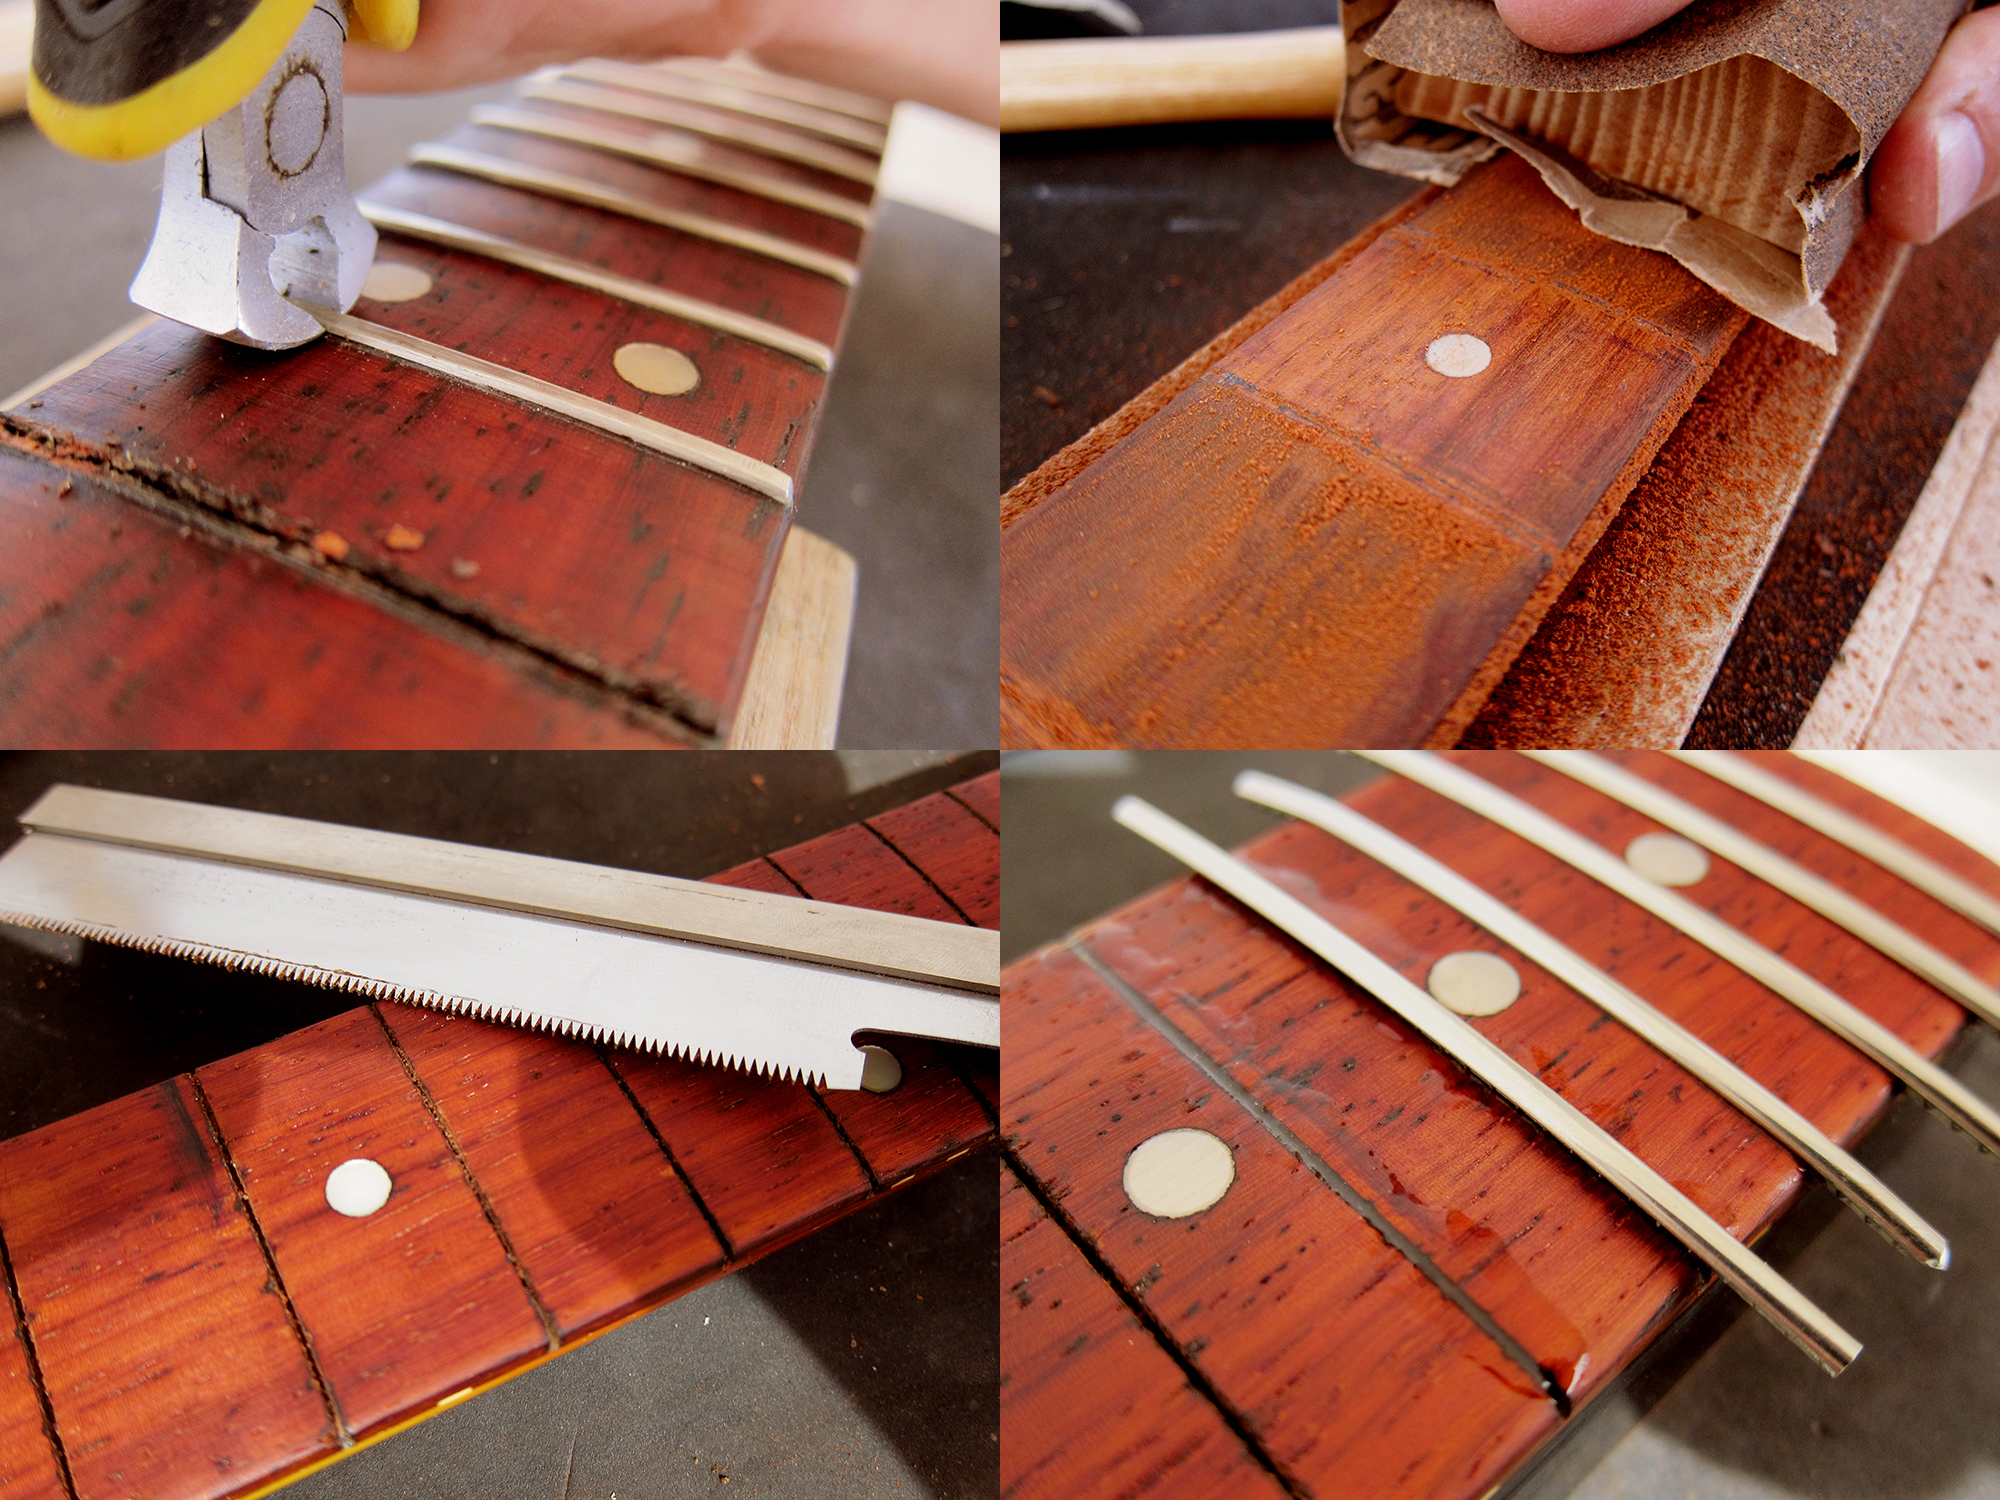
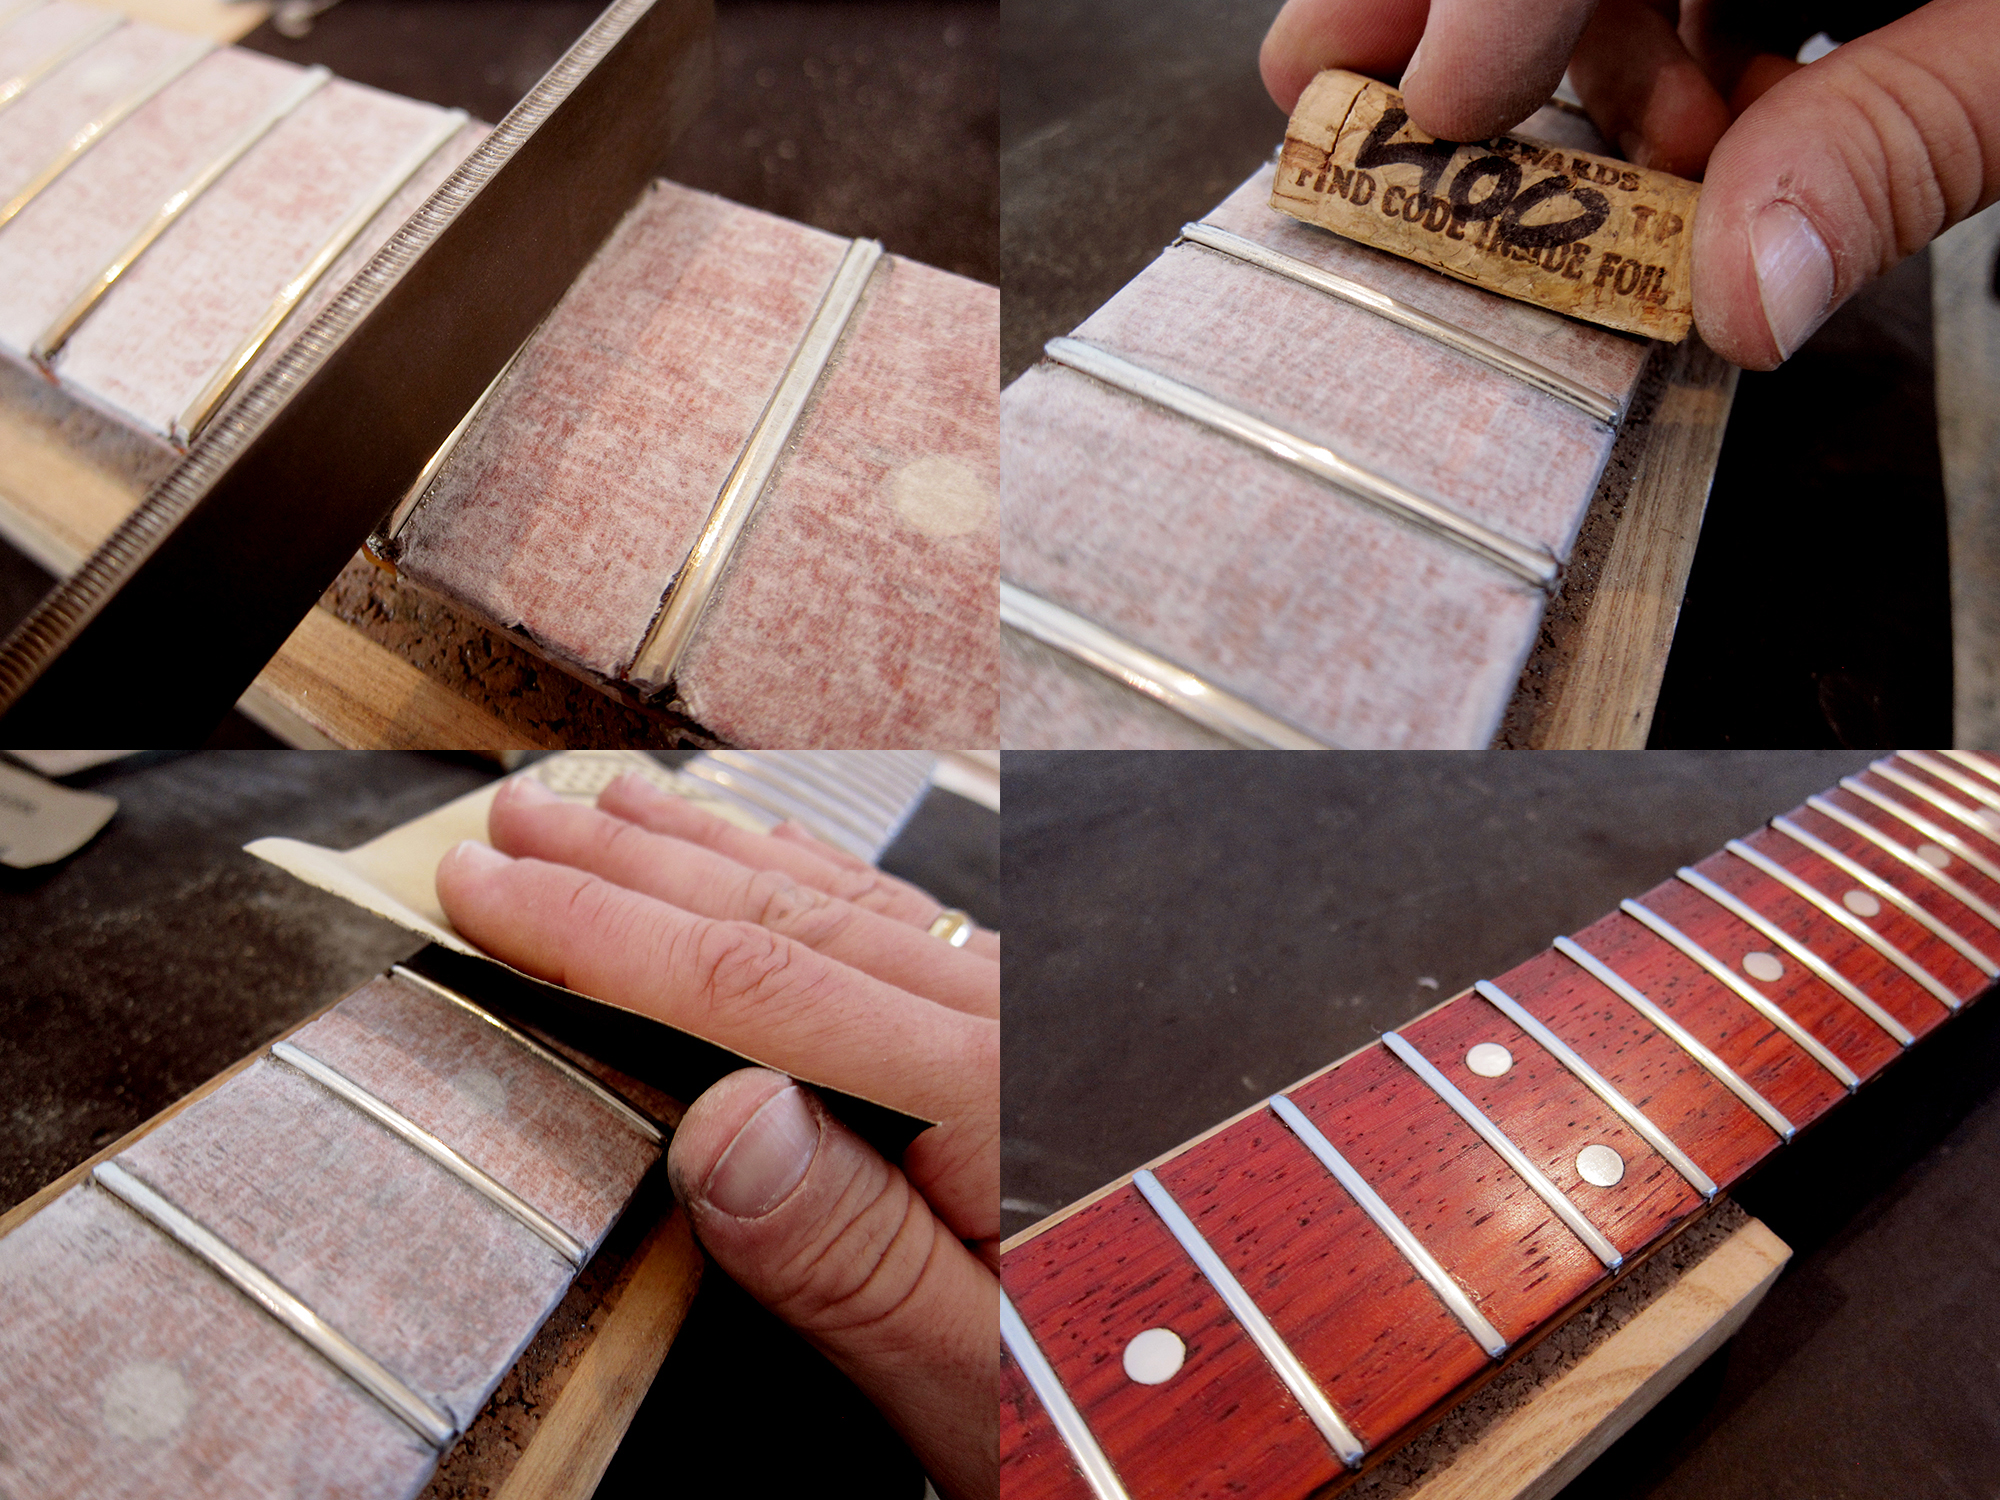
The main problem with the fretboard was the deep groves in it, it almost looked like the first 5-7 frets had been scalloped. The original frets were really uneven too so I decided to refret it completely. I pulled out the old frets, sanded the fretboard even and then gave it 10″ radius before I re-cut the fret slots and installed new Jescar jumbos.
I levelled, crowned and polished the frets and in the end the fretboard looked pretty damn good if I may say so myself.
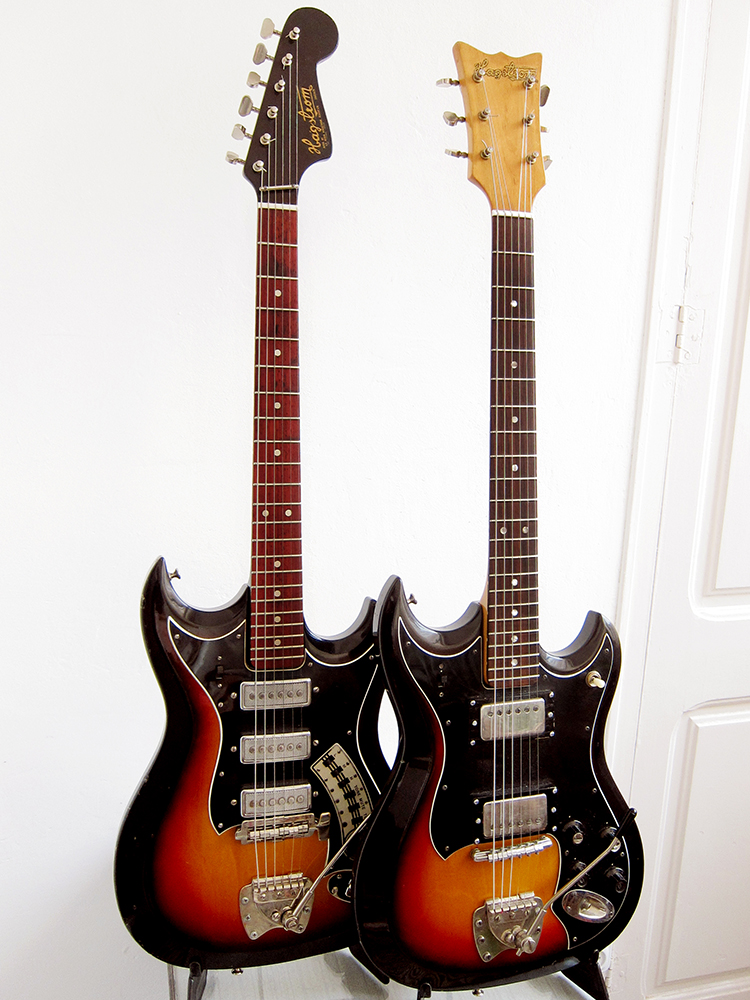
Hagström HIII and my friend Rafa’s Hagström HIIN, both Made in Sweden in 1970, same body but different pickups, electronics and head shape
This video was shot before I changed the bridge pickup’s switch so it’s cutting out occasionally, that has been sorted now with a new switch. I posted these two videos so you can here the difference between Hagström’s fat single coils and their humbuckers.
Here is a new video of the Hagström III with all the switches working, unfortunately my amp is acting up and is making hell of a noise
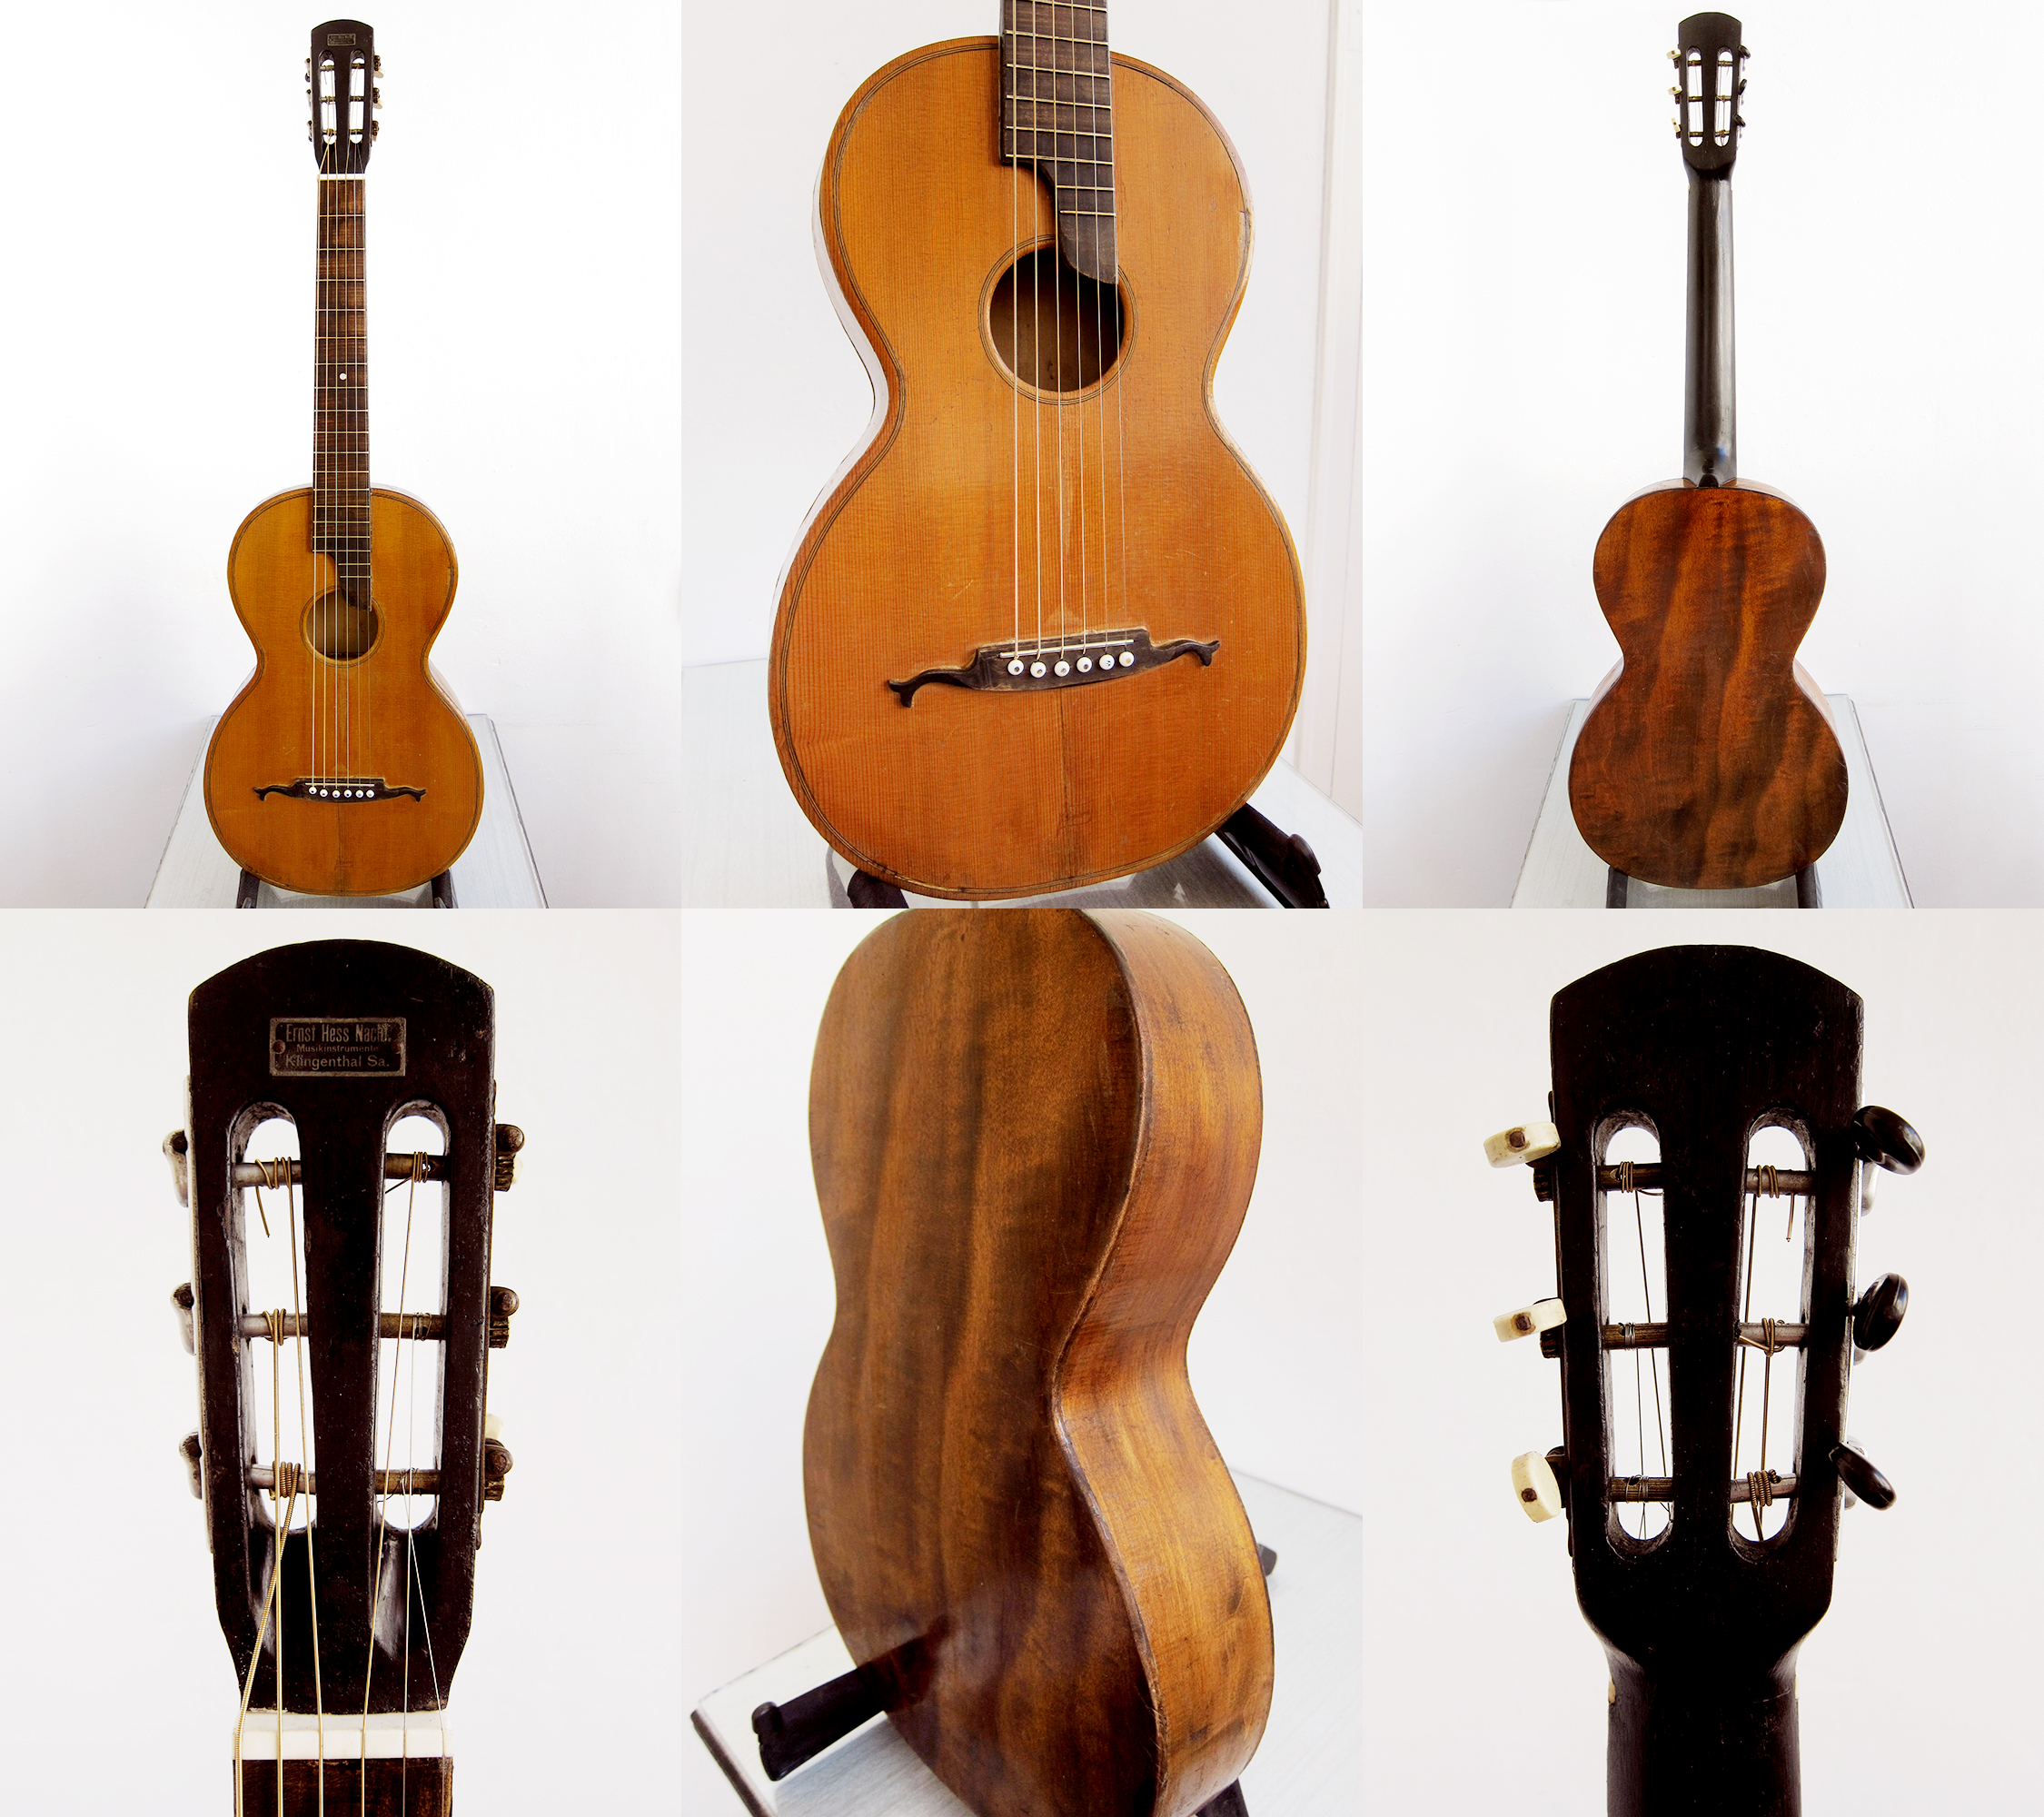
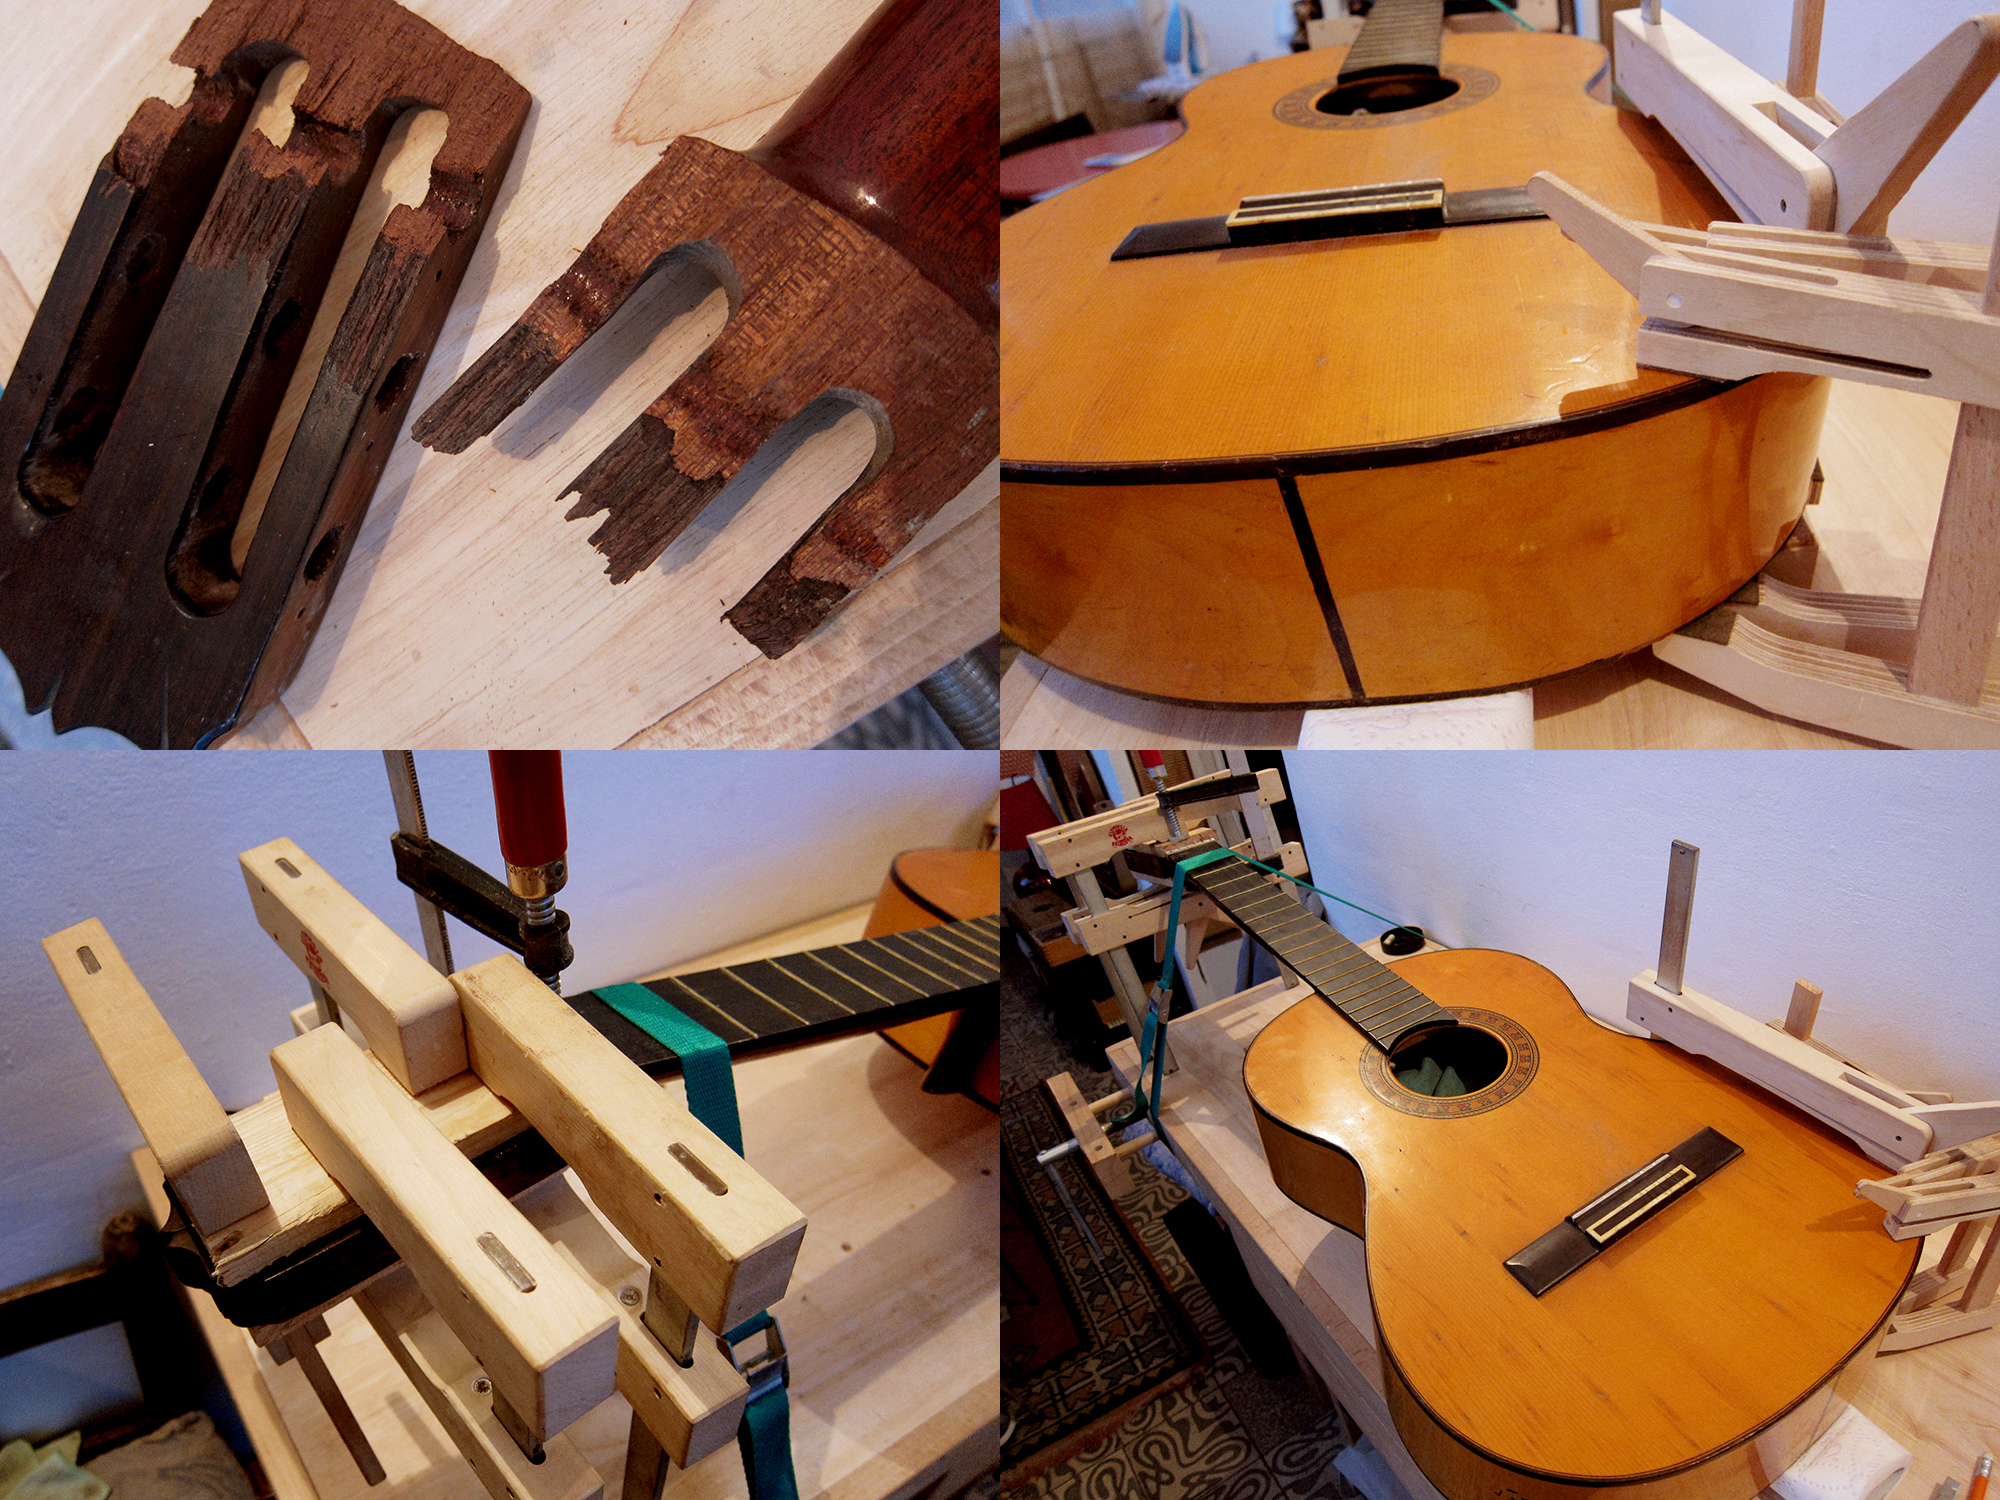
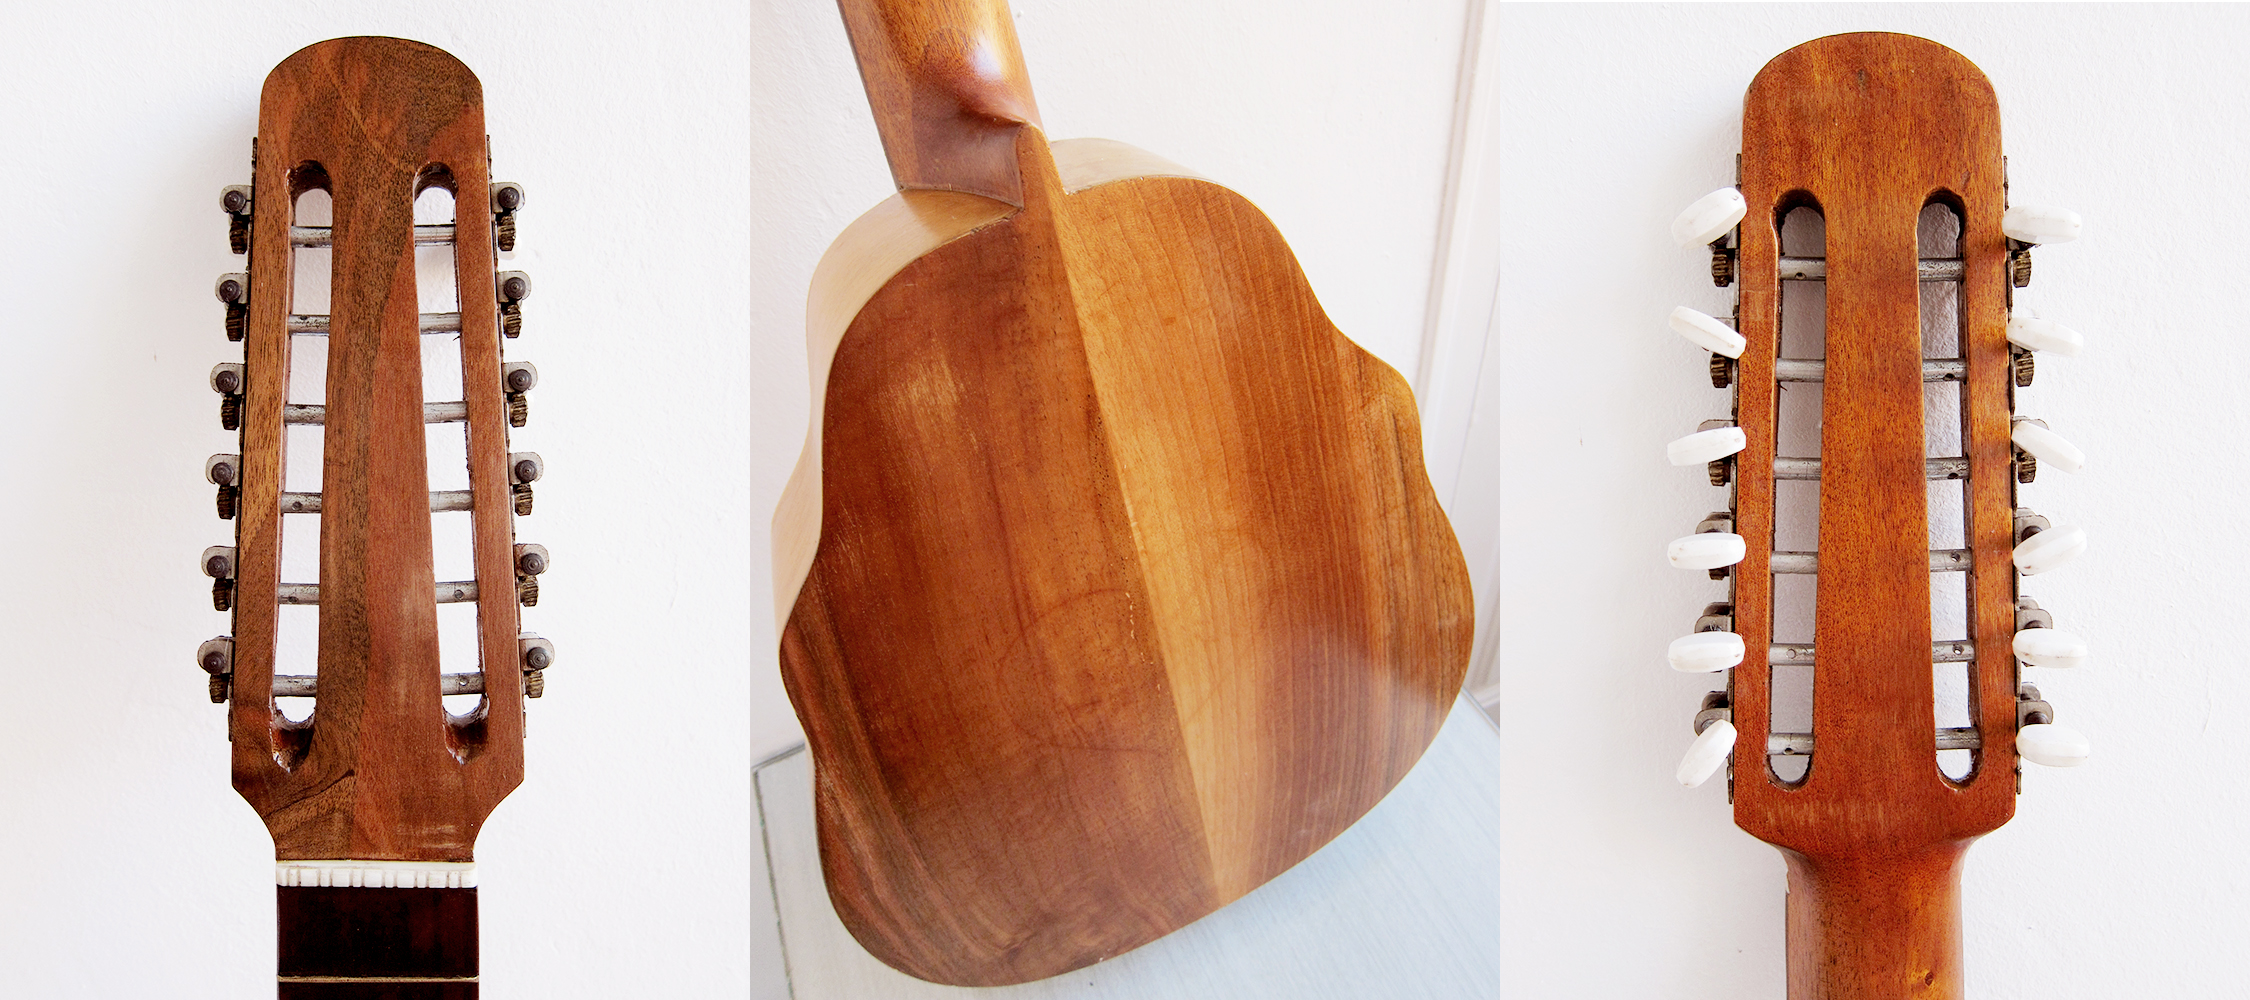
I recently restored a little German parlour that I unfortunately don’t know anything about. The only info the seller gave me was that it was made in Vogtland in perhaps the 1920-30’s. If this would have been a Japanese acoustic or a Levin I would have had a bit more of knowledge but I really don’t know anything about old German parlours. I just bought it to practice my guitar repairing skills and for that it was pretty good, I’ve learned a couple of new things. The idea was to give it to my wife but now we found another one for her so if anyone is interested in buying this then send me an email.
The action is a bit high so it’s ideal for slide playing but you can still play it like a normal guitar if you have light gauged strings on it. It sounds pretty awesome, really clear and loud for being so small. It’s made of all solid woods, spruce top, walnut back and sides and perhaps pine or some other light coloured wood in the neck, I’m not that great at guessing woods. One set of machine heads looks original and seems to be from 1920-30’s and the other is perhaps DDR made from the 1960’s, but both works fine. Overall a pretty nice sounding little guitar with a beautiful patina and the most awesome looking one piece walnut back.
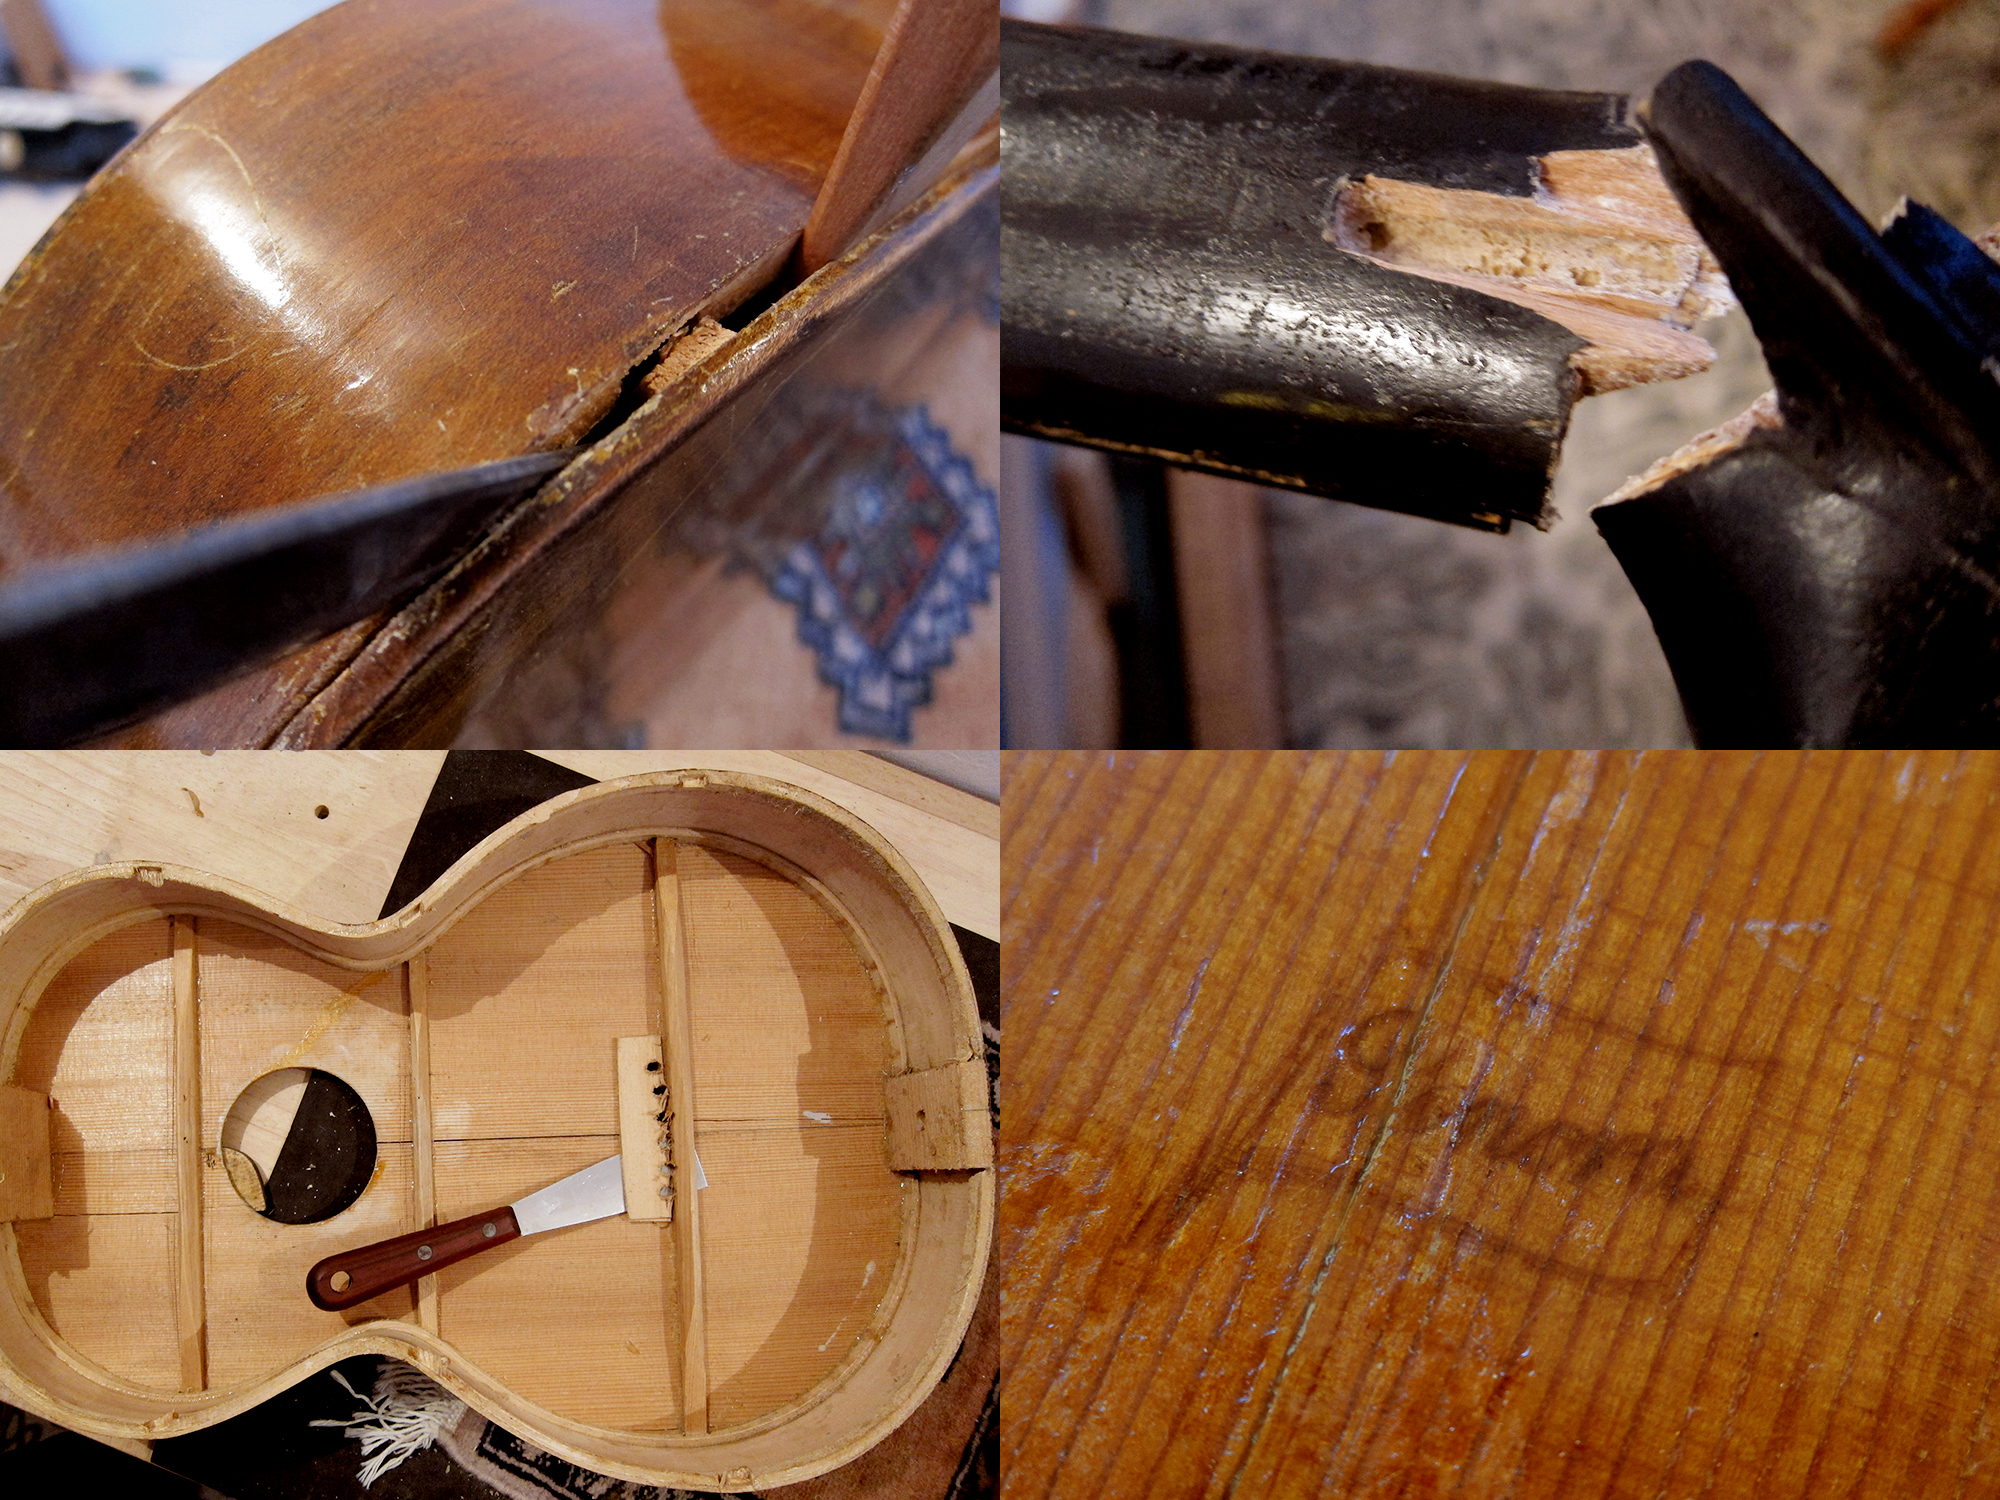
I started with taking the back off so I could re-glue all the braces. It was pretty straight forward to open it, I used a heated spatula and a knife, it worked like charm, I removed all the braces in the same way. The head was broken and pretty much everything that could be lose was lose on it when it arrived. It has a small makers mark under the bridge but I can’t really figure out what it says, if anyone has any ideas please get in touch.
Update: August 27, 2015: The brand is Sonora
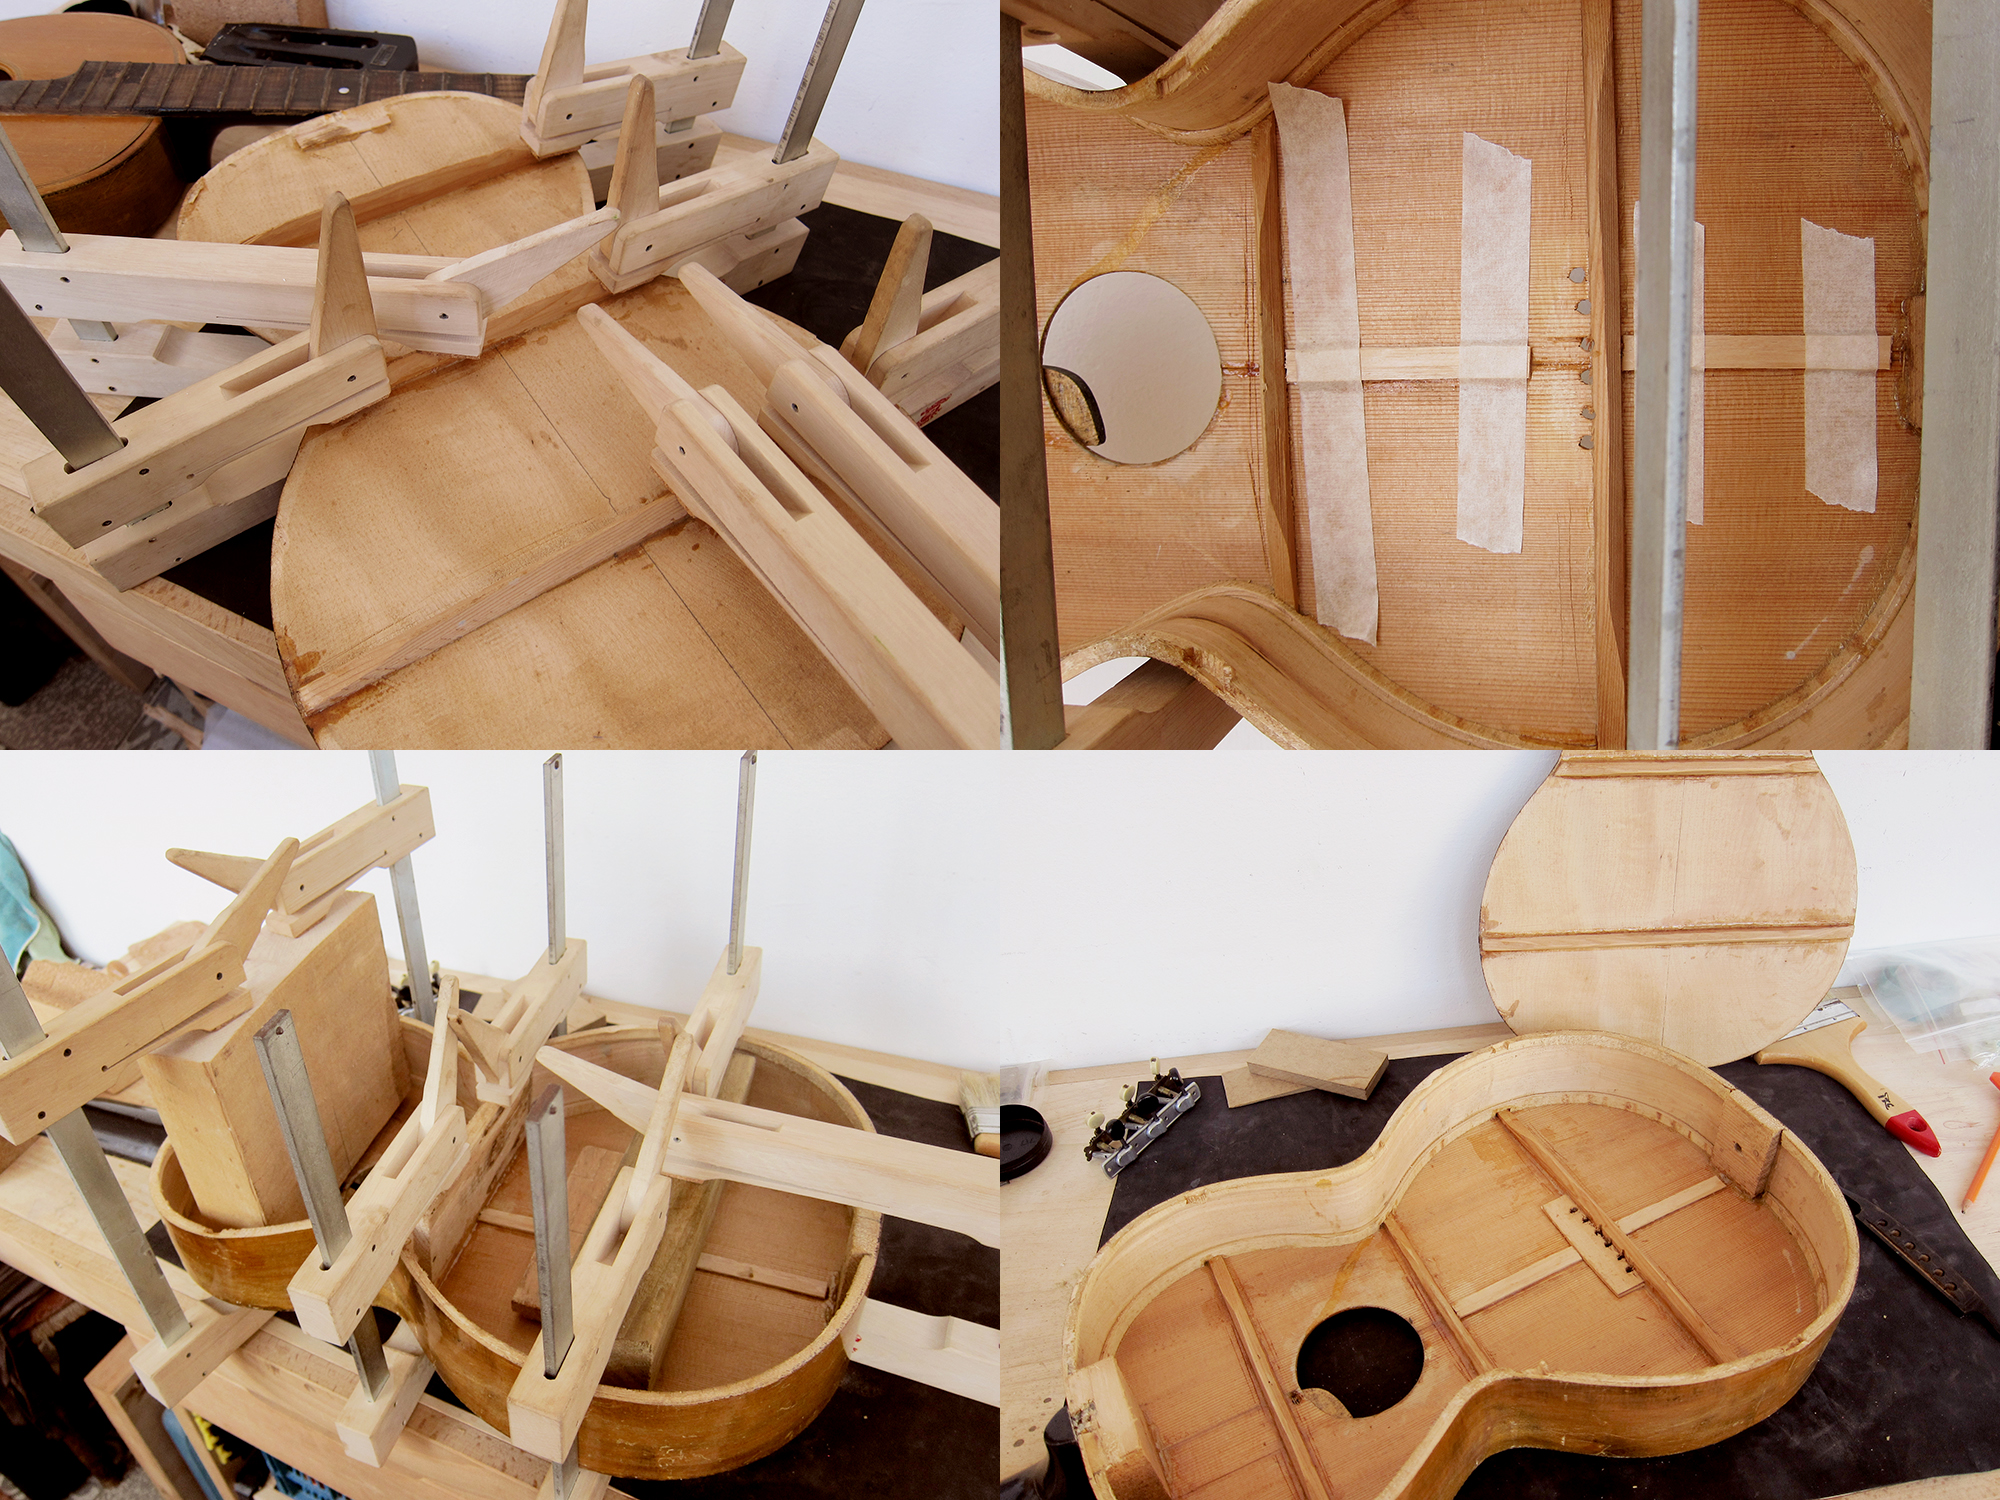
I re-glued all the braces and the two cracks in the top with fish glue. Unfortunately the top had been cracked for so long so I couldn’t get it to close perfectly but at least now it’s solid with two cleats running along the cracks.
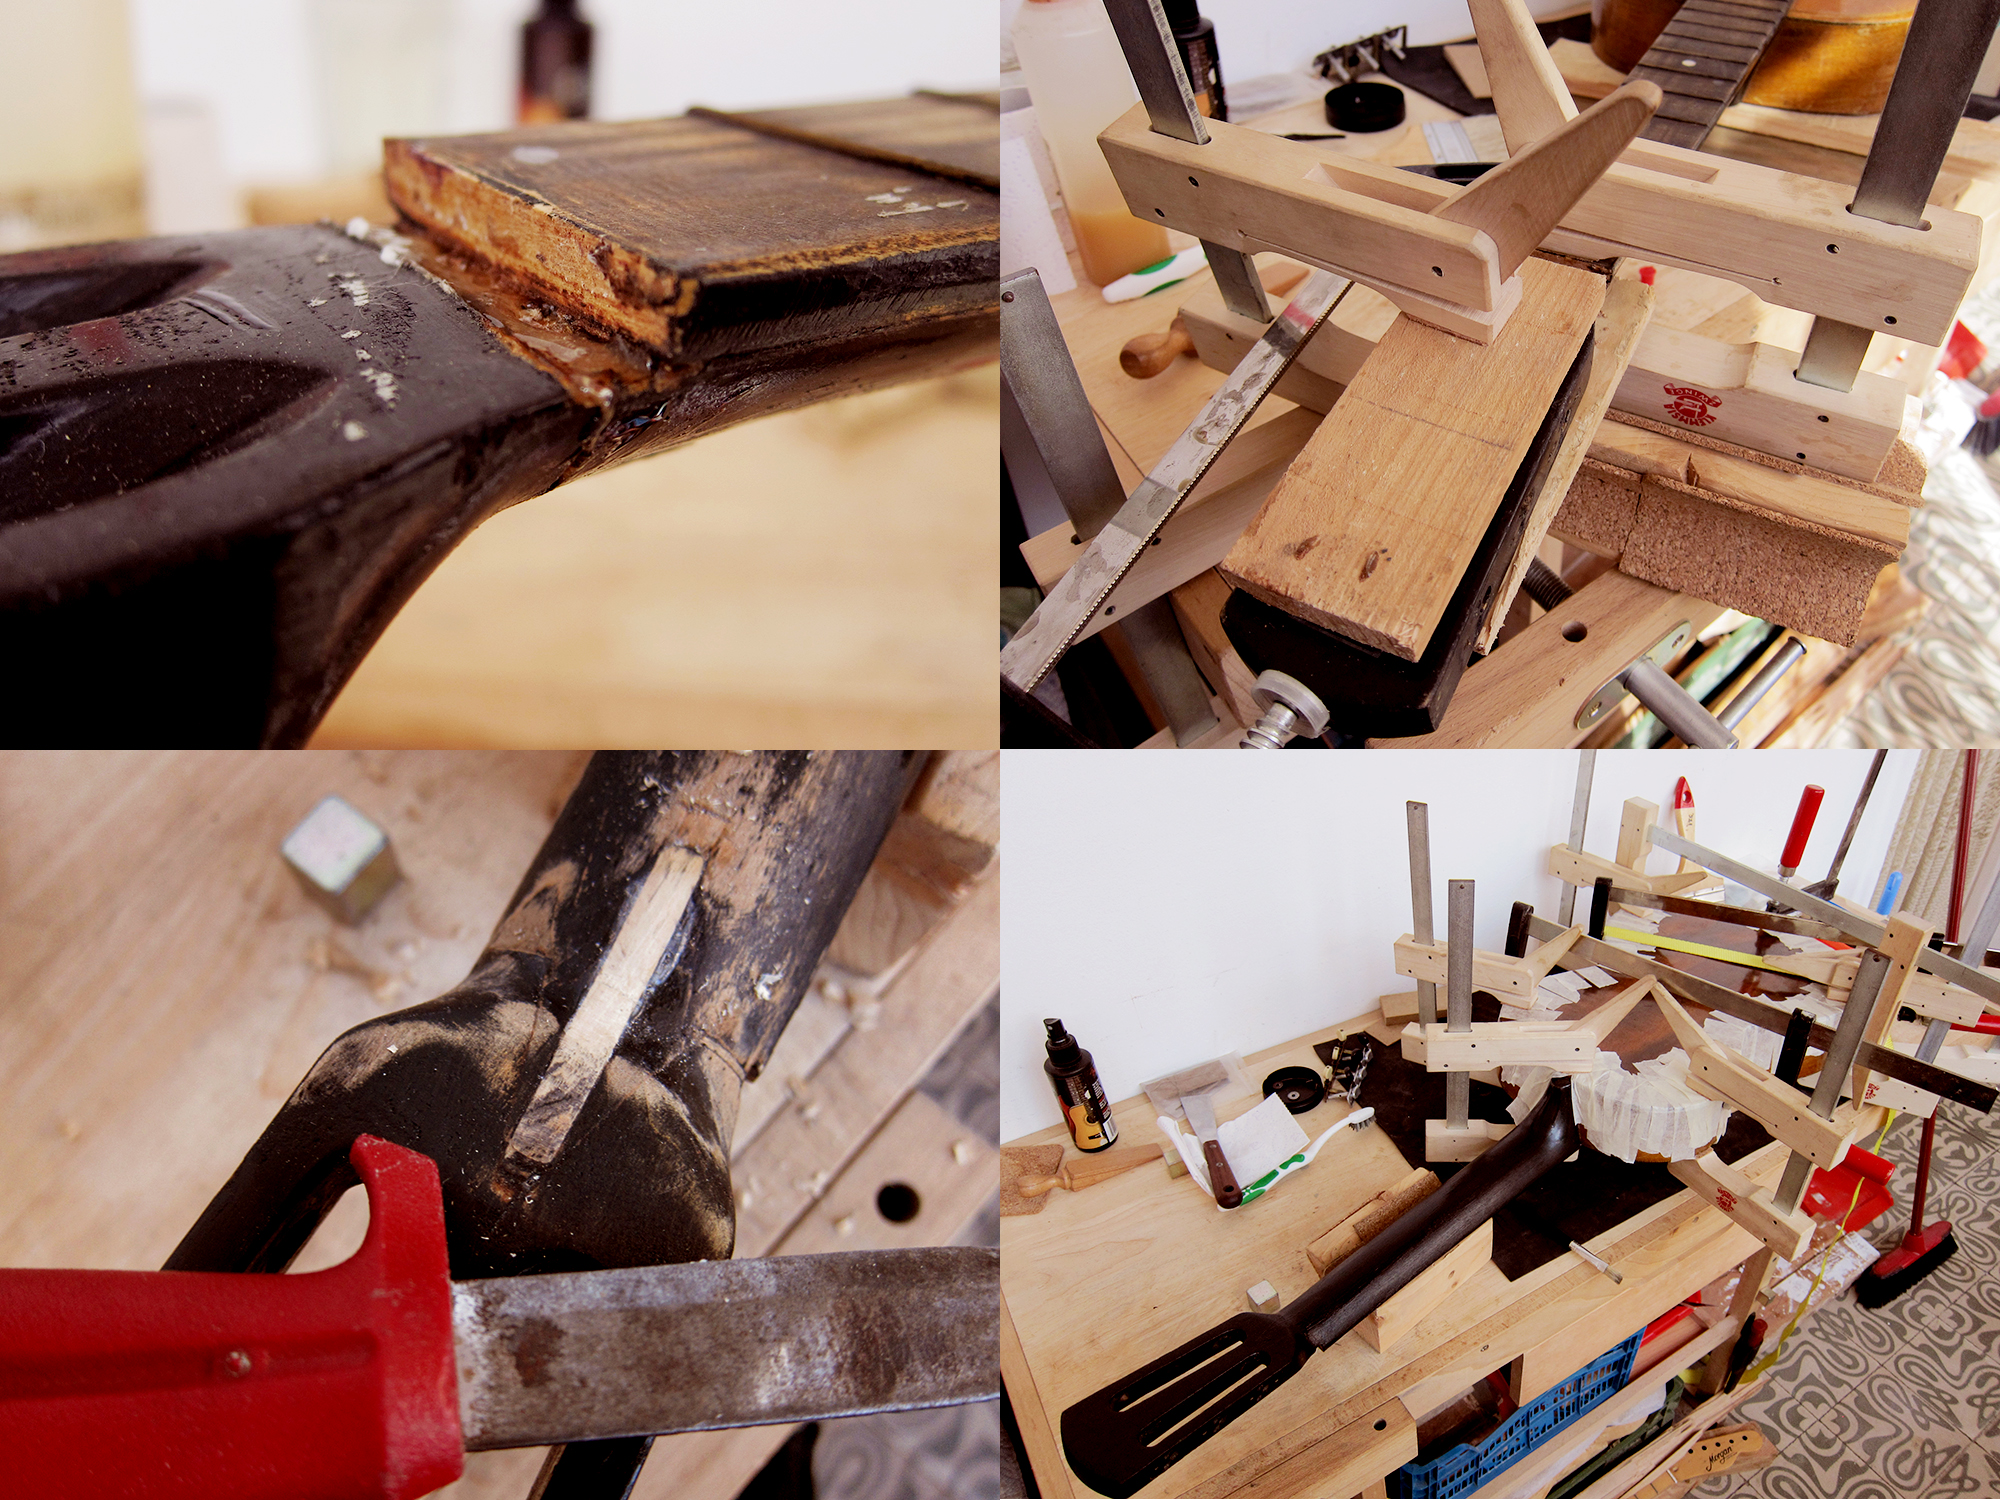
The next step was to glue the head back on. This was a bit harder than the Spanish guitar I glued the head on the week before since the break this time was just under the nut and therefore a lot harder to clamp. I left it for 48 hours and it seems to have worked pretty well so I carved and sanded the back smooth and then painted it black again. I glued the back on and closed the guitar with tape and clamps and this was pretty tricky too, as I’m sure everyone that has ever closed a guitar would know. The sides tend to move outwards so you have to push them in place sideways at the same time as you clamp the top down to the body. A bit fiddly but it worked fine in the end.
Now I just had to make the guitar playable. These old parlours are known for having banana necks since they lack any form of reinforcement in the neck. On top of that they tend to have a hump where the fretboard meets the body. First I heated and steamed the neck under pressure which worked quite well for straighten it out a bit. Then I took out the last 5 frets, sanded down the fretboard, put the frets back and lowered them as much as I could. I painted the fretboard brown and sanded over it to match the rest. After that it was just to level, crown and polish the rest of the frets.
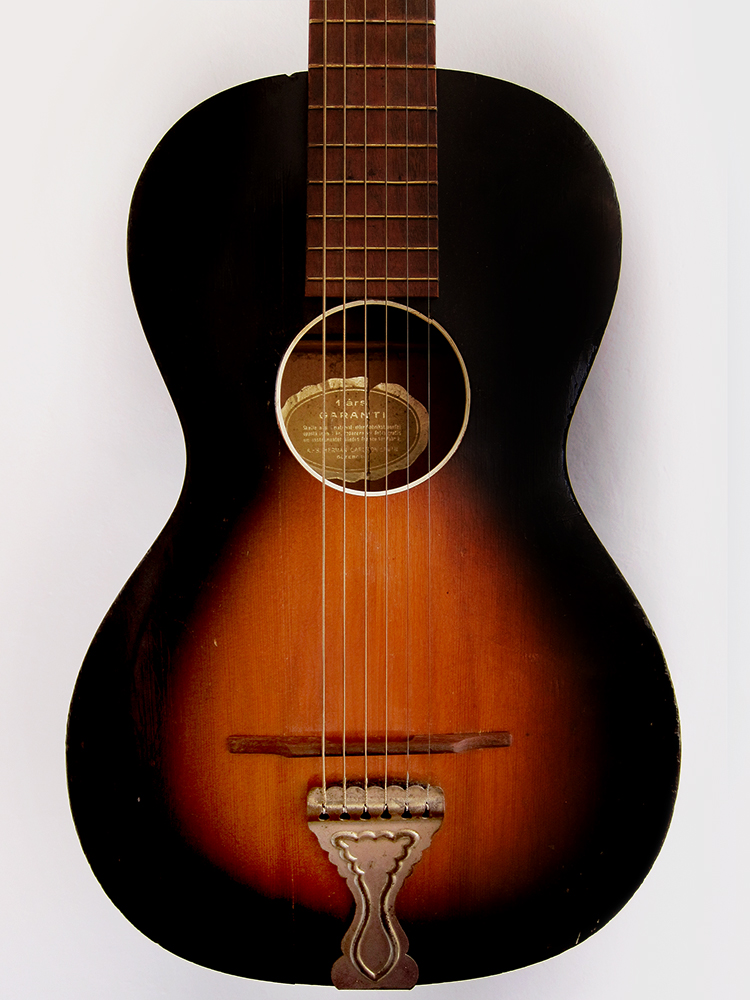
Guitarras de artesanía, Artículos J.A.R. Spanish guitar made in Mataró outside Barcelona 1970’s
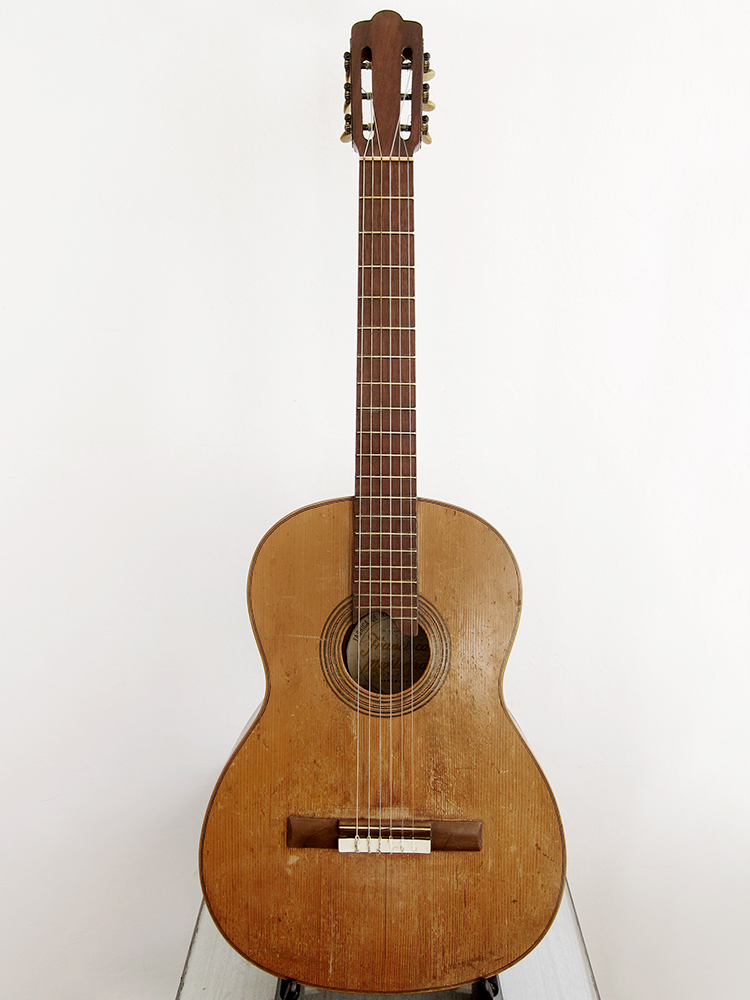
I found this guitar in a Cash converters last week and felt so sorry for it. It had a broken head, a cracked brace, loose back and looked so sad that I felt I had to save it and bring it back to life. A week later she is up and running and sounds pretty damn sweet.
I couldn’t find any info about the brand so if anyone knows anything more about it then please get in touch. It has a solid spruce top and what looks to me like solid maple back and sides. It says “Guitarras de artesanía” which should indicate hand crafted but I’m not sure, quality wise it feels pretty much like the Juan Estruch I got for my friend Rafa’s birthday. Perhaps all Spanish guitars were more or less hand crafted back then, the big business guitar factories hadn’t really kicked in yet. I have put this guitar up for sale since I mainly play steel string acoustic guitars and on top of that I have a Francisca Montserrat that I really like.
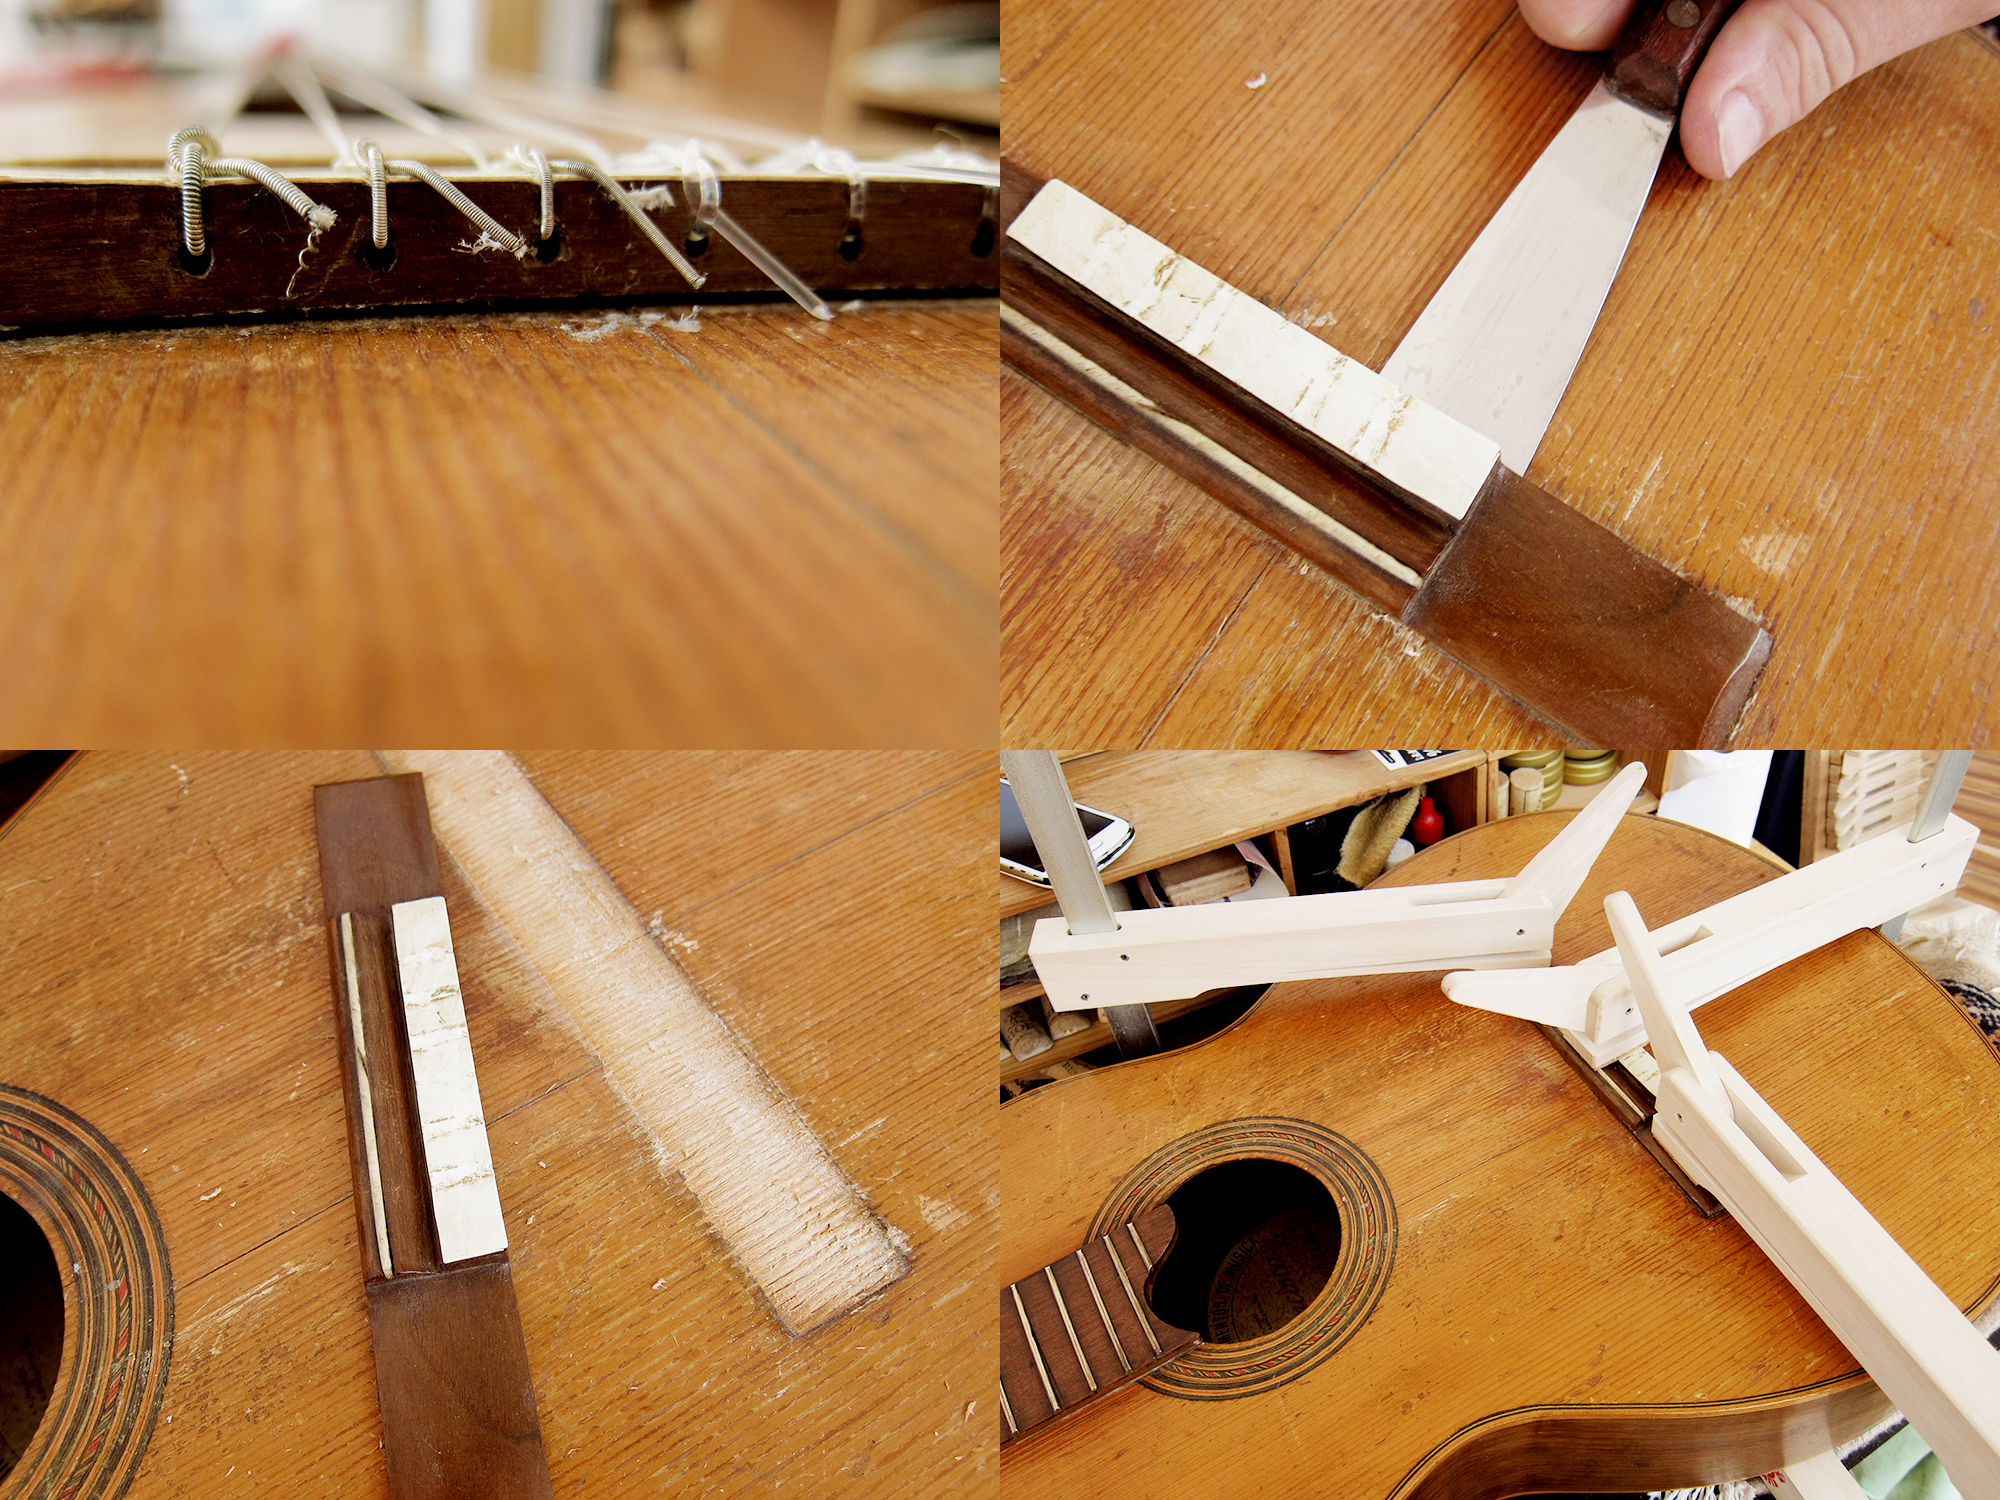
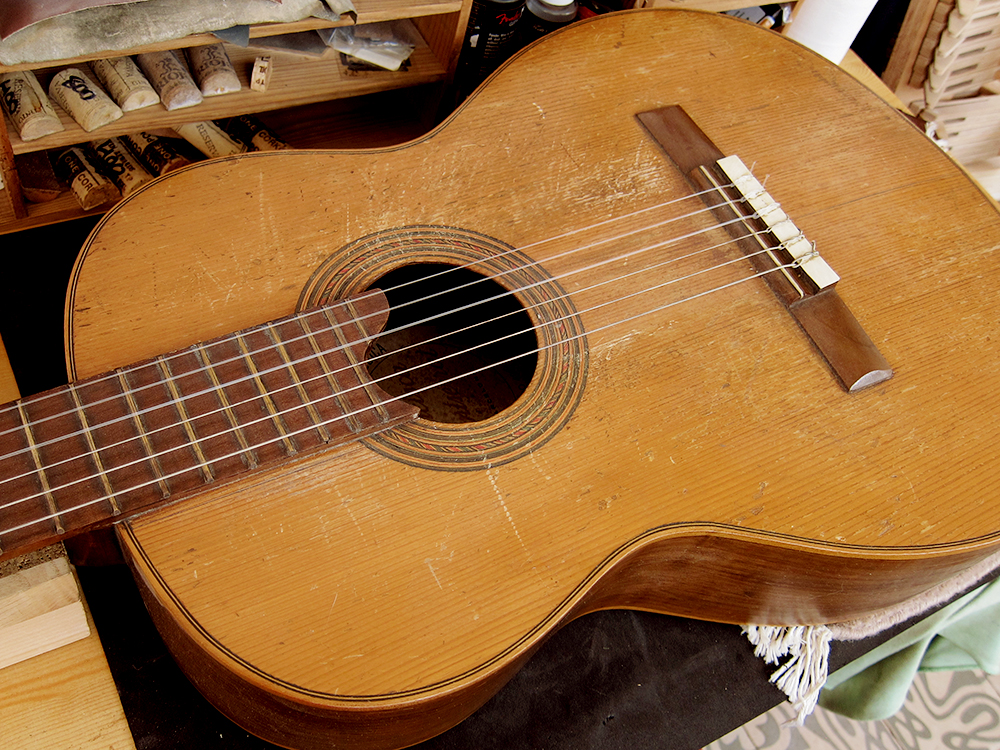
First I had to try to clean her up, I have never seen a top with that much grease and grime. I used a normal furniture spray and a toothbrush, it worked like a charm. When I had cleaned the fretboard I polished the frets and oiled up the fretboard with lemon oil. She came out looking pretty descent after that.
Now I just had to take care of the broken head and glue the back. I have actually never glued a head on before but I assumed that you do something like this. I used to thin pieces of wood on each side to stabilise it and keep things in place, and also for not damaging the head any further with the force of the clamps. I guess it could have worked with normal wood glue too but I used my trusty old fish glue that I use for pretty much everything when it comes to guitars. It came out looking very solid after being clamped for 48 hours. I also glued the open back and a cracked brace, which was pretty straight forward. The machine heads was broken on one side so I replaced them with the leftovers from the Juan Estruch I fixed last year. They don’t match exactly but at least they are from the same time and region, that’s close enough for me. Compared to the state I found her in I think she is looking pretty good. More images can be found here.
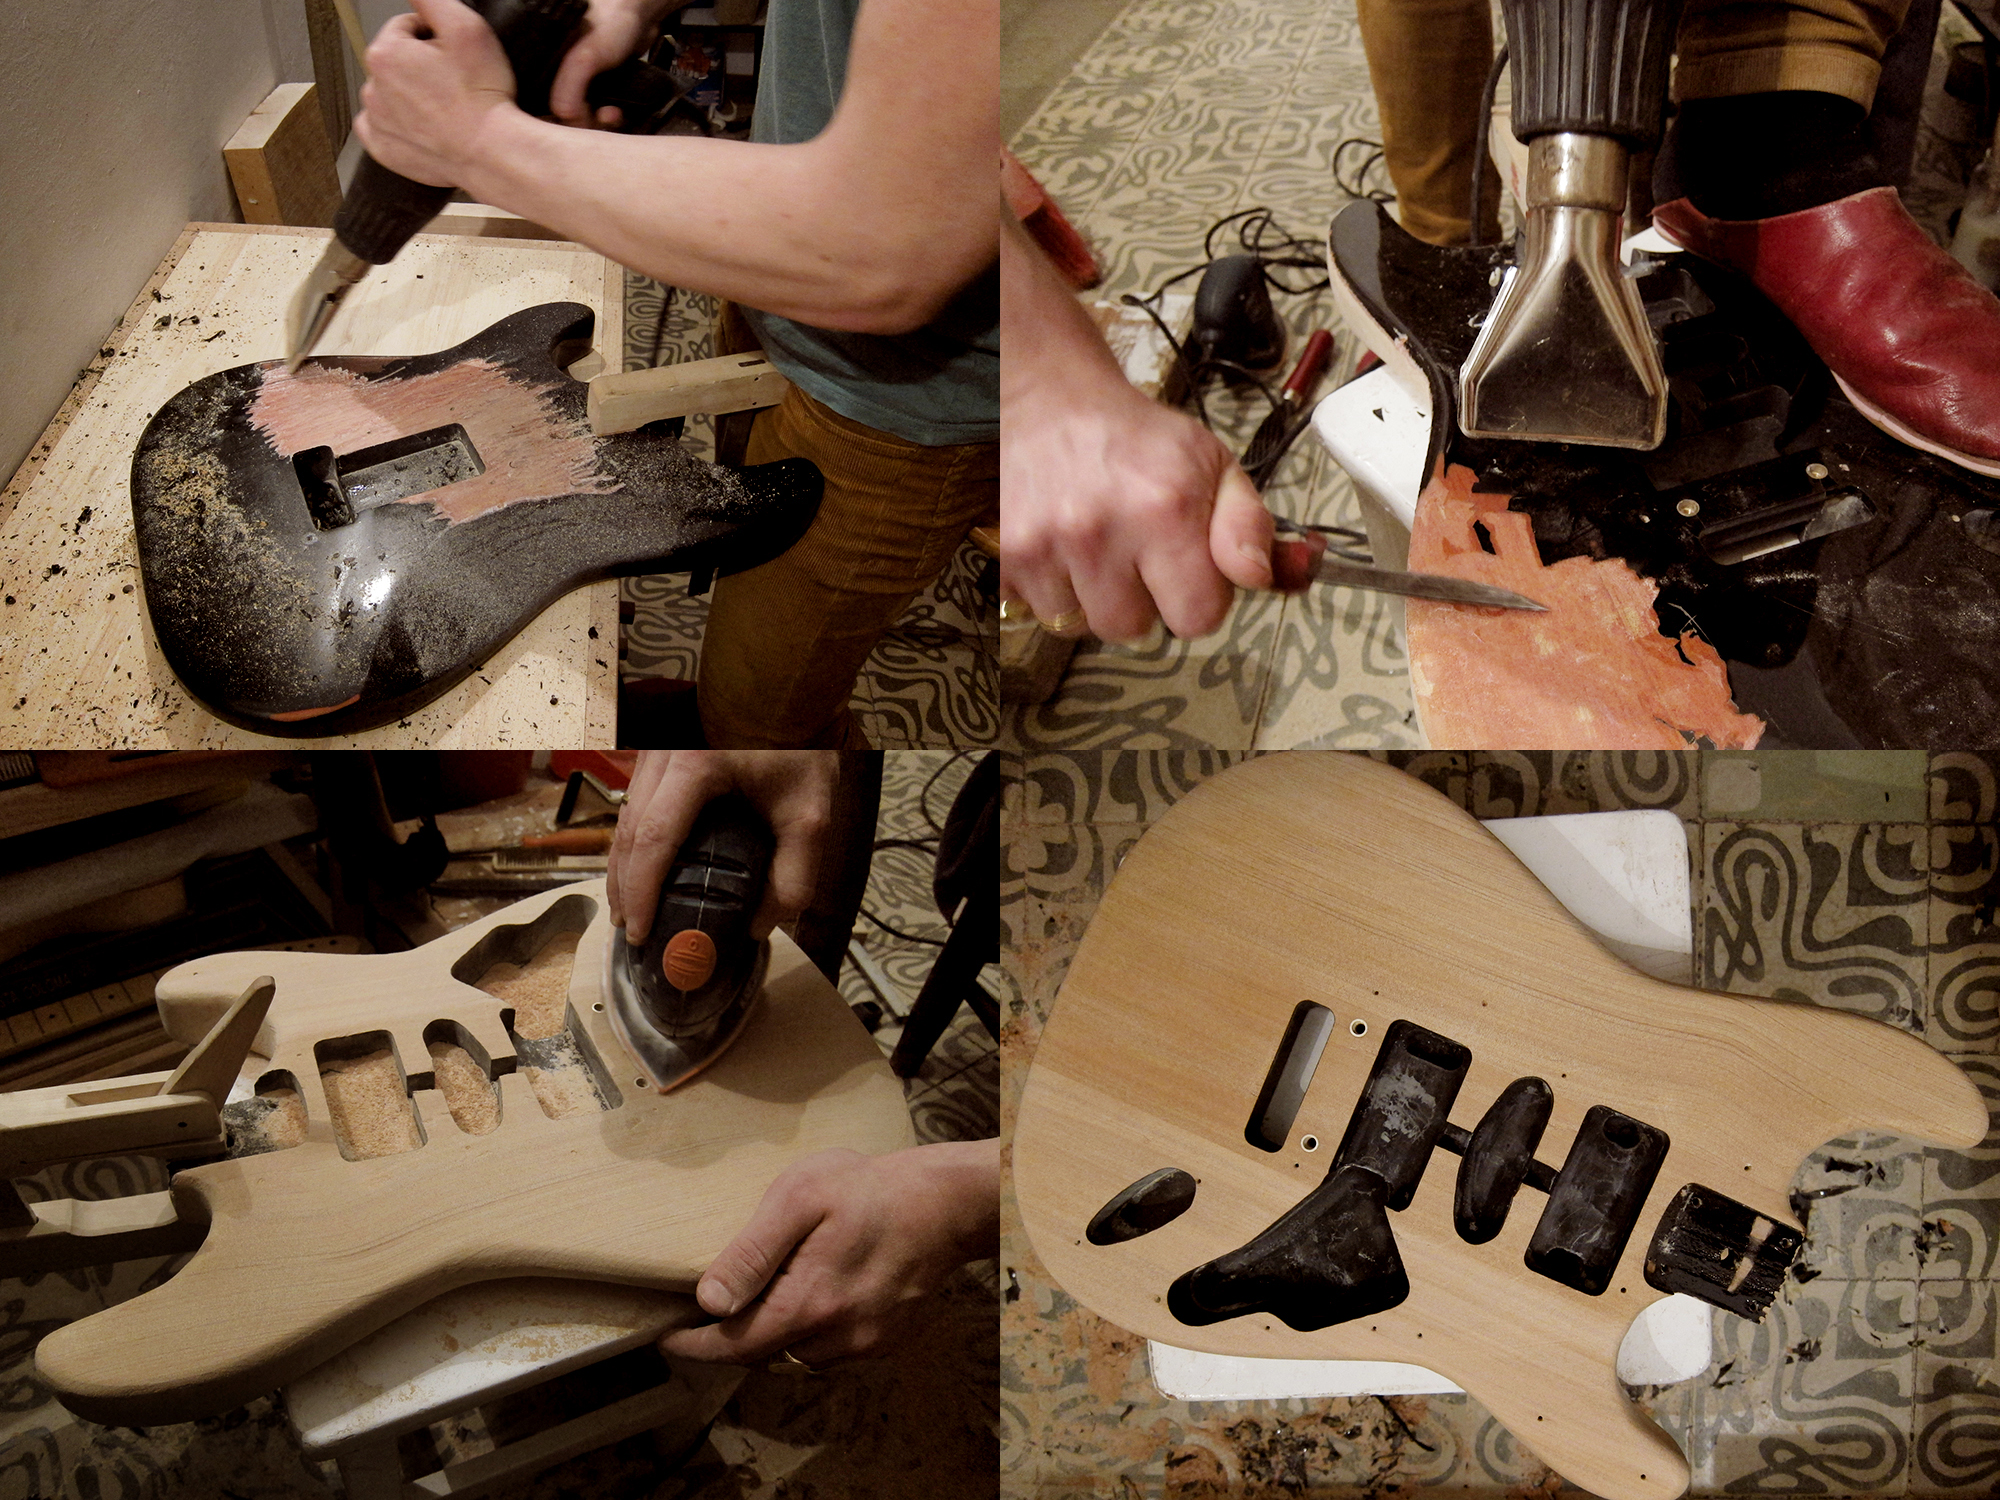
I never got around to mention this but a few months ago I helped my friend Wolf to strip his black Fender Squier Strat body. Everything went fine and it wasn’t too hard, well to be honest it was rather tedious and time consuming but the result was at least good in the end. We were pretty surprised that the body looked so good stripped with nice grain and all, I expected 8 pieces glued together and a lot of knots and crap and that’s why they chose to lacquer it black, but clearly not. Now he is going to burn in some nice country inspired patterns and then we will just ad a coat of clear lacquer.
The heat gun worked pretty well for the black top coat, but there was a red coat under that was almost impossible to get rid of. In the end I used my Japanese Shinto saw rasp for getting through it, especially on the sides, no other rasp or file seemed to bite on it. Once we got rid of all the lacquer it was just down to a lot of sanding and reshaping the edges a bit that I occasionally went a bit hard on with the saw rasp. If you are tired of the colour of your guitar body it could be an idea to strip it but please be aware of the effort involved and that it will smell like burning napalm and toxic poly lacquer that will make you dizzy and freak out the cat. This way of using a heat gun and saw rasp works pretty well but it would probably have worked fine without the heat gun too and that way we would have skipped the unhealthy plastic fumes.
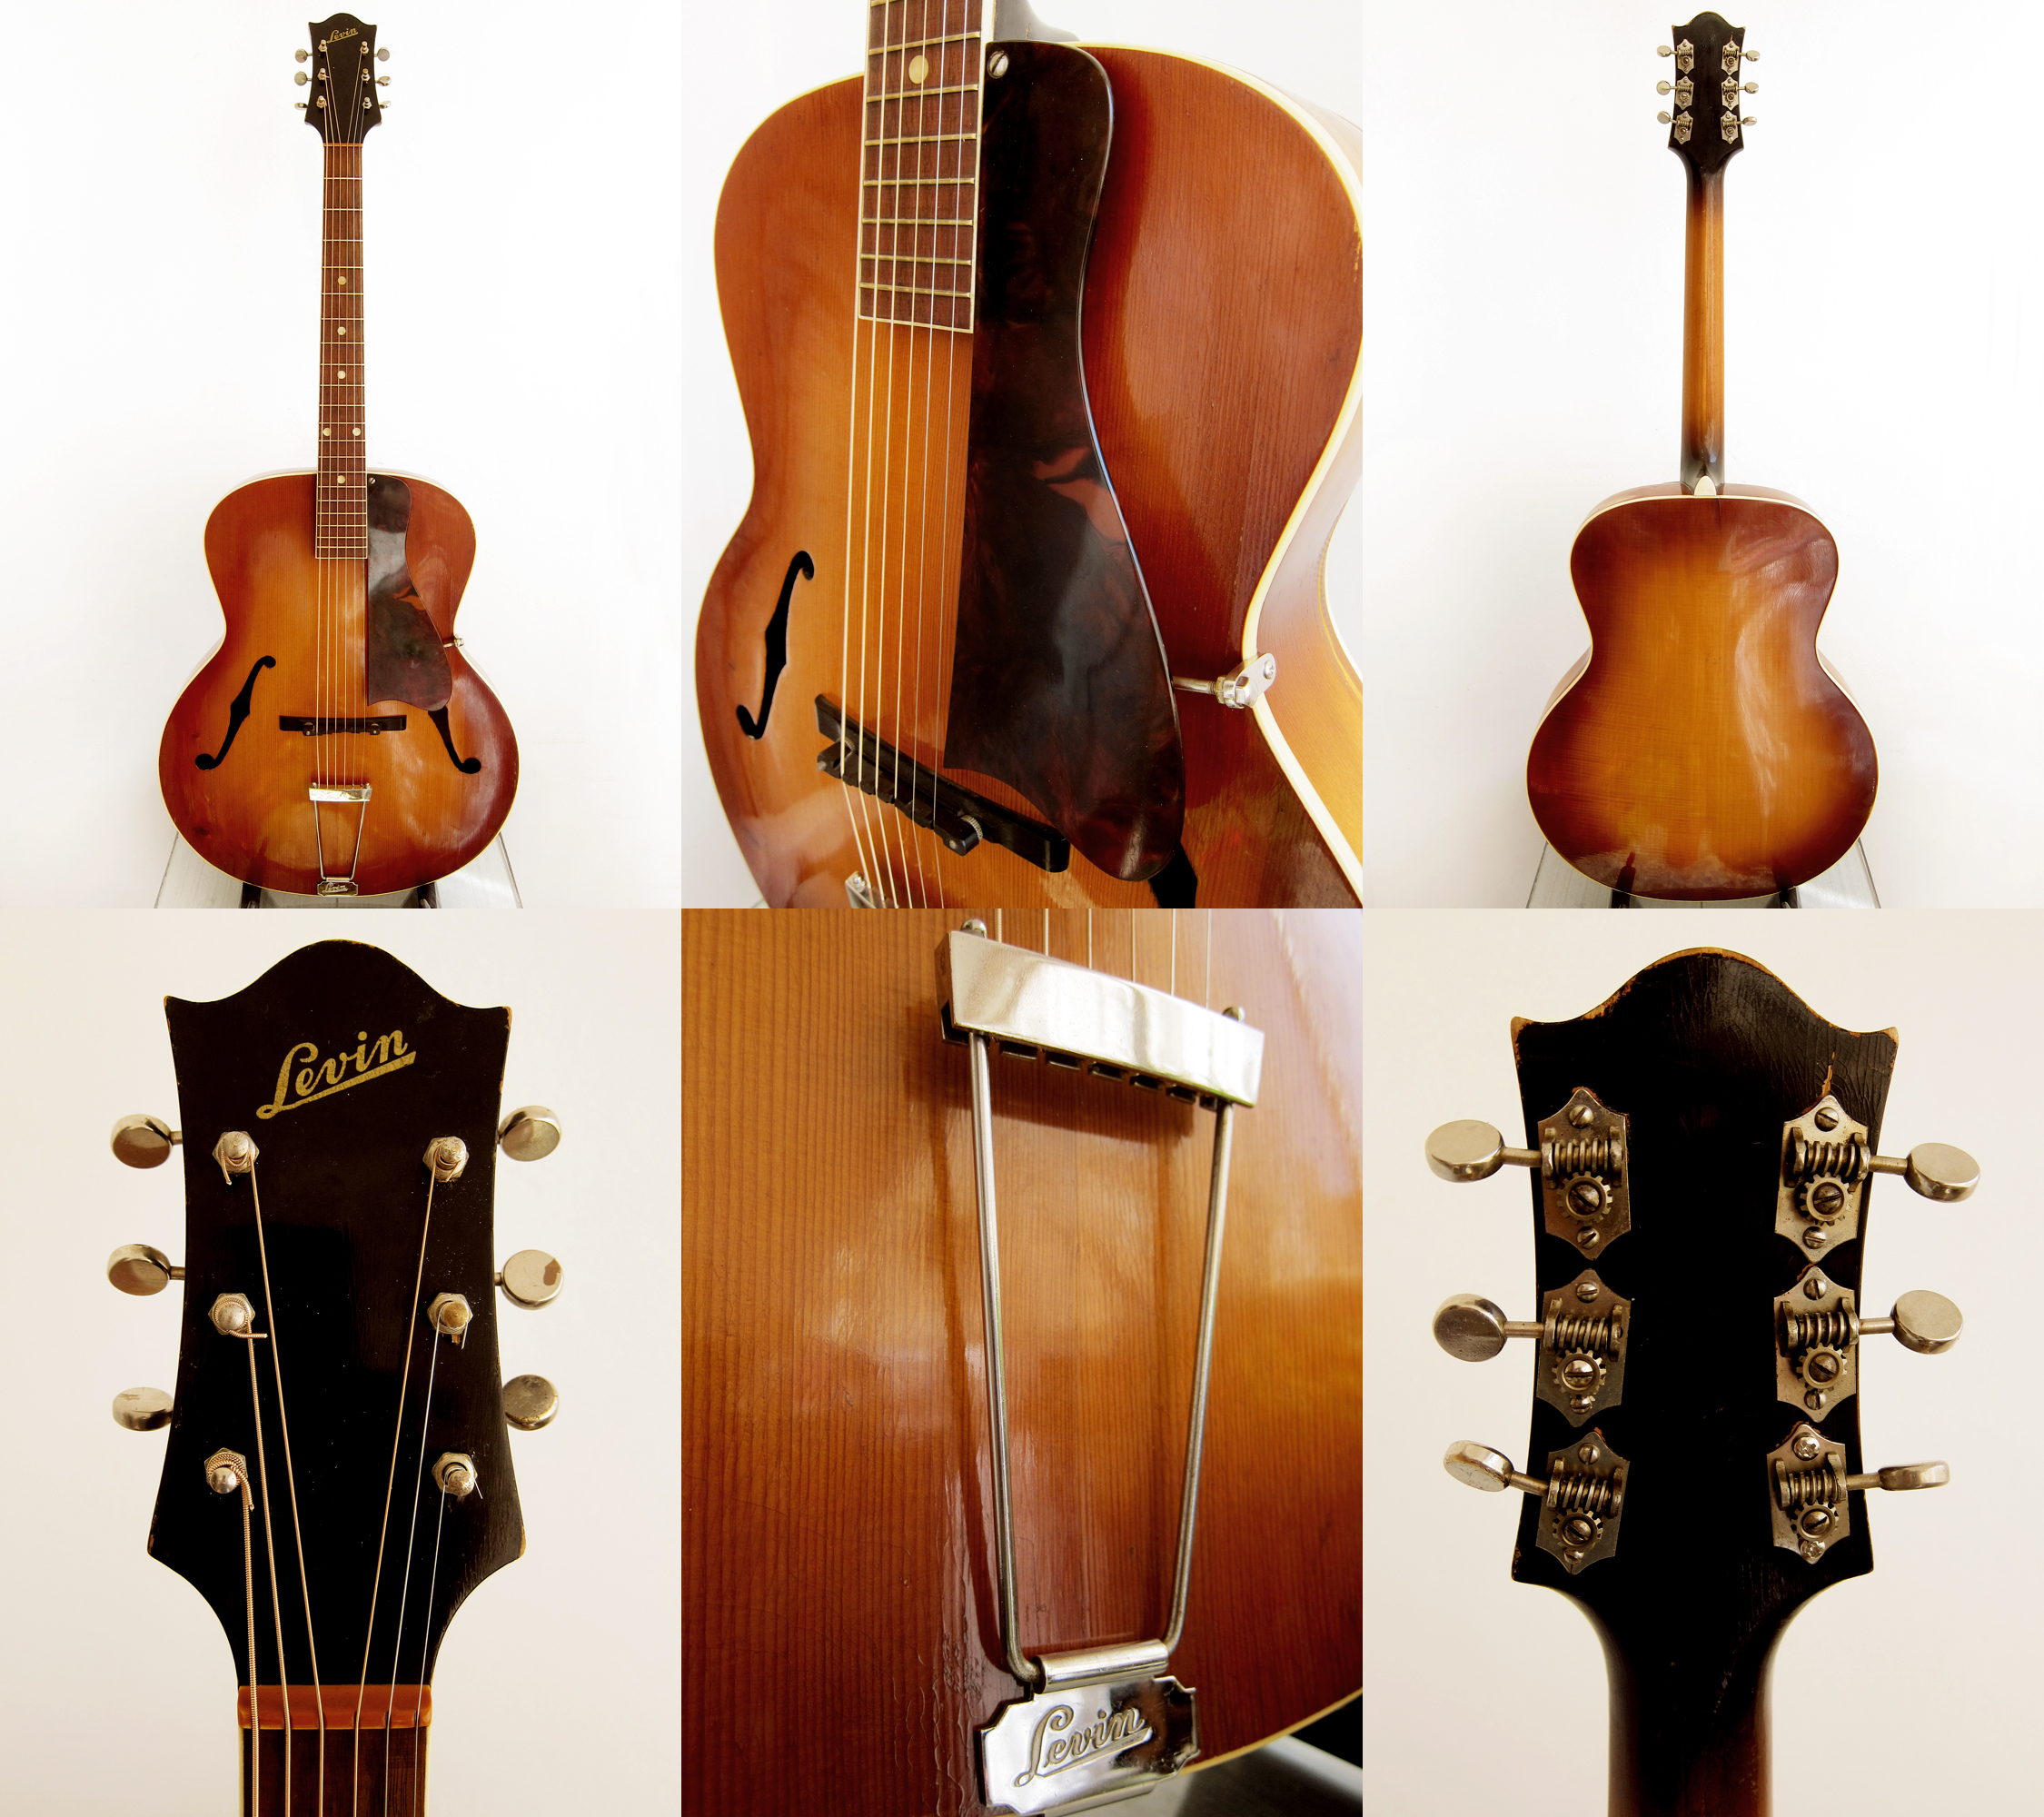
I recently got this old 1946 Levin Model 32 from an eBay seller in Vienna. The guitar has clearly seen better days but I felt she deserved a second chance in life so I got her home, dolled her up and now she is playable again. I had no idea what model it was when I got it and I was actually hoping that it would be a Model 30 from the late 1930’s, they look very similar but it turned out to be a Model 32 from the mid 1940’s instead, which isn’t bad. I guess I just wanted to have a Levin that was older than my 1942 Levin Model 65. It’s pretty close to my 1951 Levin Royal in sound and feel but with a more casual appearance. I guess there was a shortage of tonewoods all over Europe during the war so they used what they got. This one has a hand carved 3-piece Romanian spruce top and you can even see a couple of knots around the f-holes. I don’t really mind, together with all the cracks it’s just adding to that old worn archtop look and feel. The back is really beautiful though and the neck feels great, really fat and chunky as I like. It also has a quite different sunburst compared to what Levin normally used in 1940-50’s. Levin used to copy Gibson’s tobacco sunburst but this one has more of a cherry sunburst.
Levin Model 32
Non-cutaway. Body width: 420 mm, body length: 510 mm
Hand carved Romanian spruce top, mahogany back and sides
Single-bound top with unbound f-holes
Single-bound back, unbound pickguard and unbound headstock
Mahogany neck with non-adjustable T-shaped duraluminum truss rod
Single-bound rosewood fingerboard with mother-of-pearl dot inlay
Nickel plated hardware, sunburst finish and ten years warranty
Available between 1940 – 1947
Levin Model 32, here between the model above, the beautiful Model 27 and the slightly cheaper Model 35. I love that the case option offered in the bottom of each ad is a plain textile bag with a zip, really, textile? The list price for the guitar in 1946 was 285 SEK, around 30 Euro. The Royal listed that year at 575 SEK an the top of the line, the Deluxe at 1000 SEK. Taken from a 1946 Levin archtops catalog, thanks to Vintage Guitars Sweden
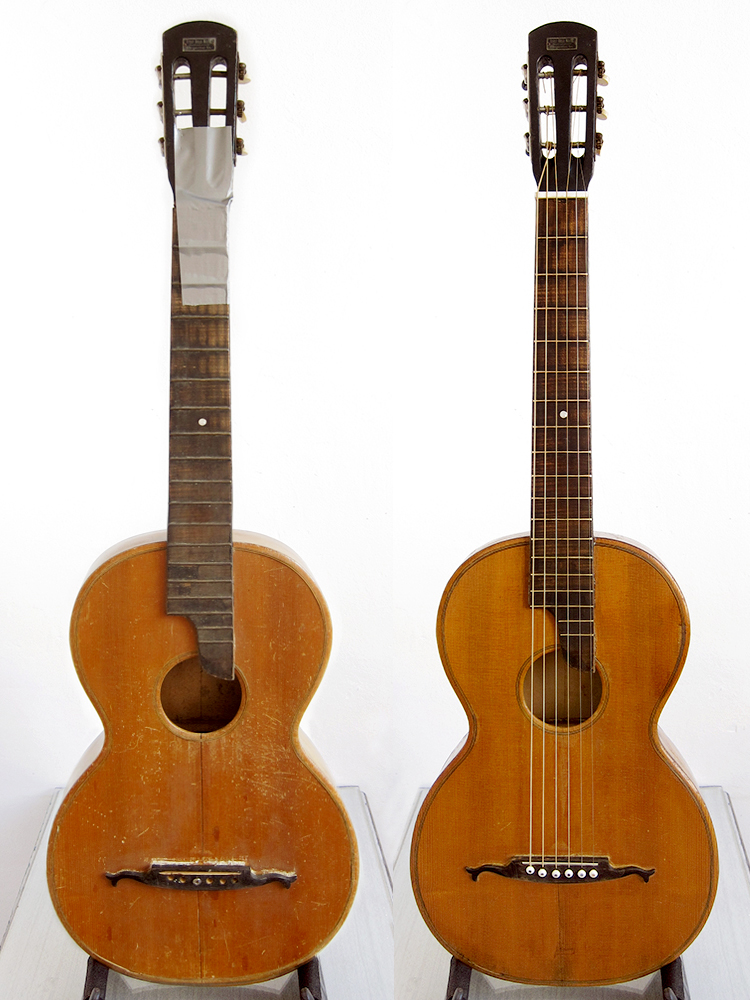
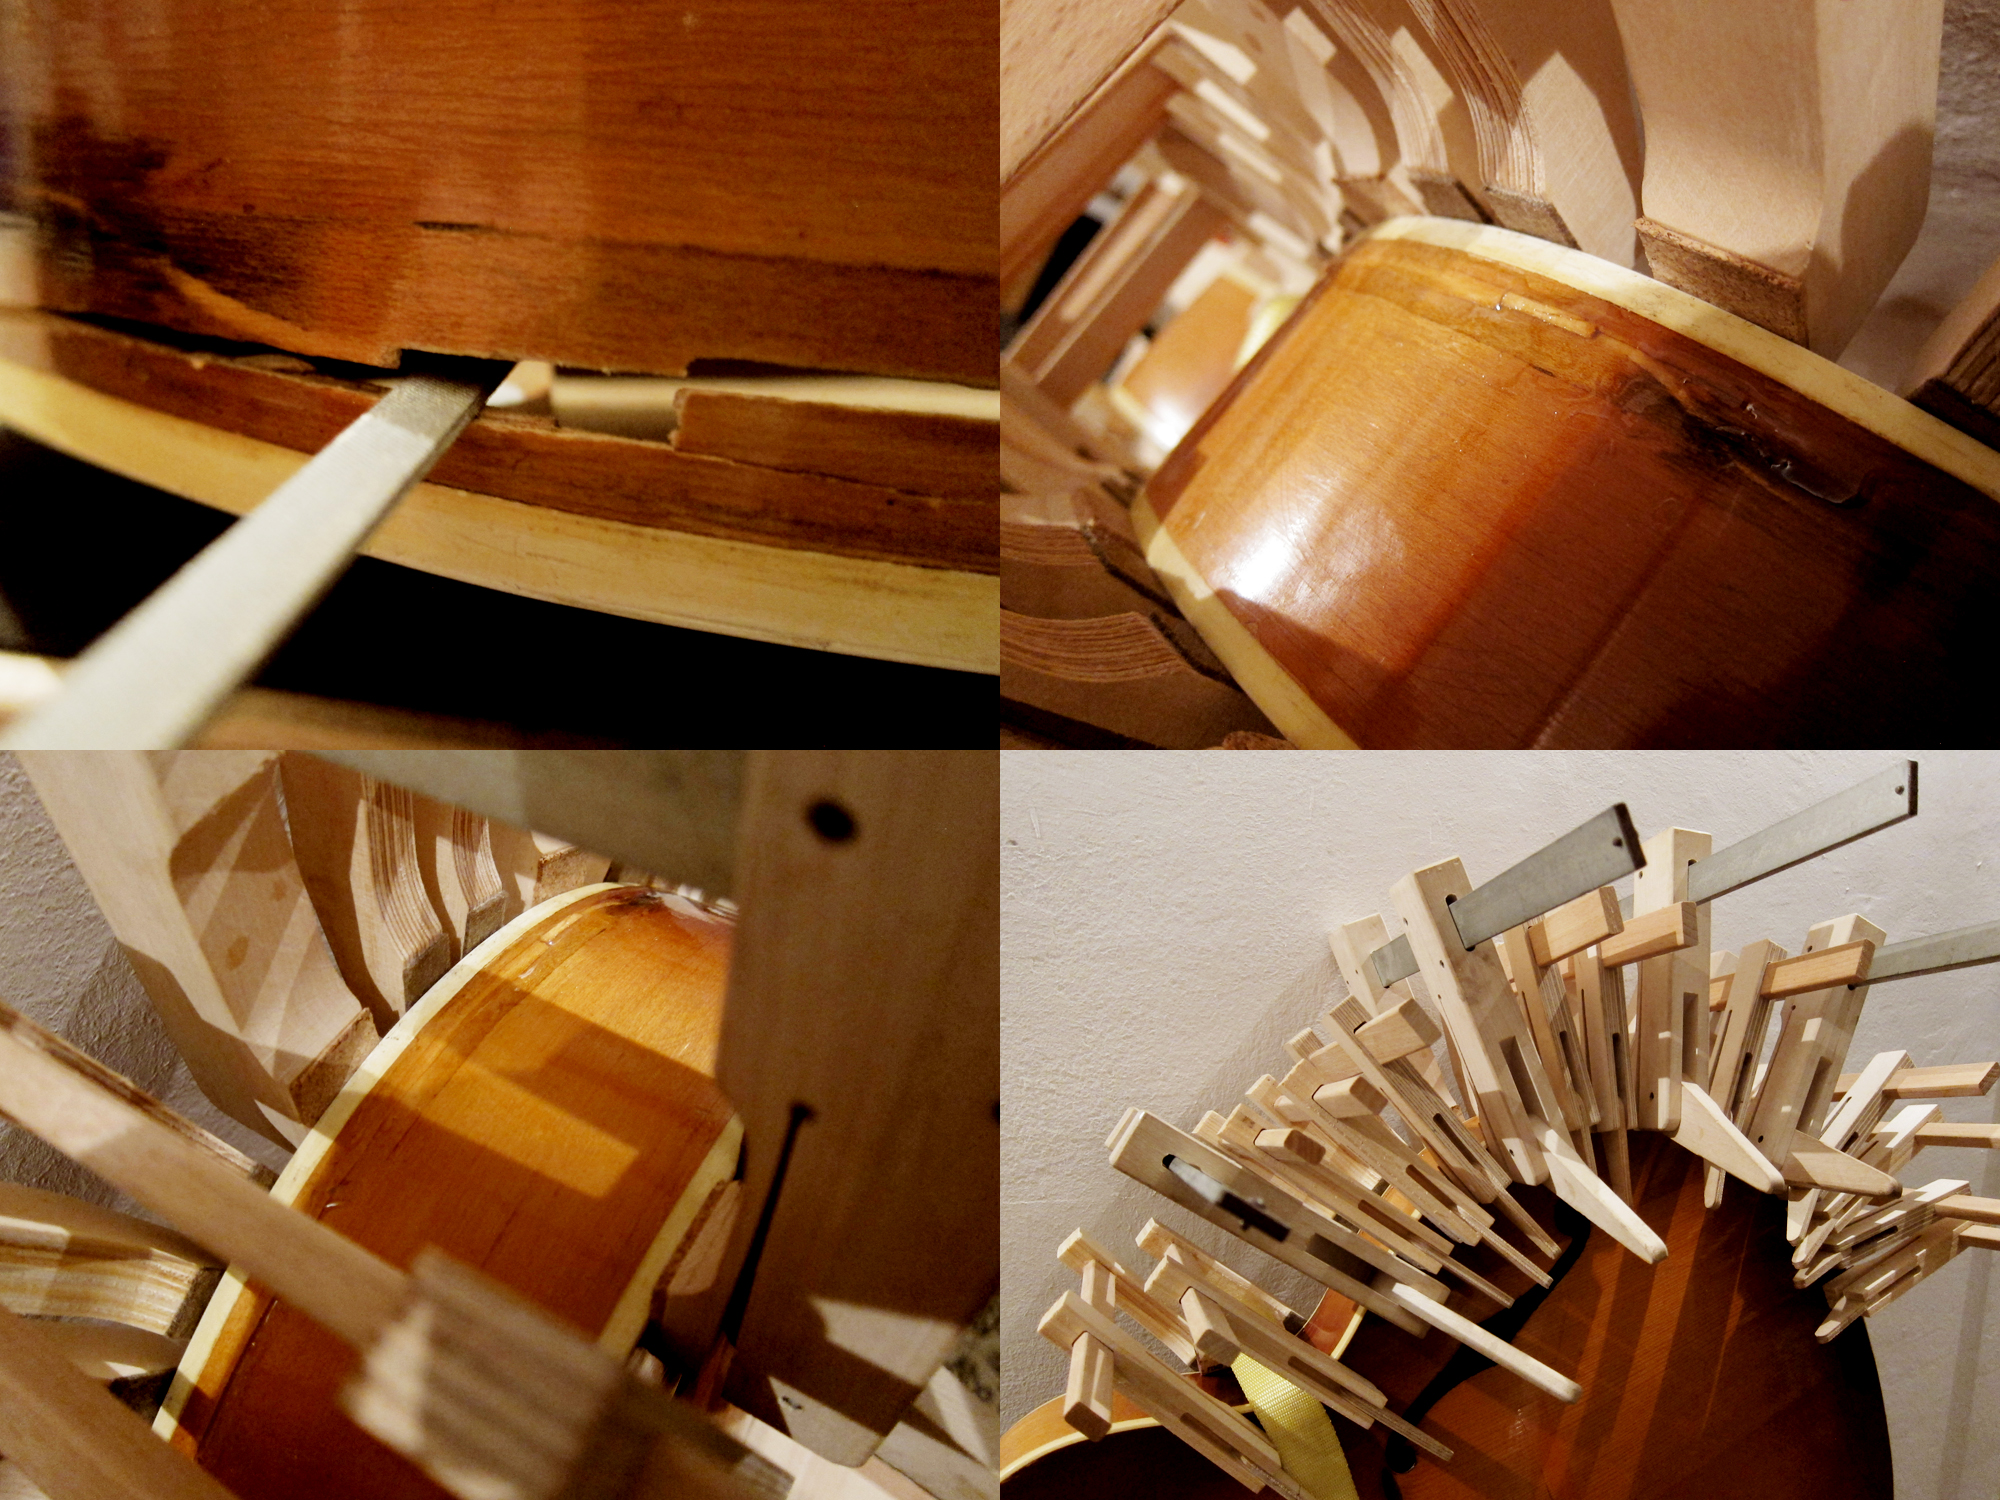
She looked a bit sad when she arrived, but there was nothing that couldn’t be fixed
First I had to deal with the crack that was running along the whole bottom side, from the upper bout to the endpin. There was also another crack, or hole, that the previous owner had glued in perhaps not the most discrete fashion.
I have never attempted to glue anything this big before but there is a first time for everything. I noticed that there was a piece of wood missing so I started with making the hole square and then I fitted a little piece of wood in the exact same size. The main problem I had was that the guitar had been cracked for so long, with the tension of the strings I think, so the whole side had kind of warped. In parts the crack was overlapping in one way then suddenly changed to go the other way. Which meant that when I was trying to close the crack it didn’t line up, at all. I did my best and with a bit of force and a lot a clamps I managed to get it to close at least, even if it didn’t line up perfectly. I know that the correct way of doing this would have been to glue cleats on the inside and perhaps a string coming trough that you can tighten from the outside or even better, magnets, but unfortunately the crack was just over the kerfing which would have made it hard to glue any cleats on top of the kerfing. I also couldn’t figure out a way of getting any magnets inside an archtop, there wasn’t really any way of getting my hands in there.
It went ok for being my first time and it seems to be very solid after letting the fish glue cure for 48 hours, I added some extra glue over the old crack too just to be on the safe side. I sanded everything smooth and then lacquered with shellac, I was trying to match the original lacquer but it turned out to be impossible to copy the sunburst. Maybe I can figure out a way and redo this part but at least now the guitar is playable. I buffed up the old lacquer and made it blend with the new shellac by polishing it with metal polish, that always works great on old guitars. It’s the same technique I use for the back of the necks, filling the dents with nitro lacquer and then sand it smooth and buff it up with metal polish. The original machine heads are pretty wonky but they work fine and cleaned up nicely, just like the tail piece, so I decided to keep the guitar all original.
I recently got myself a Morris W-50, my third Morris and it sounds as good as the other two. Solid spruce top and it looks like the back and sides are solid Brazilian rosewood and quilted maple. It was pretty beat up when I got it from Guitar Hiro in Madrid with plenty of dents and a cracked back but now I’ve fixed it up a bit and it’s playable again. It’s a nice Martin D-42 copy with snowflake inlays and the typical Martin volute where the head and neck meet. Nice inlays all around and a beautiful 3-piece back with flamed maple and rosewood. I guess it was made around 1976 since they changed to hexagon inlays in the 1979 catalogue and then renamed them from W-50 to TF around 1983.
TF Morris W-50, Made in Japan around 1976
Morris Japan catalogue 1976
There was a bit of work needed on this guitar. The back was cracked in the binding just below the heel which made the whole neck tilt forward causing a pretty high action. I cleaned out the crack, someone had put some super glue in there, filled it with fish glue that I let really sink in and connect with the neck block, clamped it and left if for 48 hours. Now it seems really solid and the action got so low that I had to make a new higher bone saddle for it. There was a lot of dents and marks on the back of the neck so I filled them with nitro lacquer and sanded it smooth and buffed it up with metal polish, here you can read more about how to repair lacquer damage. The only thing left now is to ad some gold machine heads so I ordered a set of open back Schaller ST6 this morning and will fit strap button and an endpin jack tonight.
I recently changed the machine heads on my 1970’s Japan made Morris W-50 to Wilkinson WJ28NGD open gear in gold and I couldn’t be happier
Moridaira (Morris Guitars) Founded in 1967 by Toshio “Mori” Moridaira, the Moridaira factory produced high-quality guitars, including the infamous Morris badged guitar. Moridaira also produced badged guitars for Hohner including Coronado, Futurama, H.S. Anderson, Lotus (some) and Sakai.
I recently reglued the bridge on my Francisca Montserrat and just wanted to show how easy it is if anyone out there feels a bit scared of doing it yourself. It’s very straight forward and only takes a couple of minutes.
Heat a spatula on a normal clothes iron, it’s good to keep a finger on it so it doesn’t get too hot and scorch the lacquer. Insert the spatula under the bridge, start with the edges and work your way to the middle to loosen the bridge. I prefer to reheat often instead of working with a really hot spatula from the start, less risk of damaging the top that way. Be careful when you do the last push so you don’t break it off, it’s supposed to come off without any direct force if the spatula is warm enough to loosen the glue. Once the bridge is off, clean the guitar top and the bottom of the bridge with some sandpaper to get a smooth surface. I earlier thought that it was good to scratch the bottom of the bridge with a knife to get something for the glue to grip to but have later been told that’s an old myth and it’s better to keep the surfaces smooth. Apply plenty of glue on both the guitar top and the bottom of the bridge, I always use fish glue for my guitars. Put the bridge in place, apply some pressure with your hands and remove all the extra glue that comes out on the side and then apply a couple of clamps to keep it in place over night. I recently got myself a couple of deep throated, 200 x 195 mm, Klemmsia clamps from German eBay that worked great.
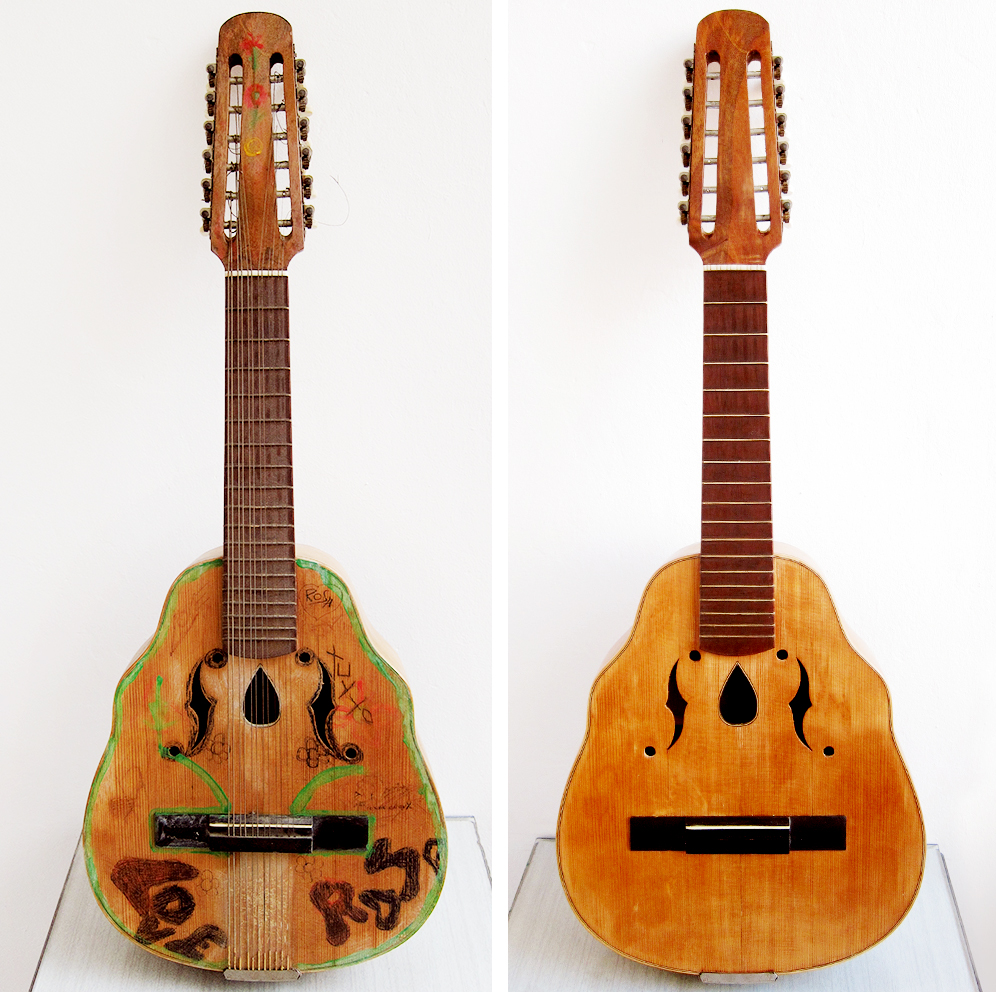
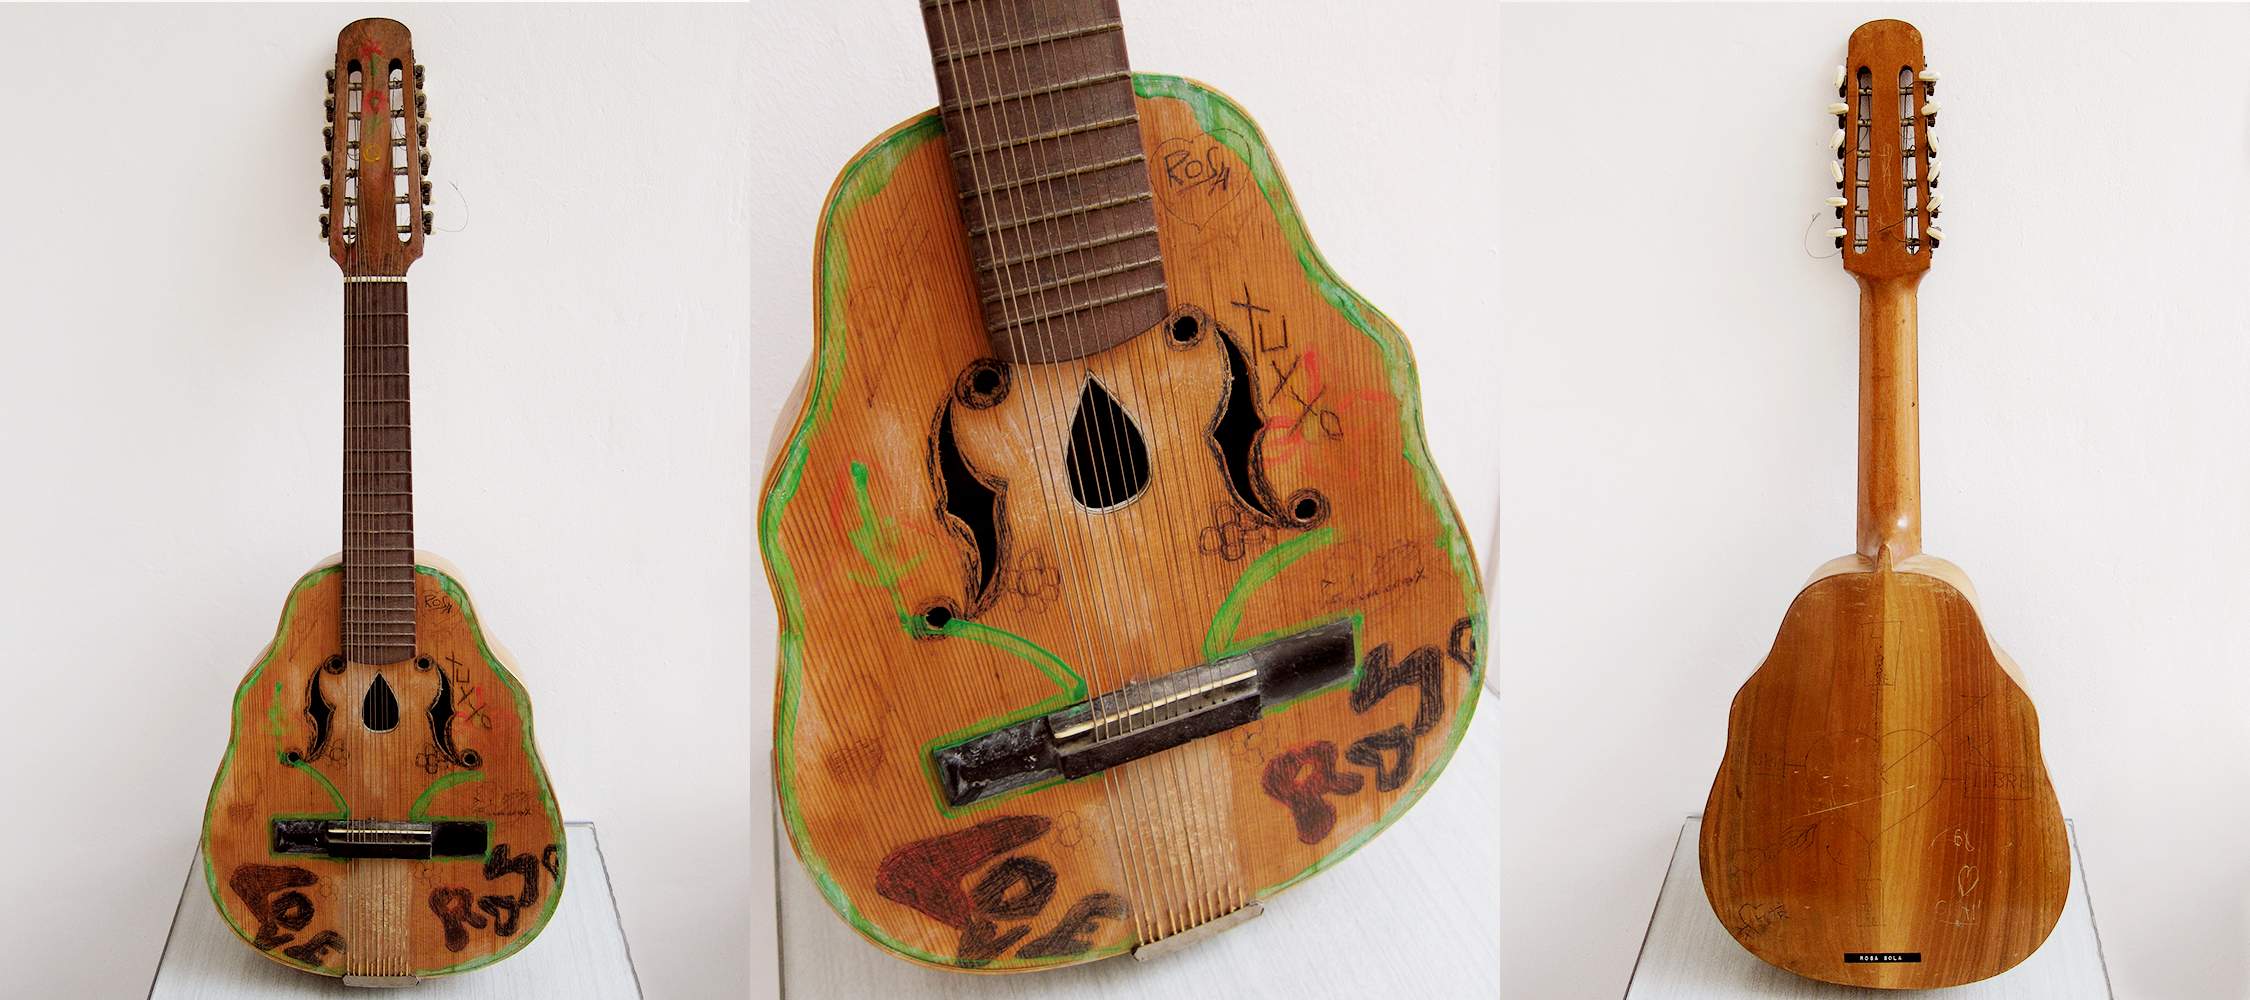
Before and after, a Spanish Laúd, made by Casa Parramon, Barcelona
When Araceli and I first moved to Barcelona we found this Laúd in the streets, we took it home, put it in the back of a wardrobe and completely forgot about it for four years. It was so ugly so we couldn’t have it out, on top of that we didn’t even know if it was a laúd, a bandurria or some other weird Spanish instrument. It was therefore tucked away and quickly forgotten. Until recently when Araceli’s dad Marcos mentioned that he wanted to learn to play a new string instrument, or as he put it, I need something new to make noise on. We suddenly remembered that ugly thing with strings on in the wardrobe and I thought that maybe I could restore it for him. I mentioned earlier that we managed to find a really nice Spanish made Alhambra from the late 1970’s that we gave him for Christmas.
Someone called Rosa Sola had gone crazy bananas, full blown hippie on this poor laúd when we found it
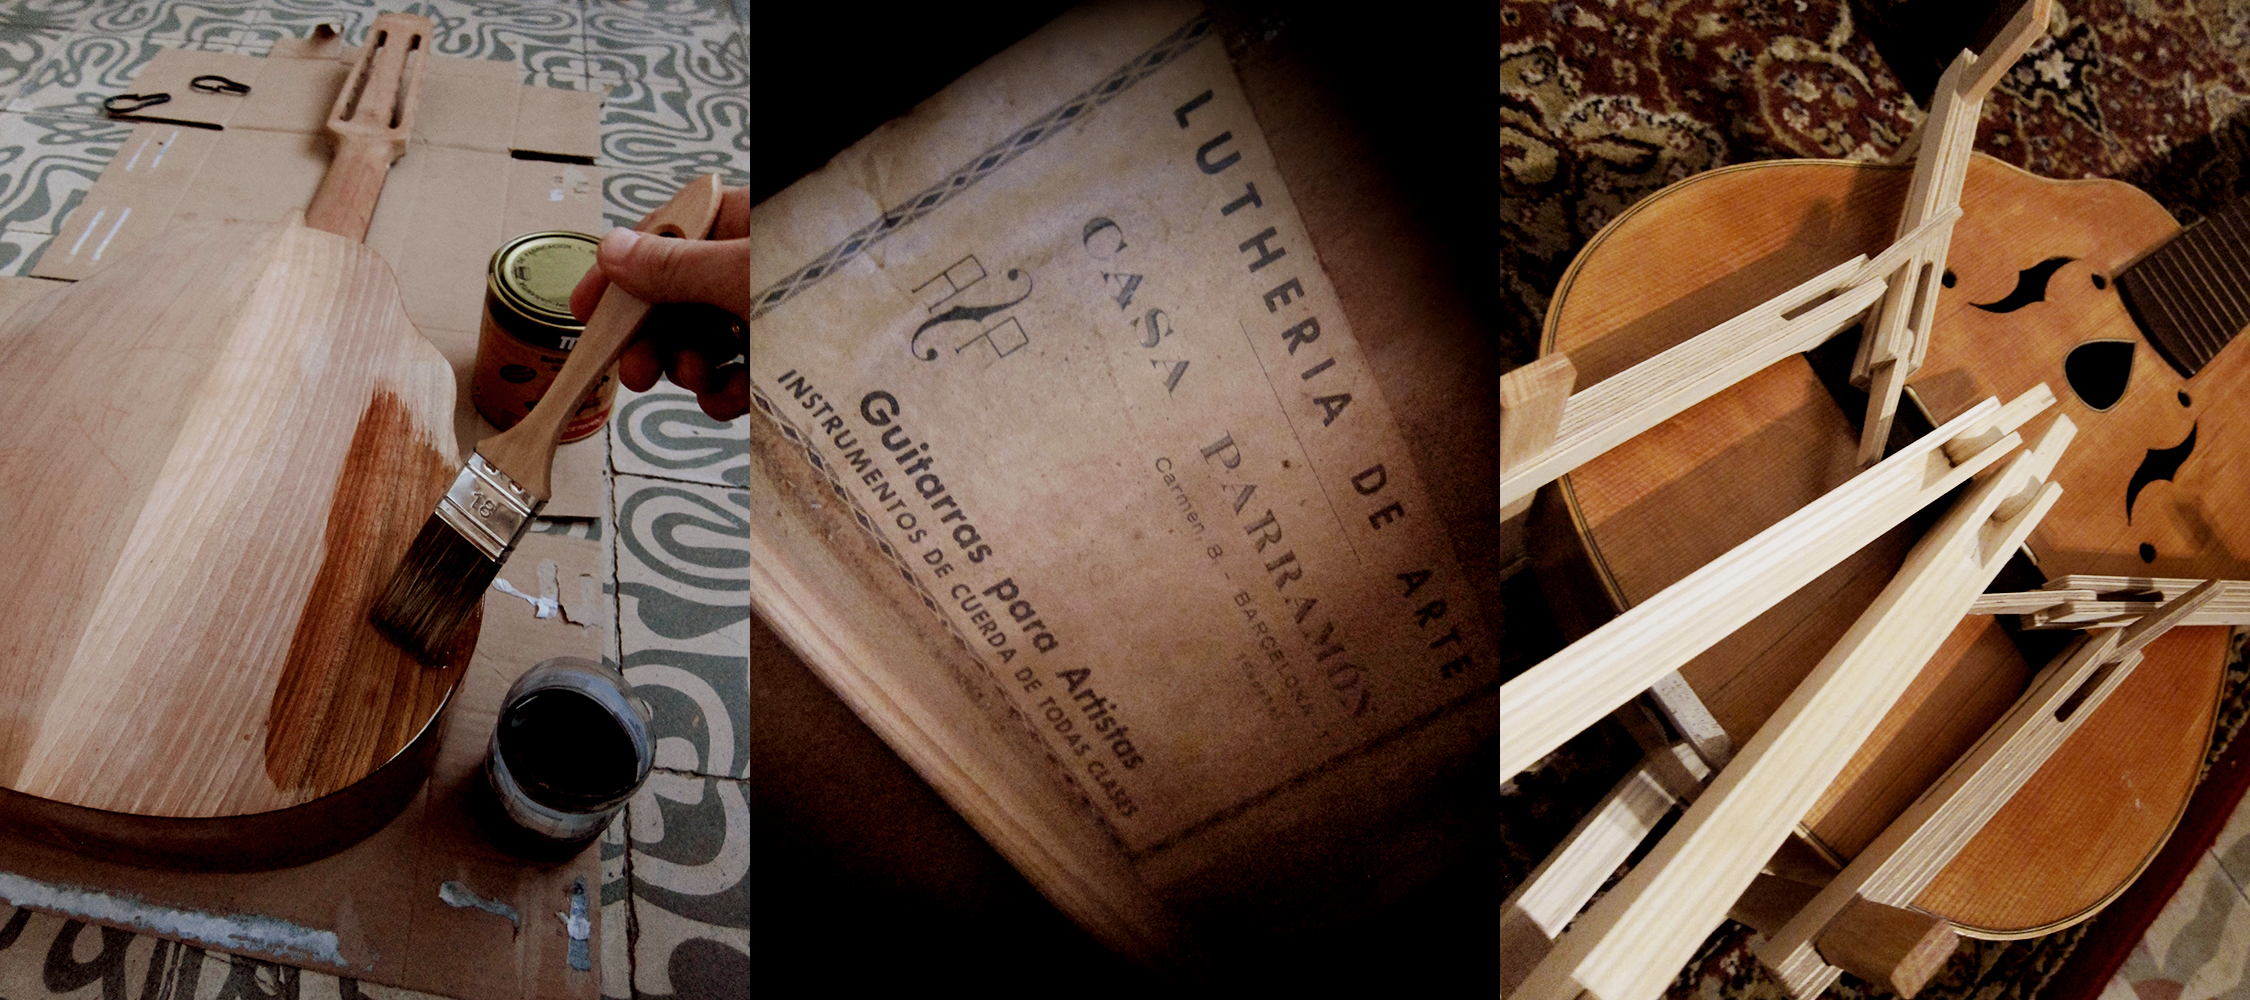
I have no idea how old this laúd is but it was built by Casa Parramon here in Barcelona. The workshop was started in 1897 by Ramon Parramon and I think he mainly built violins. Casa Parramon is actually still in the same place today as they were 117 years ago, C/ Carme 8. Now I think they are mainly building violins again but I guess they would have had time to build both laúds, bandurrias and guitars over the last hundred years.
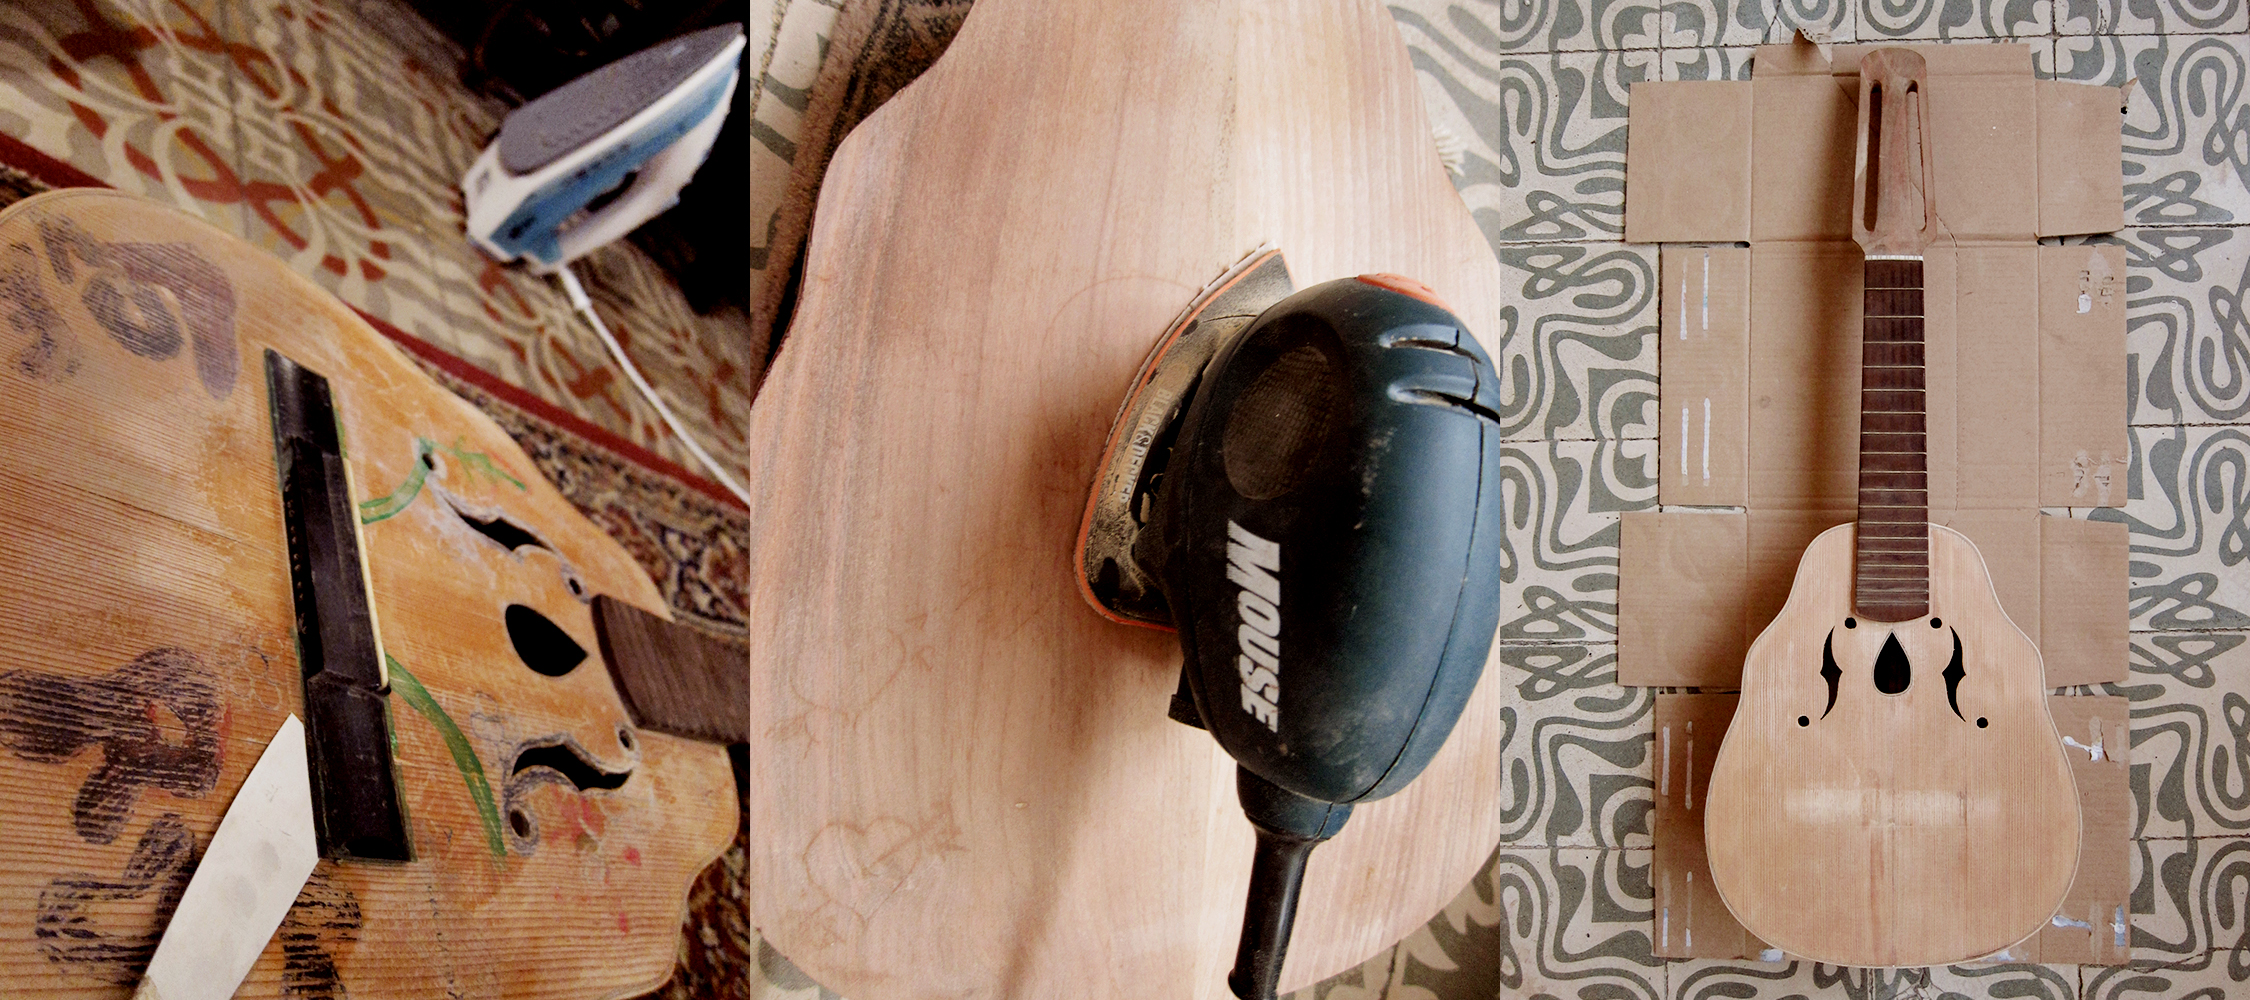
I stripped the laúd completely, took off machine heads, tail piece and bridge. I got the bridge off with a spatula heated on a normal clothes iron, it works like a charm every time. I cleaned and oiled the fretboard and polished the frets. Then I sanded down all the wood with an electric sander, this felt a bit harsh on an instrument but most of the text was actually scratched in to the wood and not painted on so I had to take out the heavy artillery. On top of that, the solid spruce top felt really thick so I thought that the sound might actually benefit from a thinner top. I glued some cracks in the top with my trusty old fish glue and then I waited and waited for the shellac I had ordered from Germany that unfortunately never arrived. I really wanted to use shellac on this instrument, both for practice for myself for future builds and projects, but also for the laúds sake, it felt like the healthiest option. In the end I went and bought normal clear lacquer, or varnish, I’m not really sure what the guy sold me but he said it would work and it did. It applied two coats and sanded lightly in between and it looks ok but I guess if I would have looked even better if I had spent more time on sanding and getting it super smooth in between the coats. I had to paint this at night in poor light and got some drips that should have been taken out properly, I just scraped them off with a razor and then applied new lacquer. I guess I have learnt a few things for the next time. One trick I can share though, that everyone might already know about but anyway. Before I started with the lacquer I marked out where the bridge was going to be and then masked that off with tape so I wouldn’t have to remove the lacquer before I glued the bridge back on and that worked really well.
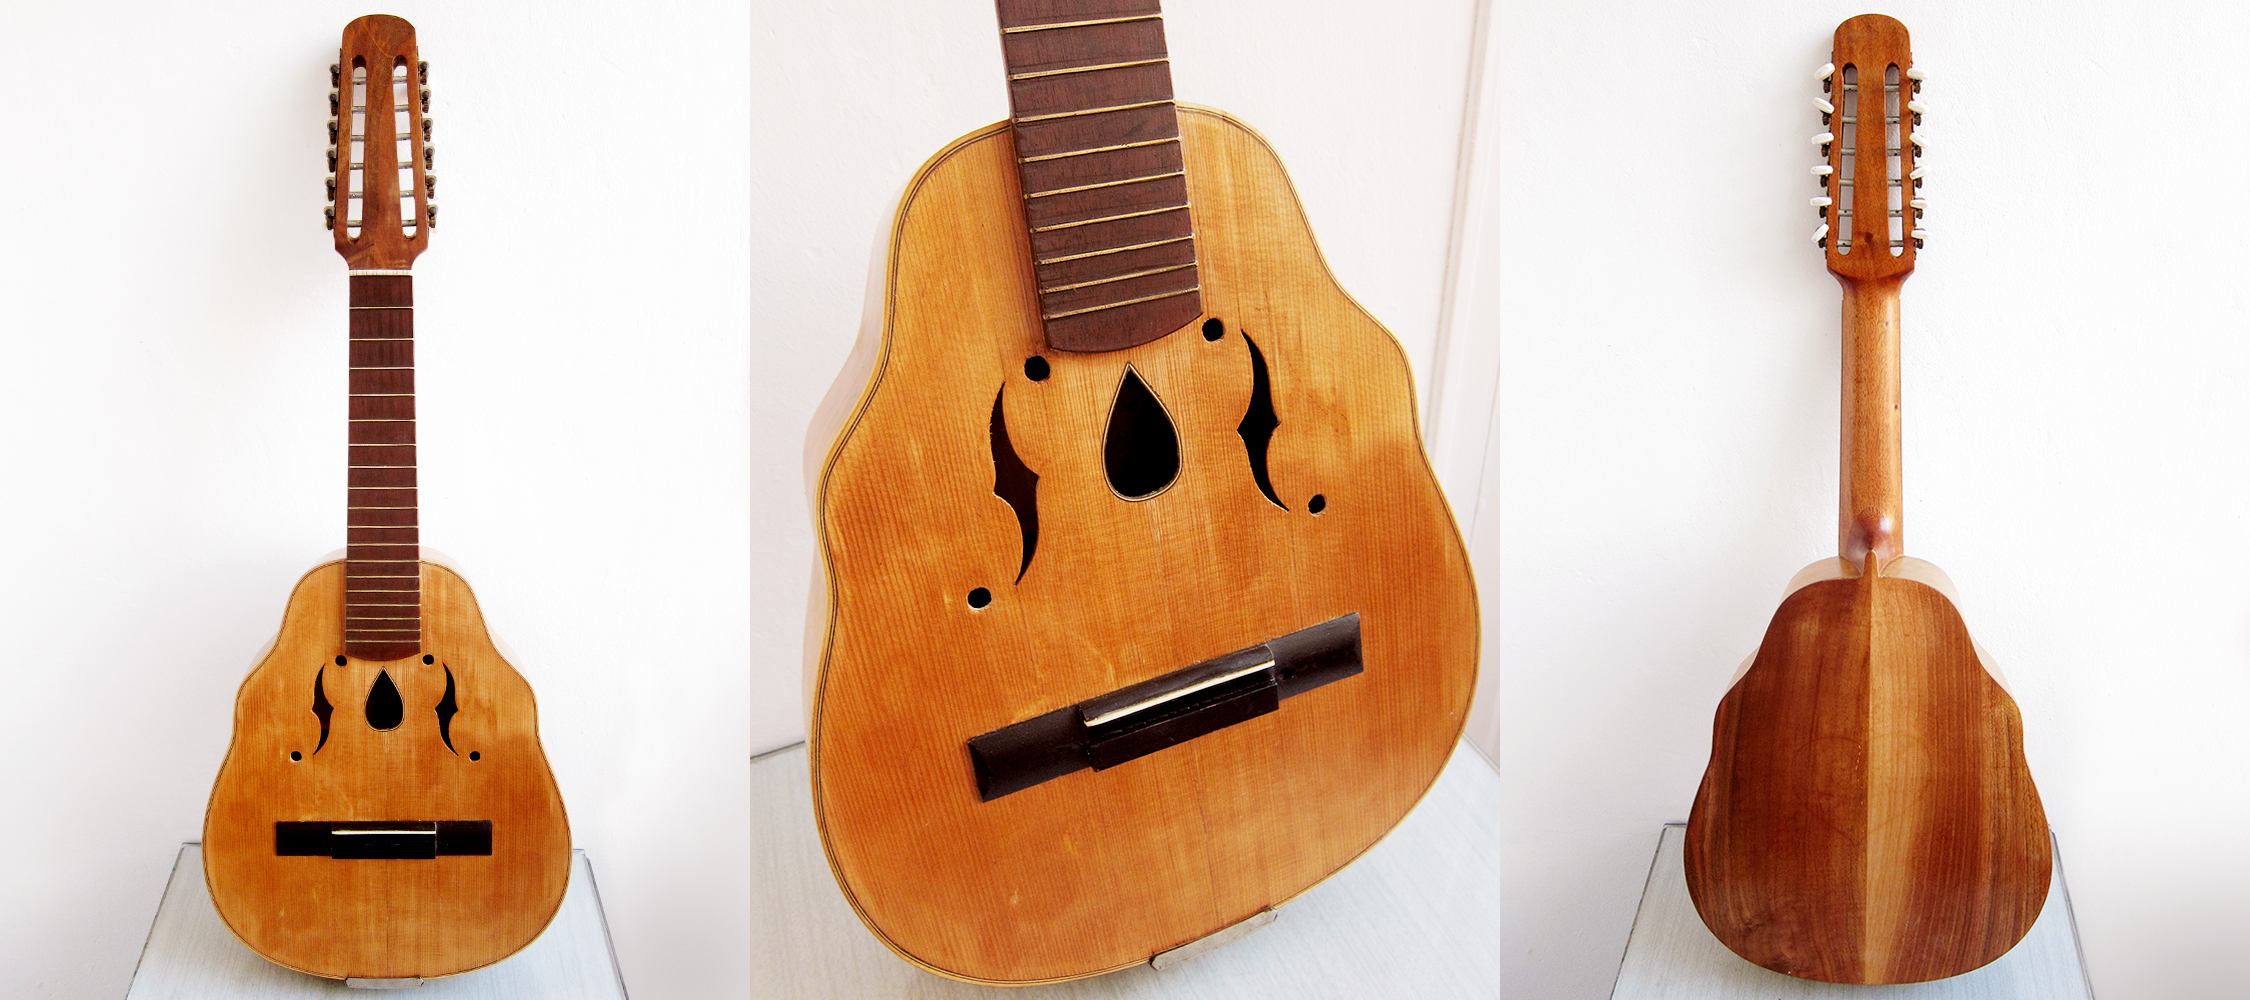
The final result, Marcos new laúd, now I just have to string it up and try to figure out how it’s tuned
Update: August 16, 2014Marcos seemed very pleased with his new laúd
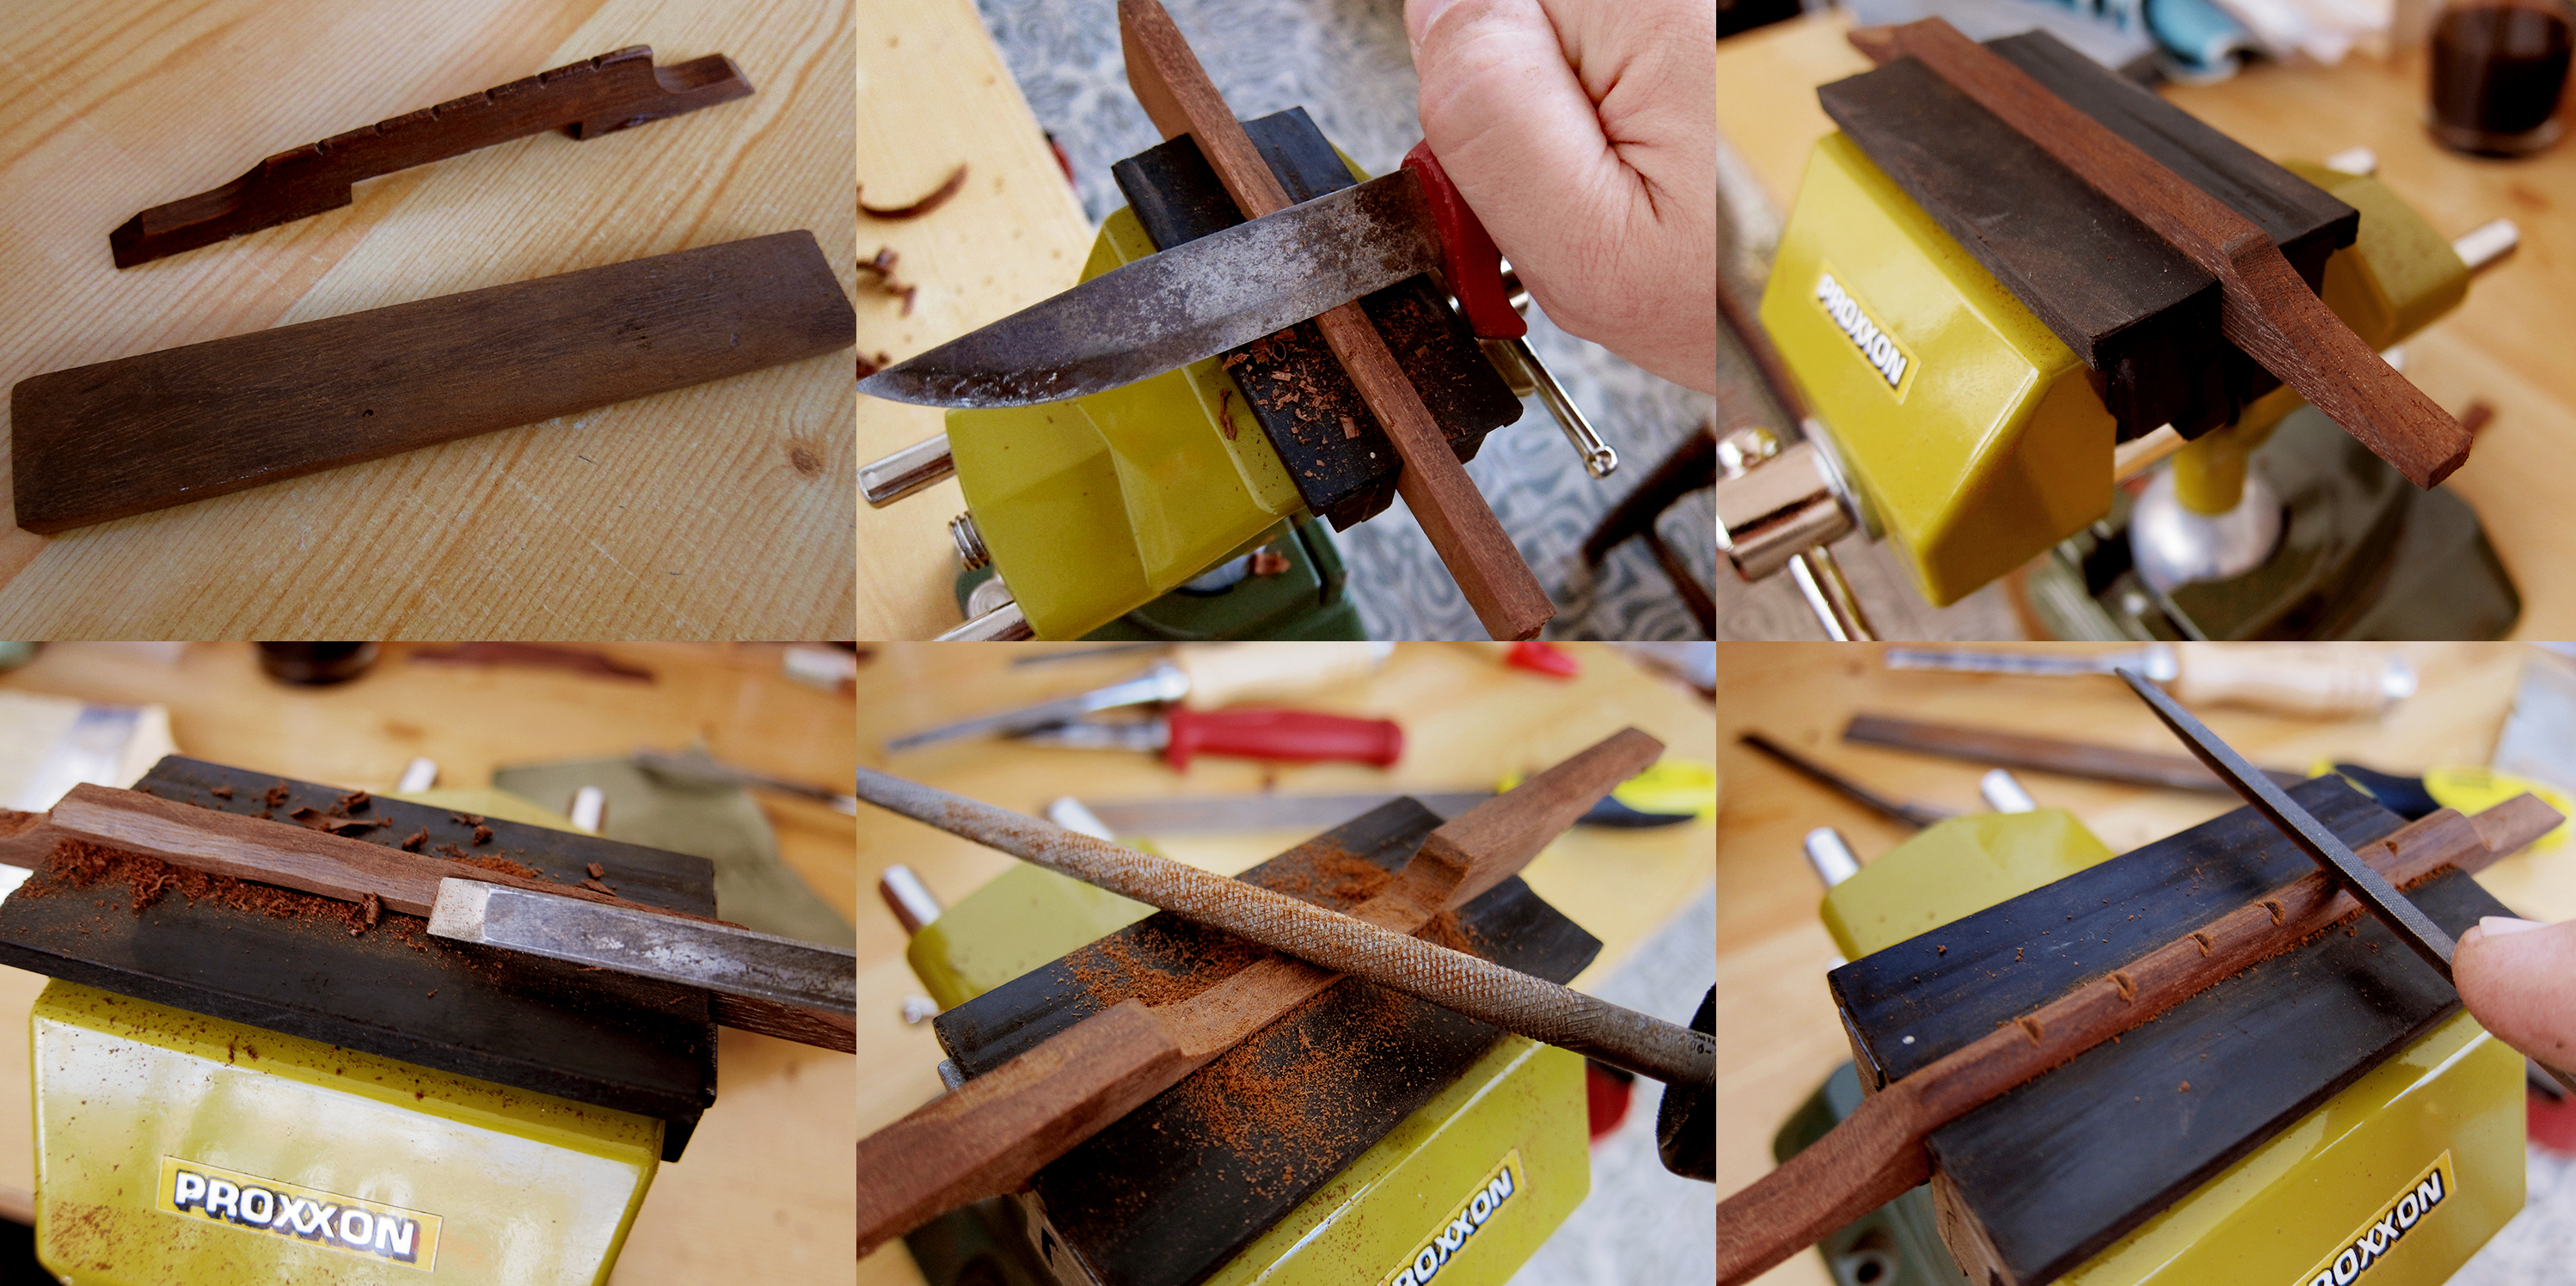
Last weekend I decided to make a new bridge for my 1940’s Levin model 65. I actually did the same thing about a year ago but with less success, you can read about it here. This time I had more tools, better material and at least some knowledge of working with wood.
I started with a rosewood blank that I carved roughly to the right height with my trusty old Mora kniv, a cheap Swedish knife that solves most of my guitar related problems. Then I carved the shape of the edges, I just marked where to start and then carved it in to a rounded slope. I got the top in to a nice triangle shape with a narrow chisel and then cut out the arch in the bottom with a round file. I compared it to the old bridge to get the string spacing right and then just made little groves with a small triangle file. After a bit of lemon oil I was ready to try it out and it worked perfectly.
The final result, a new bridge for not only the oldest Levin I own but the olderst guitar I’ve ever actually had in my hands.
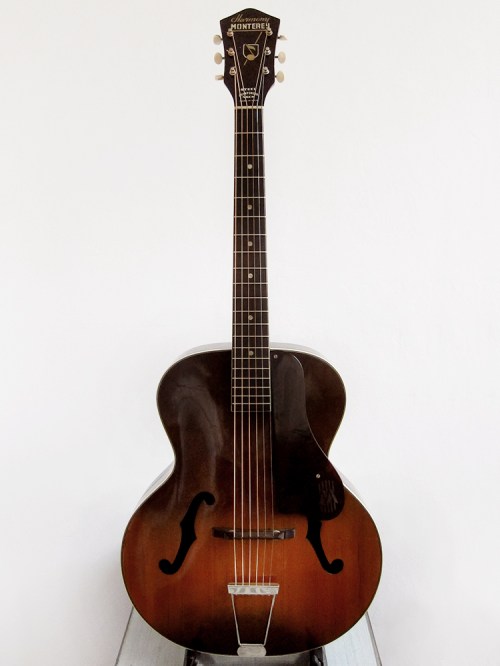 A late 1950’s Harmony Monterey H1325, made in USA
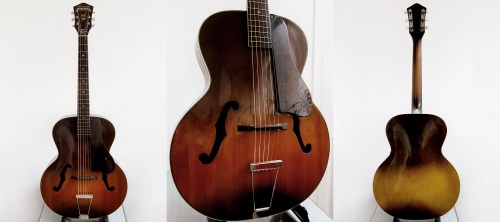

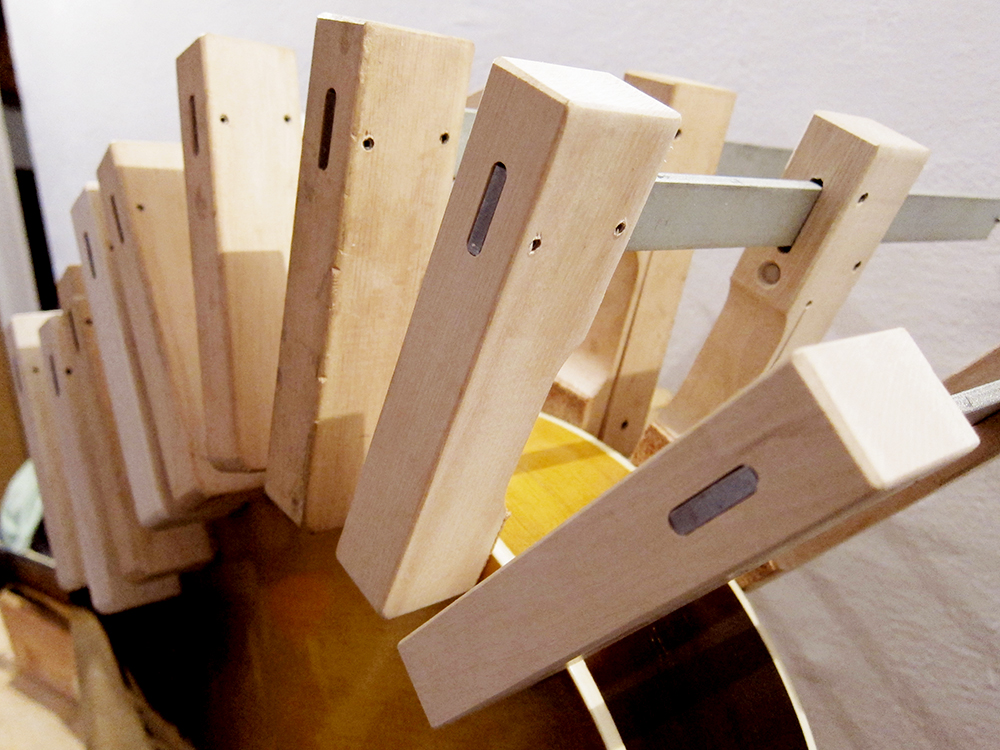 There was a lot of cleaning to do and two cracks that needed to be glued. One large on the upper bout and a smaller one on the top and then I glued down the heel a bit better which got the action down. Except for that it was in pretty good shape for being around 60-years old and all original.
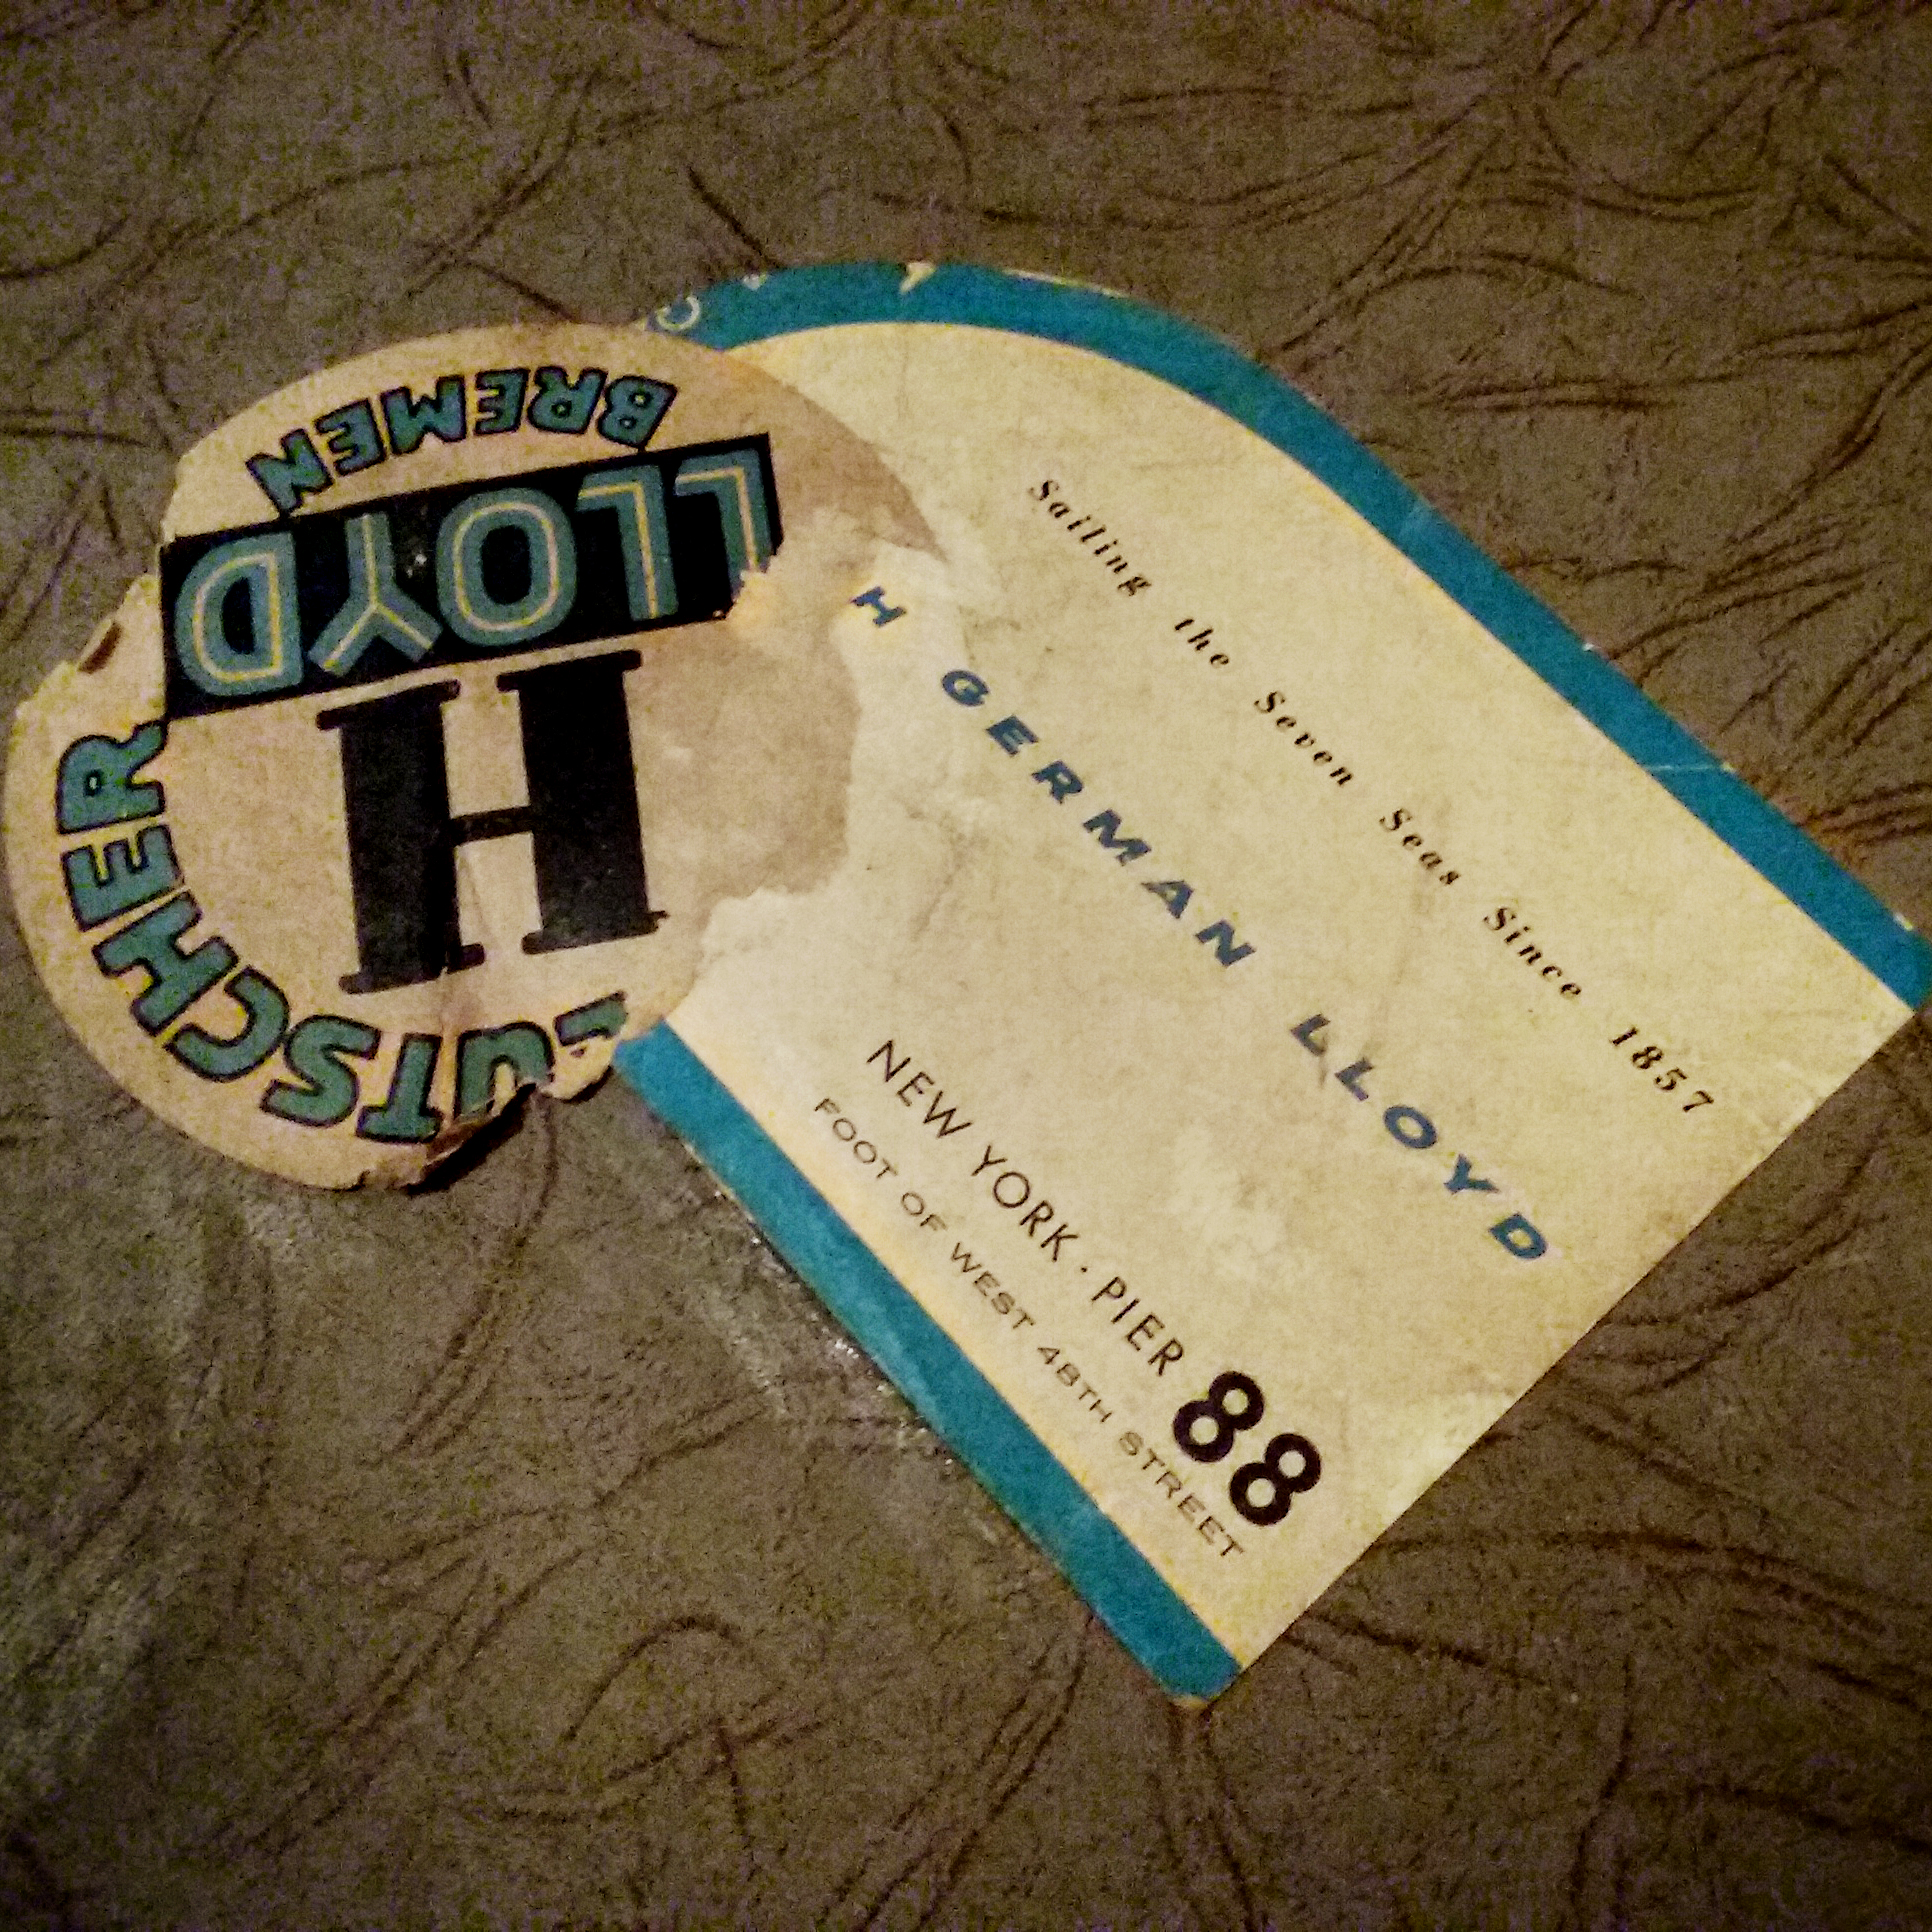 The original case has these awesome looking shipping stickers on it, I presume from when the guitar left America for Germany by boat in the 1950’s carried by the first owner.
 The top left looks very much like my Harmony Monterey, having said that, the model number inside mine is H1325 which match the bottom left. Taken from a 1959 Harmony catalogue
 I also got myself two late 1960’s H162 from the US that I need to restore. First of all they need a neck reset but then I was actually thinking of removing the back and X-brace at least one of them. Taken from a 1959 Harmony catalogue.